
Jul
02
Shooting Macro
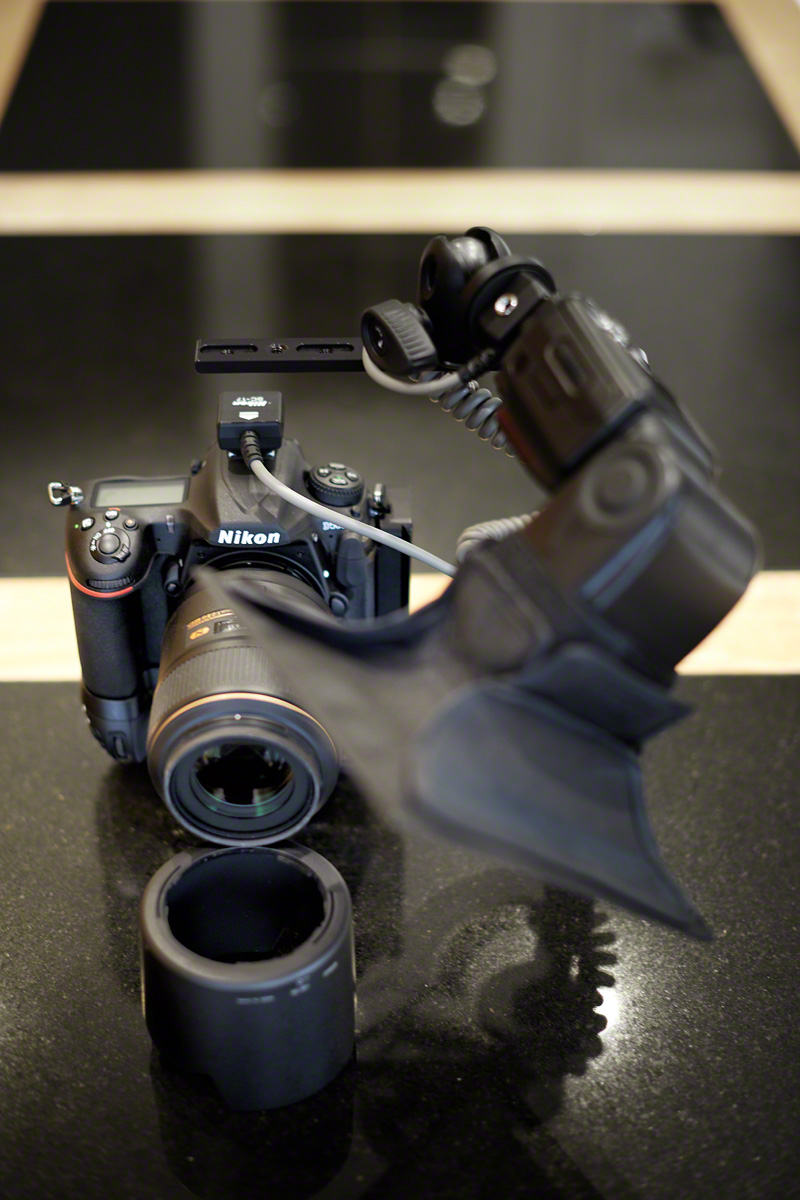
I love shooting macro, though inspiration can be a little tough to find at times. I already have a 105 mm Micro Nikkor, but had been thinking about a longer focal length for some time. After some research, it seemed to me that, rather than buying the 200mm f4 Micro Nikkor which has a 20 year old design, I’d be better off going with the Sigma 180 mm F2.8 APO Macro ED DG OS. My thinking was thus. Firstly it is a faster lens, very sharp and has a good reputation. The 200 mm Nikkor, is also stunningly sharp, and built like a tank, but it is very much a one trick pony. The autofocus is very slow (though satisfactory for things a long way off apparently) and it has a maximum aperture of f4.
Making a Purchase, Checking It Out..
So, at the last but one photography show in Birmingham, I visited the Sigma stand and spoke to a representative. After looking at the lens, and hearing about it’s performance, a purchase was made from London Camera Exchange. It duly arrived, at our local store, about a week later. Had it not been a bank-holiday weekend it would have been even sooner. It’s been superb! Out of the box, the Sigma appeared well made and robust. I fitted a Wimberley Arca Swiss lens plate and set about shooting tethered using Helicon Focus. This revealed an unexpected, yet key, difference with the 105 mm Nikkor.
Bearing in mind that I had always considered the 105mm Nikkor to be an excellent lens, I was not prepared for the stunning absence of chromatic aberration. It’s not that the Nikkor is particularly bad, it’s just that the Sigma has no chromatic aberration. None at all. At least, I haven’t come across it yet. There must be some somewhere mustn’t there? But the visible difference was remarkable. With the same subject you could see the artifacting on the Nikkor but not on the Sigma. Amazing!
Choosing Between Macro Lenses
Back Garden Birds, Hide, Backlit
Choosing a lens for shooting macro requires a little thought. Firstly, what do you tend to shoot? If it’s wildlife, there is something to be said for a longer focal length to keep you more distant from your subject. This is not the only relevant factor however. Most of my outdoor shooting uses available light, sometimes with a reflector or torch to provide fill or dimension. The physical length of the macro lens I use makes little difference in this scenario, but if I’m to use flash then I need to consider two other issues.
Flash and Macro Lens Choice
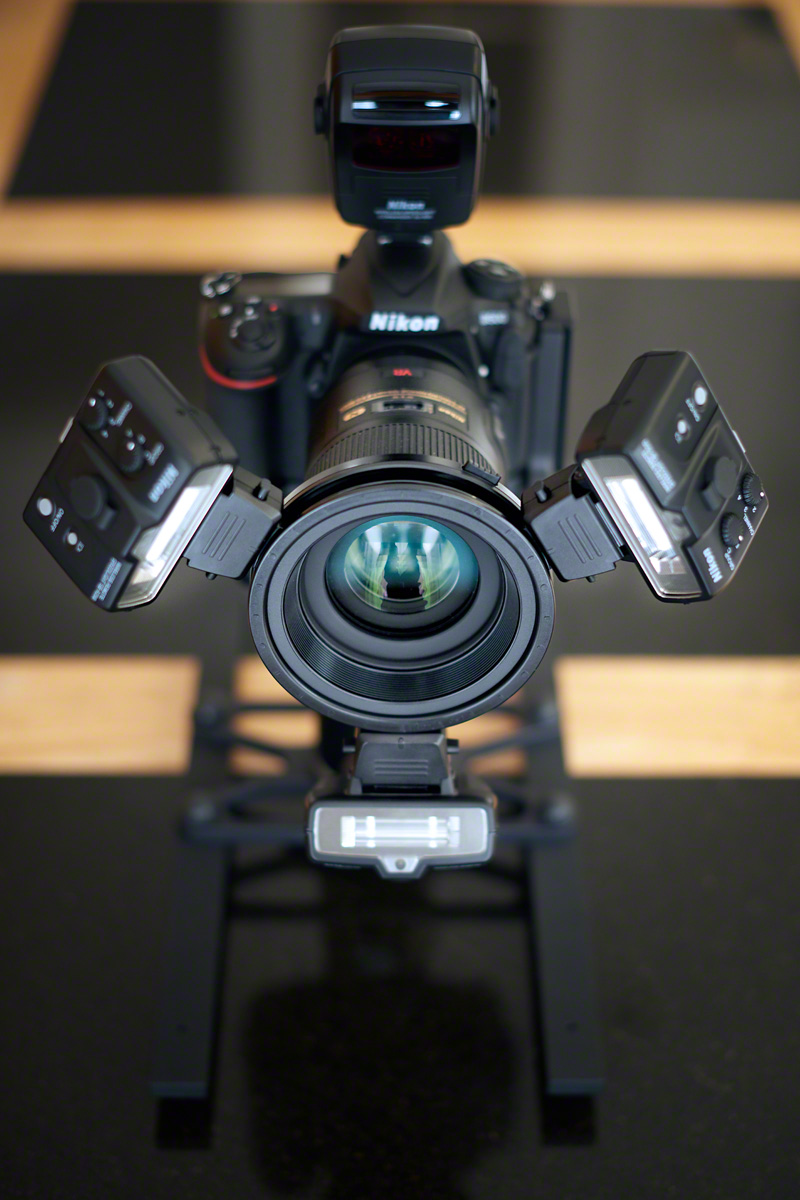
Clearly, for macro shooting with flash, the length of the lens itself makes a big difference to the type of flash you might use on camera. Will the flash be a Speedlight on a flash bracket? If so, a 105mm or 150mm lens will be more useful as you can get the flash nearer to the subject. The flash bracket can reach over the lens (as opposed to be in the lens’ shadow). Here I’m using a Custom Brackets CB Folding-T folding flash rotating bracket to hold an SB900, with a Neewer SB1520 small softbox attached, to light a subject from above and to the side.
Were I to attempt this with the Sigma 180 mm F2.8 APO Macro ED DG OS I’d be out of luck. On a D500, with the APSC lens hood extension, it is approximately 330 mm in length compared to the 190 mm of the Nikkor (or aprox 115 mm without the lens hood).
R1C1 macro flash kit on a Nikkor 105mm f2.8
Using a Nikon Speedlight Commander R1C1 Macro Flash
If you are going to use the Nikon Speedlight Commander R1C1 Macro flash, for instance, you also need to bear in mind that there is no adaptor ring available in the 86 mm filter size of the Sigma 180 mm. You have to use the SB200s off lens in this case. Personally, I felt this was an inconvenience rather than a deal breaker, because when I work with flash it is usually in the studio and I can easily use stands for the flash.
Multi-Purposing a Macro Lens
It occurred to me that I have used my 105 mm Nikkor as a portrait lens in the past, ideal on a full frame camera. Would a longer prime be useful for some of my larger birds in flight work, for instance Osprey at Rothiemurchus? With a working focal length of 27o mm on a crop sensor camera (my D500), it might be a useful alternative to using my D810 with my 300 mm f2.8 (which is a much larger lens). This could be ideal for the lower light situations pre-dawn when the D810’s ISO performance is less suitable.
Lower-weight, and shorter minimum focal distance, make it a good choice for ad-hoc wildlife appearances closer to the hide.
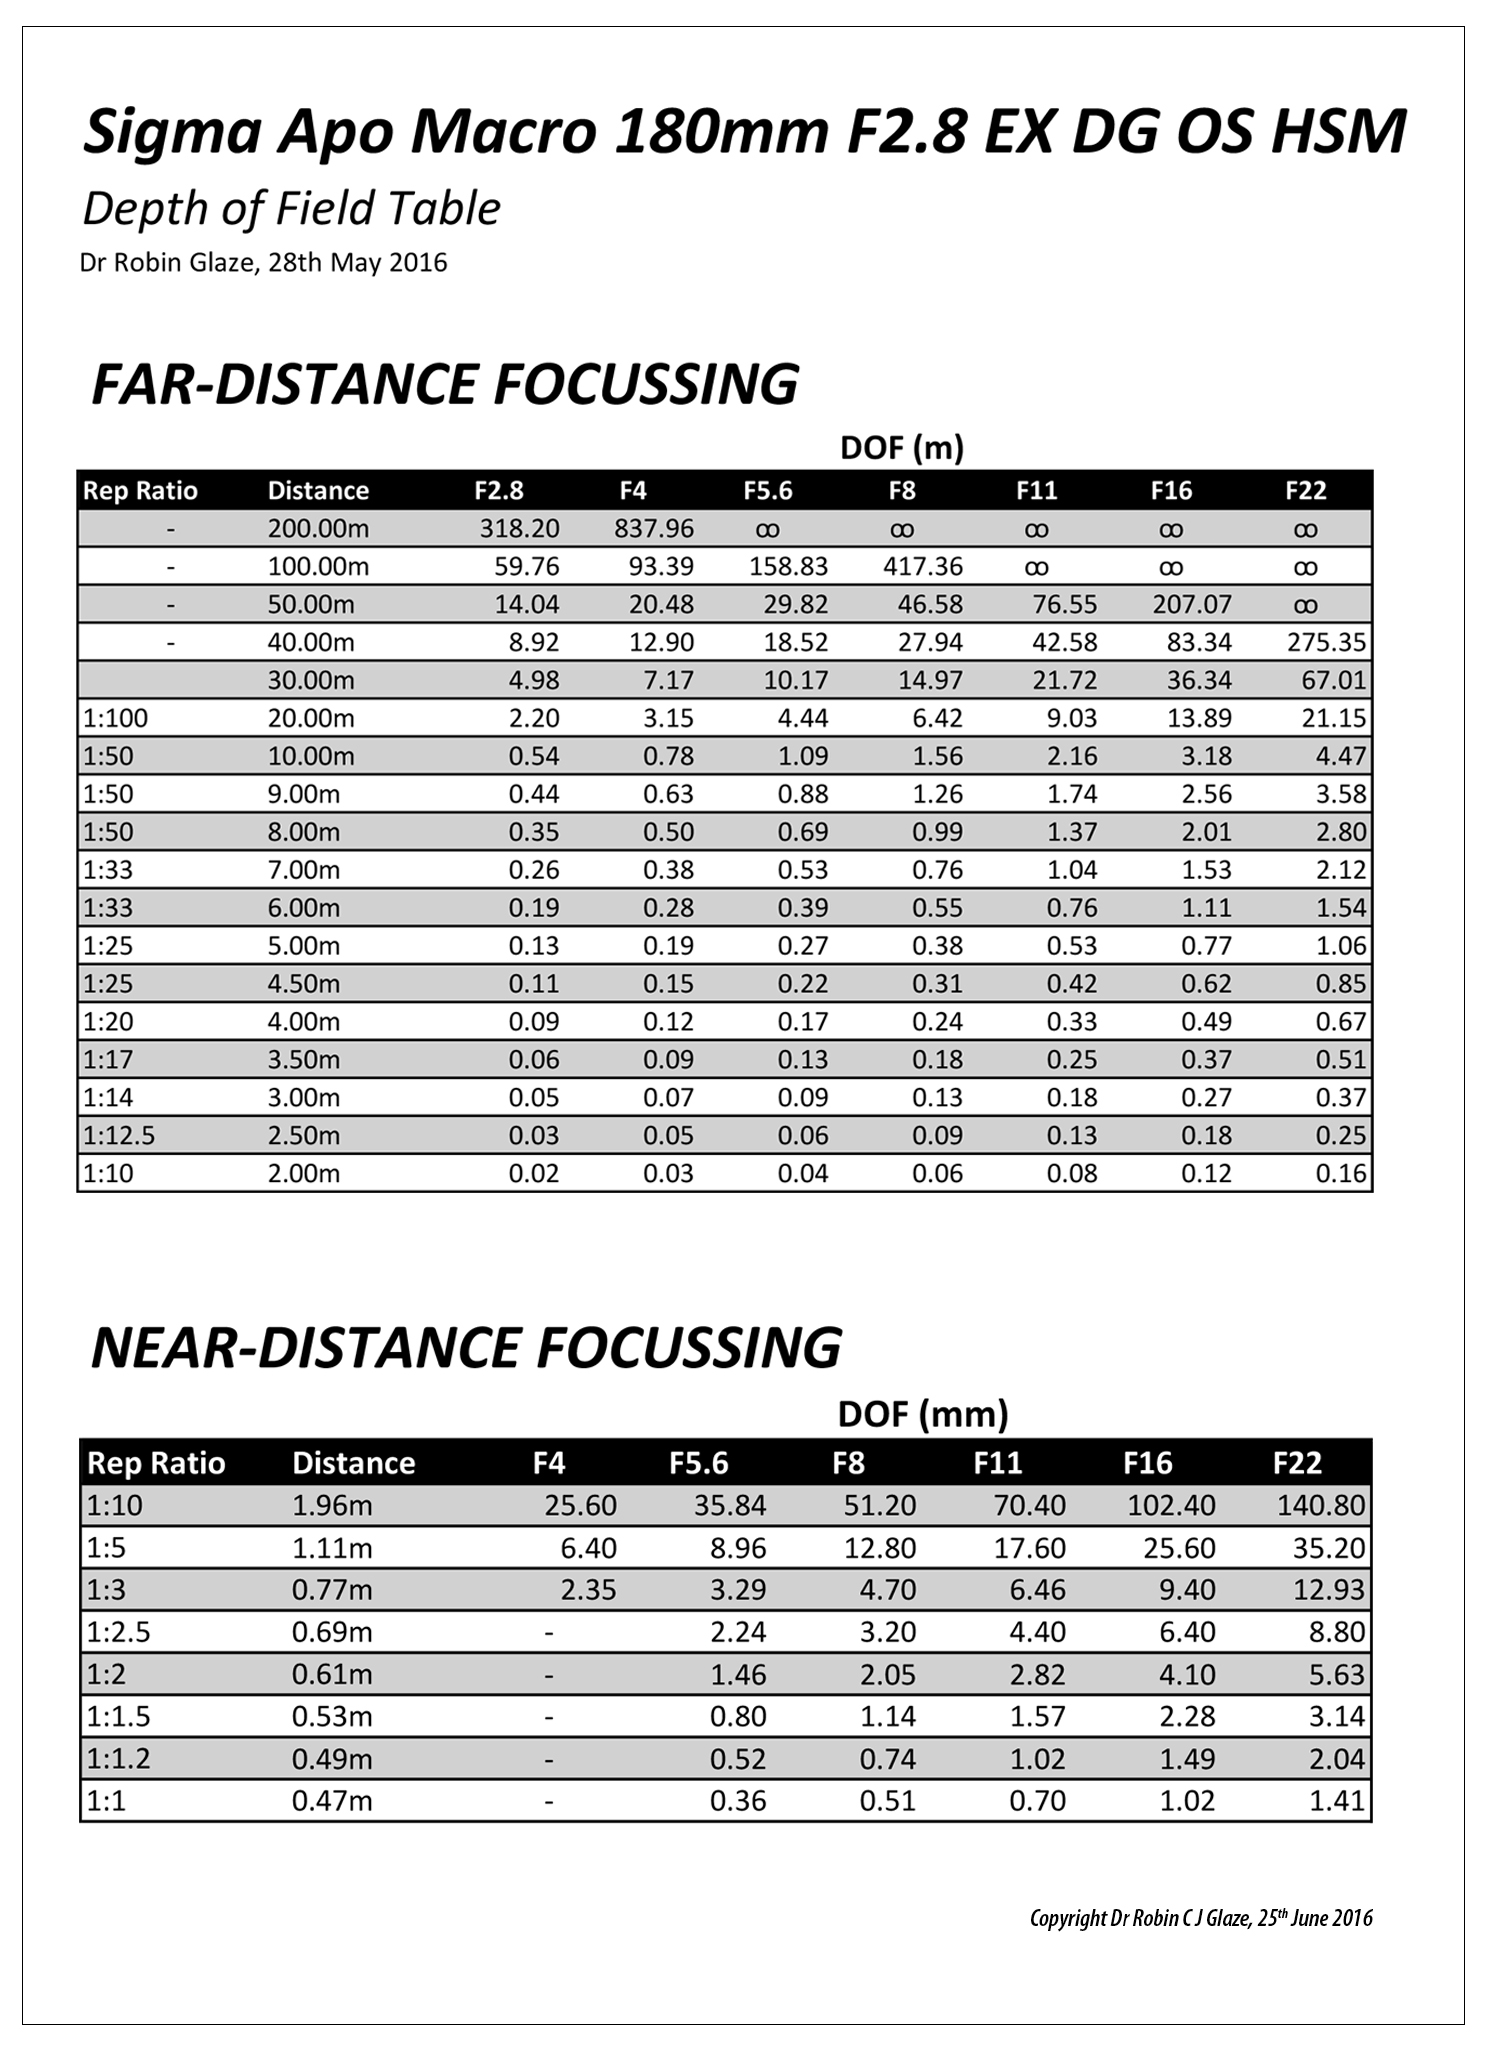
Depth of Field Calculations
Sigma do not supply depth of field tables for shooting macro with their lenses, so ascertaining depth of field for close up work is not straightforward.
Doing the Math..
Some research was required to find out how to do the DOF maths, but with an Excel Spreadsheet I was able to produce a depth of field table. This has helped me appreciate how some of my shots might work – pre shutter release.
I guess, ultimately, if you take enough shots, you learn from experience, but knowing whether to make a virtue out of a wide aperture shot’s limited depth of field can be a little thought provoking if not enough image is sharp. I never mind taking many different shots whilst I’m out in the field, on the basis that one of them might be spot on. When I can get them onto the computer, It’s easy to see how I did, but I’d really rather know how to take the image work with a single click.
Lateral vs Longitudinal Chromatic Aberration (CA)
Types of Chromatic Aberration
Chromatic aberration occurs because shorter wavelengths of light (blue) are refracted (bent) more than longer (green and red) wavelengths of light which are refracted less. There are two types of chromatic aberration. Lateral (or transverse) and Longitudinal (or Axial).
Lateral CA occurs when all the colours are focussed at the same plane, just not aligned. R, G and B light are focussed sharply, but side by side. In Longitudinal CA, the colours are not focussed at the same plane, they are superimposed with blue in front of green in front of red. To observe this, Lateral CA causes coloured fringes around objects of high contrast, whereas Longitudinal CA causes patches of colour (ie. the most in-focus colour predominates).
The 180 mm Sigma Macro lens is particularly good with Longitudinal CA, you do not see colours change as you move up to, and then through, the focal point for high contrast details. Longitudinal chromatic aberration is very noticeable in the Nikkor 105 mm in comparison.
Recent Images

Nov
02
Rediscovering My Photography
B&W / Birds of Prey / Cameras / Landscapes / Macro / Motorcycling / Nature / Nikon Cameras / Nikon D3 / Nikon D300 / Nikon D4 / Nikon D810 / Photography Posted by Robin
/
0 comments
Rediscovering My Photography
My Journey Back, This Year in Pictures..
Background
I’m sure that I am the same as every other working individual. Work-life, home-life and chores expand to fill all available time — that’s Robin’s Law, one of many! The balance of these three may change from time to time, but essentially, hobbies are squeezed into any free time that you are not too tired to use. Over the past 12 months I’ve been focused on my cycling, as this has been making me feel better emotionally, and physically, but whilst doing so I’ve had a nagging feeling that something else is missing. I’ve known that it is my photography well enough. I’ve been thinking that I may as well dispose of my cameras, and other studio equipment, because they represent a large investment and I’m not using them. Fortunately I have managed to resist the urge, and in an effort to re-balance things, have started making time to take a few images again.
Recession and the Cost of Living
In reality my retreat from picture taking has been multi-factorial. I have read a lot of recommendations along the following lines: “Take loads of pictures, it doesn’t cost you anything to experiment with digital photography”. In one way this is true, well almost, it doesn’t cost very much to press the shutter button. The only real costs, once you have purchased the machinery, are for electricity to charge the batteries. Beyond this though, if you want to keep your photos safely, you need storage space in the form of multiple hard drives (or DVD’s if you have the patience to record them), and these do cost money. If you want people to enjoy your work you may also choose to purchase a website with it’s own attendant charges etc. There may be other expenses too, after all, there are only so many photographs you can find in your garden or front room. There comes a time when you have to invest in some form of subject-seeking. This can take many forms from the full-octane photography holiday, through to purchasing multi-colored knickknacks from a stationers for your macro photography. For some of us, the true joy of photography lies in the execution of a fabulous print. These also cost money, especially the A3 and A2 ones, and if times are hard, and you can’t afford the ink and paper for your printer, some of the joy of photography is leached away. The improvement in the UK economy has therefore also been one factor in my rediscovering my photography again.
With all this in mind, I took a day out to replenish my soul with one of my favorite subjects, a variety of birds of prey on an organized shoot at a falconry center. Some out-doors in natural settings, and others in the studio. Easy-peasy..
Gauntlet Birds of Prey, Eagle and Vulture Park
If you would like to visit the Gauntlet birds of prey, eagle and vulture park I can strongly recommend it. The vulture collection is a particular treat. In addition to photography workshops they have flying displays at 12.30 pm and 3.00 pm, Vulture feeding at 12.00 pm and a meet and greet at 2.00 pm as well as other attractions.
A Photo-Walk Around Chester
Invigorated by shooting wildlife again, albeit in captivity, I next tackled a photo-walk around Chester. Not a brilliant day, in fact quite dull, so I had to keep my wits about me. Black and white to the rescue..
A Visit to Oxford
In our only city-break this year, we went down to Oxford to see Ceri, the daughter of some friends of ours, as she started her final exams. The weather was not kind to us, unfortunately, so we had plenty of time to look around the shops, and drink the occasional cup of tea and coffee.
A Visit Thurstaston
The next step in my rehabilitation occurred during a drive out to Thurstaston with my daughter. The plan was to find some coastline, and take a few pictures along the way. As good fortune was to have it, the North Wales Hang Gliding and Paragliding Club were flying, and we got a few shots of them, plus the visitor center had a photography exhibition and a public hide with views out onto some well stocked bird feeders. Heaven!
The Journey Continues
Sadly, these trips were still not quite enough, on their own, to get me taking pictures regularly again. Have you had the experience of wanting something all the more, when you knew you couldn’t have it? Well, my D300 broke! I hadn’t been abusing it, I’d just been updating the firmware to include compatibility with the 800mm f5.6 Nikkor extreme telephoto (it’s not like I will ever own one, but I like to be up to date), when to my astonishment, it just stopped working. In all honesty I hardly ever use the D300. It’s old technology now, but it is my backup camera and I do like to use it for macro shooting extreme close-ups with an old 300mm zoom and a 50mm reversed onto the end. And now, suddenly, I couldn’t. Should I buy a new camera? Probably not worth it if I’m not using my cameras much, but should I get the D300 repaired? Well probably, yes, was the conclusion I came to, if a camera that old can even be repaired? Well it turns out that it could. Nikon UK have a fabulous online system for repairs. You can say how much you would be prepared to pay without seeking permission to proceed, and even get the free postage label printed out from the website. They prepare an estimate and you say whether you want to go ahead or not and that is pretty much that.
Needless to say, once the D300 was returned to me in good working order, I couldn’t resist using it for some macro shots, and generally loving it and reminding myself of all its settings. Sad I know.. In fact, the challenge was as much to produce some good looking and clean shots with it as I could. I’d forgotten how noisy and textured D300 images could look. Sensor technology, and the supporting electronics behind them, are so much better now than even 5 years ago! Here’s how I got on:
Oulton Park Track Day
By this point I’m fully engaged with the drama and creativity, seeking new photographic experiences and subjects again. I’ve said before on this blog that, for me, it is more about the photography than the subject. Novelty and complexity are always the way for me. I’ve never shot cars or bikes on a track before, so this would be a great entrée. Is it difficult? Depends. If you want a straightforward shot, tack sharp, just set a monster shutter speed and shoot away. If you want a sharp bike and rider with spin-blur on the wheels done in camera, on a bend, yes that’s tricky first time out. Impossible? You be the judge!!
Hooked Again!!
The Inevitible Consequences..
And so it was, hooked again. Desperately fighting the urge to buy a new camera, but eventually succumbing to the temptation. A couple of years ago I blogged about wanting a Nikon D4 and a D800, but having to choose just one. That time it was the D4, this time the siren call of 36mp detail was too much for my battered psyche, and so to the D810..
More later,
Robin.
Feb
28
The Machinery for Drop Collision Photography

Splash Art Kit Mk II
First off, I was alerted to this new drop-image possibility by a review in Amateur Photographer (January 26th edition). The kit in question is the SplashArt Kit Mark II, manufactured by High Speed photography Ltd, 31 Roebuck Lane, Buckhurst Hill, Essex IG9 5QN. Their website is www.phototrigger.co.uk. Tel: 07905 836280. My pal Geoff was similarly taken and, without further ado, purchased said item and brought it round for a test shoot for which I supplied the set and the lighting.
There are 4 dials on the control box, with line markers but no scale markings or labeling, so it all seems like guesswork to start with. From left to right (and top to bottom) the dials control; the size of the first drop, the time delay between drops, the size of the second drop and the camera delay adjustment. There is a small micro-switch that controls the mode (1 drop, 2 drops or 3) and is responsible for firing off a round of drops and triggering your camera. As others before me have said, the apparatus is reminiscent of the retort stands we used to have in school chemistry lessons with an additional gizmo attachment at the end. The drop container looks like a small sandwich box of the type popular in supermarkets now, though this does not impede its functionality. Un-clipping the top to add colourants to the drop mixture will move the retort stand however, so you will need to refocus if you do.
For lighting the drop collision photography I used 2-3 SB900 strobes set to 1/128 power fired through a translucent (clear) plastic A4 ring binder cover (with the ring binder removed) to backlight the drops. I would have liked to use a translucent plastic sheet similar to those used on light-boxes or x-ray viewers, but I did not have time to source this for our shoot. I angled both strobes at 45 degrees, to begin with, both at the same height. I quickly realized that a diagonal spread of light would be better so moved one of the lights onto a light stand.
The Technique

Setting up the Focus Point
In order to start our drop collision photography, we set the SplashArt kit to 1 drop mode to find the focusing point. First time out I used the knife-edge method, but I have now found a better way. I used the dual threaded spigot that comes with my flash brackets. It has a thread each end and is shaped like a small metal reel. It is reversible so that it can be attached to two sizes of thread and then acts as the spigot that you clamp your bracket onto in the same way that you would use the top of a formal light-stand. I placed this in the drip tray and fired off a series of drops adjusting the position each time until the drops fell inside the small threaded end. This works much better because you don’t need a second person to hold it still whilst you focus and can get a more accurate result. When using a macro lens it is quite difficult to get the whole splash in focus, and this way you know where the front and back of the drip will fall, so you can focus on the front edge, back edge or in between according to what you prefer to be most sharp. As you can see, this drop was slightly to the right of the threaded hole at this point (greater splash to the right). It was also a 2 drop scenario because we hadn’t yet switched the SplashArt kit to single drop mode. You will notice that the drop is red colored. We didn’t start off this way, we began with clear water in the tray and the dropper, but this shot from later on in the shoot was necessary to reposition the camera focus following moving the drip container in the process of putting pink food colouring into the top and stirring it.
The next logical step was get a feel for where the drops fell in the two drop mode and how much camera delay would be required to get a pit, crown, or a pole.

Pit

Crown

Pole
Once this is done, the next step is to control the spacing between drops so that there is a collision. The size of the drops that collide seems important and I think that similar settings on the dials for the first and second drops (first and third dials) helped me get a satisfactory result with the SplashArt Kit. The sign that you are approaching the correct timing between the drops is when you start to see some action at the tip of the pole, for example:

Finding the Collision Point

Repeatability
Once this point is reached a smaller further closing of the gap between drops may be necessary, and thereafter just plenty of trials, until you get some attractive results. All the shots you see here in the slide show were made first time out with the SplashArt Kit Mark II. One session of 4 hours or so got us all these shots (minus a coffee and brief lunch break of course). There is a lot of variability between shots. I don’t know whether this is because the timer cannot perfectly control the drip valve, or whether there are timing issues with the flash. My SB900 strobes, as usual, were fired using my trusty Flex Mini TT1 with AC3 controller and TT5 trigger combination. This gives on-camera control of the distant flash which makes for less walking round the studio (kitchen) and speeds things up a little. I suspect that there is no particular issue with the flash timings (but can’t completely rule it out) as at no point do I see a double drop image which means that both flashes trigger at the same time. Not bad when the flash duration is 1/38500 of a second!!
More on the Lighting
As you can see from the slide show, and the production images, I have used a selection of coloured gels on the strobes along with changing up the position of the strobes relative to the translucent plastic background. I must admit that my selection of gels is a bit limited, but the combinations were:
- White on White
- CTO (orange) on White
- CTO on Blue
- CTO on Red
I have also got green gels (to colour match for flourescent lights) which might also have looked good but I didn’t think to try. Needless to say there are a couple of approaches to white balance settings in this situation. You can use tungsten or cloudy settings for, instance, to produce a uniform rich yellow or blue colour. Alternatively, as I did here, you can use the preset flash white balance to produce an overal neutral result but then gel the flashes to produce the colours. This is my preferred approach because, although it requires multiple strobes, you do get greater flexibility.
It would be possible to set up a single coloured, or patterned multicoloured (perhaps printed out on a home inkjet printer), background, and reverse light that to get similar results to the multi-strobe effect.
For water drop collision images you do really need to backlight. For milk images you can front light, and for the closeups you see in the slide show this was really necessary to counter some of the shadows produced by side lighting. In fact I ended up using three strobes. A single backlight and two front lights. The front lights were camera right at 45 degrees and camera left at 45 degrees but much higher up to light into the extensive crowns. We might have been ok with a single front strobe placed centrally and above the camera in order to throw the shadows behind the splash.
More on the Fluids
Since my first attempt at drop collision photography, I have been reading Corrie White’s Comprehensive Water Drop Photography Guide. You will find a lot more detail on what you might do to water to thicken it, and some further tips on lighting milk etc. What I have realized is that it is easier to get spectacular crowns, and some really interesting graphic shapes, using the thicker substrate of milk, than it is with water. In fact, as Corrie points out, there are some things that you just can’t do with water alone. Clearly thickening water with sugar or guar gum also has side-effects to the look of the resulting solutions, so sticking with plain water is probably best. Nevertheless the old school physics fact that water is densest at 4 degrees centigrade is worth knowing and using here. So next time I will definitely try using very cold water and placing some ice cubes in the drip dispenser and into the drip tray.
Colourings
We only had red food colouring at our disposal this time out. Clearly there are many others that you could purchase fairly cheaply. I have heard that some people use printer inks, but this may be quite expensive. Red looks great in contrast to the white milk. One tip for the milk shots using coloured drops, you need to stir the drip tray in between trials to whiten up the milk again. You could also put colouring into the drip tray and experiment with the two colours mixing together in the drip stem. I really do think that you are limited only by your creativity.
Things to Try
- I really fancy having a go at splashes inside bubbles. Wow. Can’t wait.
- Splashes where the drip container is a crystal glass, or similar, and can be seen in the shot.
- Odd looking colour combinations.
- Several splashes composited into the same shot.
Until next time,
Robin.
Recent Comments