
Aug
26
Photographing Osprey
Birds of Prey / Field Craft / Garden Birds / Nikon D4 / Nikon D810 / Photography / Wetland Birds Posted by Robin
/
2 comments
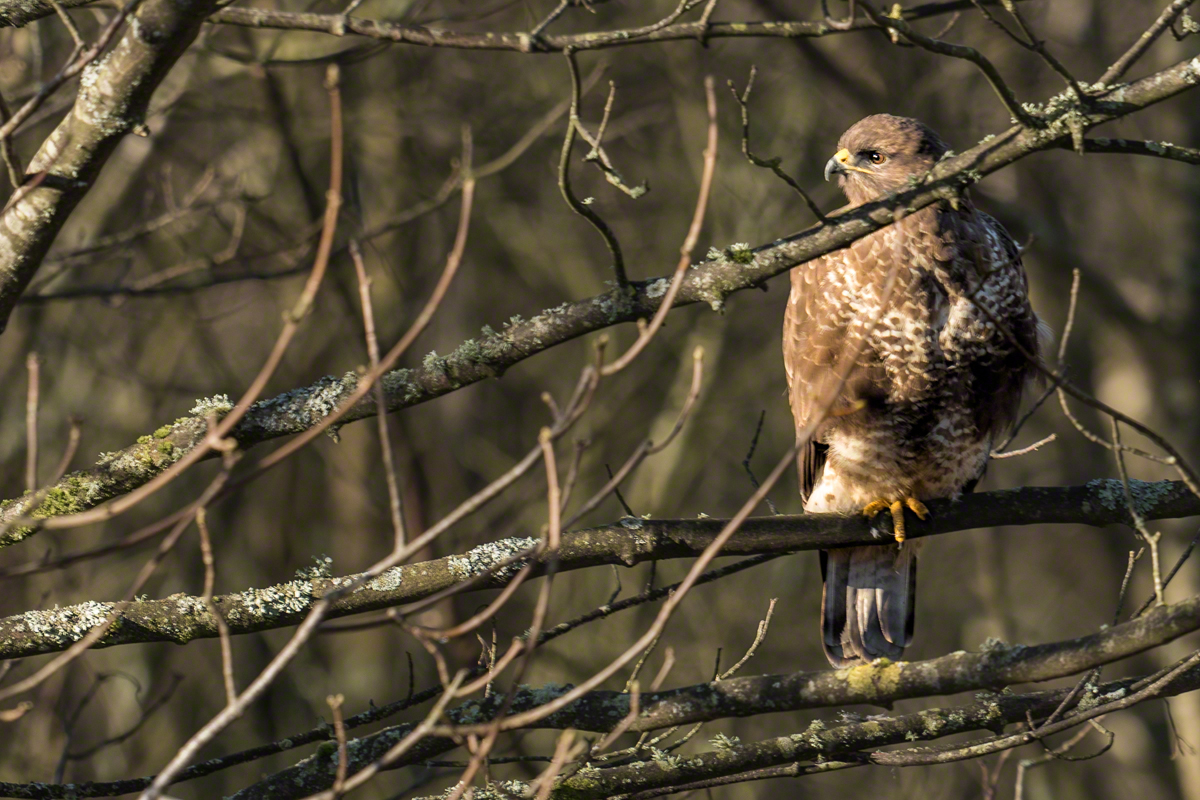
Photographing Osprey

Full Gas: Osprey Leaves with Trout..
I’m just back from an osprey shooting workshop in the Scottish Highlands. Photographing osprey is a new experience for me, and there are a number of differences in approach to assimilate. But first let me describe the workshop in general terms, before moving into the particulars of the photography, and telling you a secret or two about my personal journey in photography!
Images In Nature
My long-time shooting buddy Geoff and I had booked the Osprey Workshop with Images In Nature earlier in the year. Images in Nature, run by Lee Mott, offers small group nature photography workshops and tours. We stayed in the Osprey Hotel where we were very well looked after by proprietor Sue and her husband John. Lee is a hugely personable, experienced and knowledgeable photographer. He talked us through what to expect the night before, showing us pictures of the venue, describing the hides and, of course, discussed camera settings and the itinerary.
Itinerary and Venues
Photographing 0sprey involves an early start as you ideally need to be in-situ before sunrise. We were to meet outside the Osprey Hotel at 4:40 am and drive the 11 miles or so to the Rothiemurchus Estate in the Cairngorms National Park, Aviemore. The purpose built hides are based in the Rothiemurchus Fishery where they look over a purpose built pond, well stocked with rainbow trout, for the osprey to dive for and catch. You can book the hides at Rothiemurchus independently if you wish, and the Wild Scotland link gives you a sense of what is available. I can, however, unreservedly state that these are the best designed hides that I have shot from in the UK.
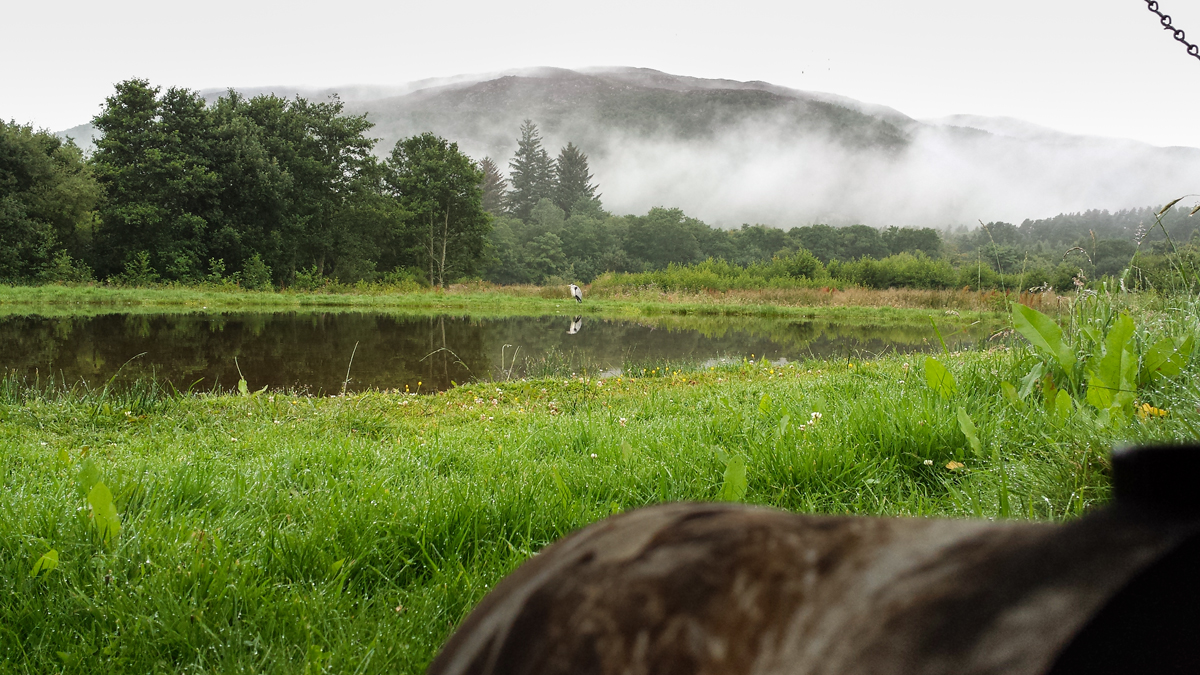
View from the Hide..
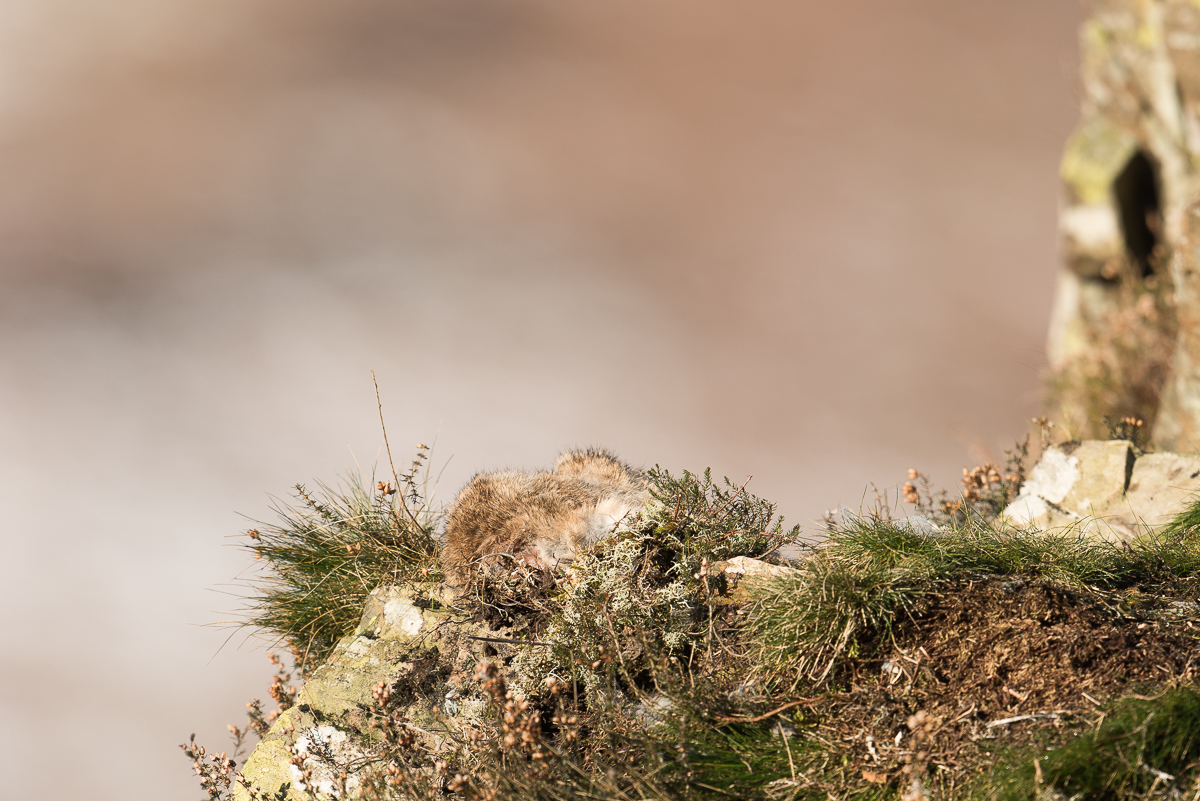
On arrival at the fishery, we had a quick coffee and were installed within the hides by 5.30am. There are 4 hides around the fishing pool. The best hide choice depends on the prevailing wind direction because the osprey prefer to take off into the wind (as it helps with lift) and, hopefully, it also helps the photographer to be positioned to see the bird moving towards the camera rather than away from it. During our time at Rothiemurchus the conditions were very still, so we picked one of the middle hides to see what happened. The scenery is spectacular giving multiple possibilities for decent backgrounds and different shot styles. Osprey are not the only visitors to the pond, we had a visit from a field mouse, a family of mallard, rooks, kingfisher and several heron so there is always plenty going on in-between the drama of the osprey diving shots.
After the morning shoot, it was back to the hotel for a fabulous full Scottish breakfast (thank you Sue) and then back to the Rothiemurchus estate to shoot red squirrel, and more traditional garden birds, in the forest in the afternoon.
Key Technique Issues for Photographing Osprey
There are a number of issues to consider, namely, camera settings, fieldcraft and good lens technique.
Camera Settings
Ok, we are only talking Nikon here (I can’t speak for Canon shooters, but if you do shoot Canon you may find these Arthur Morris links useful – Getting the Right Exposure, Camera Settings, Tele-Extenders).
Autofocus Settings
AF-C priority selection = release. Dynamic AF area 9 points. AF activation = AF on only. AF Point selection = 51. AF Continuous and Focus Tracking with Lock on (3-normal). Back button focus is mandatory (well not mandatory, but certainly a lot easier). It’s only fair to say that Lee disagreed with me on the Focus Tracking setting, which he prefers to be set to 1-short or off altogether. I find that I sometimes lose the focus point on the bird and then my focus snaps to the background, or something in front of the bird, before I can get it back again, losing me time and plenty of good shots. For me Focus Tracking is best left on 3-normal or even 5-long (which I use for my red kite shots). If I had Lee’s experience and skill I could probably get away with 1-short, but that’s the benefit of being a professional, you get loads more practice! Use what works for you. It goes without saying that you will be shooting above a 1/500th second so Vibration Reduction should be set to off.
Aperture, Shutter Speed and ISO
As I have mentioned in my blog before, exposure is a perennial difficulty when shooting birds in flight, especially ones like osprey with an intrinsic high dynamic range against a rapidly changing background. I like to shoot manual for this, and so too on this occasion!
At 5.30am in mid-August it is pretty dark so you are dancing a very thin line in order to get useable pictures. Lee’s, very sensible, approach is to start off wide open at 1/500th second with whatever ISO gives a decent exposure. Clearly you risk subject movement at a 1/500th second but, in a way, this can paradoxically enhance a shot with an osprey taking off from the water because it gives a dynamic sense of movement and action with blurring of the wing-tips and water splashes, but still good potential for tack sharp eyes and fish. As the light improves you can increase shutter speed up towards 1/1600 and then reduce ISO to reduce noise. I tend to make 1/1000th second shutter speed my initial priority and then reduce ISO and increase shutter speed in tandem. It’s a percentage game really. Finally, if the sun comes up (it doesn’t always) you can also increase aperture from f2.8, f4.0 or f5.6 (depending on what lens/teleconvertor combination you have) up to about f7.1 for optimal depth of field. On two of the days we had mostly dull and overcast weather and I never got out of f2.8 on my 300mm Nikkor.
Avoiding blown highlights remains something of a tricky issue, and even shooting manual, you have to take account of changing contrast levels in the scene and leave more leeway as the contrast increases. So in dull flat light you can expose further to the right than you can in bright sunlight for a given exposure reading taken from an average tone in advance. As I have said before, I will often use a patch of grass, but this is not always available, and the direction that it is lit from (and how wet it is) can all give a misleading result. I don’t think there is a hard and fast answer to this. On this occasion I knew more or less where the osprey were going to dive and I used the whole scene to take my initial exposure via matrix metering, leaving 1/2 to 1/4 of the histogram width in leeway (i.e. shooting markedly to the left) according to the contrast in the scene. On other occasions I might use spot metering, it just depends on what’s around to take a reading from.
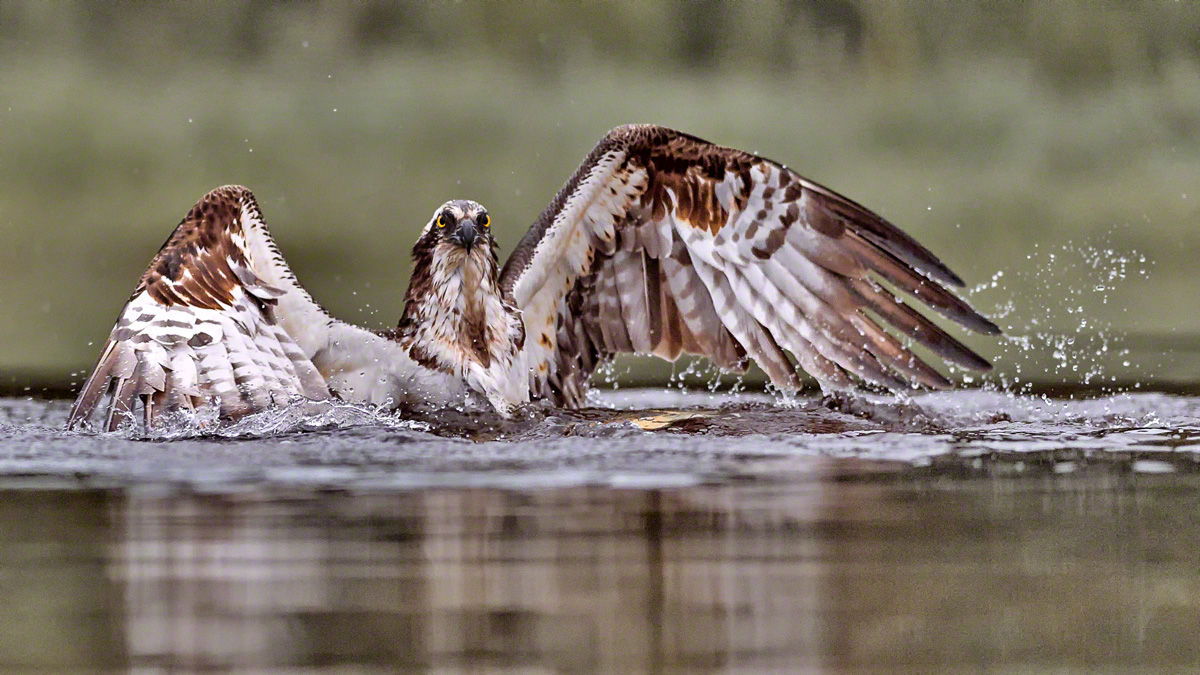
In the interest of full disclosure, we had a heron at the poolside for the majority of the shoot and this was perfect as a cross check for blown highlights. Still, heron images beats endless photos of an empty perch by a huge margin!!
Lens Choice
The Rothiemurchus setup is really excellent and the birds are fishing very close to you. I used my 300mm f2.8 on my D4 (better for me on this occasion, given the light, than the D810, at least until the sun came out!) without any teleconvertor assistance. This was perfect! In fact, I could probably have used my 70-200 f2.8. The wingspan of the osprey can be up to 6 feet so it is really easy to get clipped wings as they fly past. It may be that a 70-200mm with a 1.4x tc would be the perfect setup to begin with – but hey, I’m addicted to sharpness, so what can I say, I used the 300mm!
Fieldcraft
Osprey Landing..
The Rothiemurchus Fishery setup is particularly helpful for photographing osprey because they provide an experienced gillie to spot for the photographers. The gillie watches the osprey and keeps the hides informed on what the osprey are doing via two-way radio communication. The gillie tells you when they are circling over the pond and when they are diving. These guys are all very experienced (we had 3 different gillies over the 3-morning shoot, all excellent) and they don’t waste your time getting unnecessary hopes up. They all know the osprey behaviour well and can often recognize the different birds by sight. The heron can be problematic photo-bombers if they are standing opposite the hides. The gillies would even tell us when it was safe to leave the hide to move them away. It took me a while to realise that this was an opportunity for heron flight shots (but it was 5.30 am after all!).
It’s really important that you do not track, and photograph, the osprey in flight before they dive for fish because this tends to spook them and that bird will not return that day. Luckily, during the osprey season, there are many local pairs of birds with young to feed so you do typically get quite a few opportunities. It is crucial to wait until the osprey has hit the water, then you get focus and keep it as the bird exits the water and flies away with the fish (hopefully). The osprey will be in the water for a few seconds as it has to kill the fish and then manipulate it into a carrying position before exiting. The osprey can move through 180 degrees during this process so it’s worth waiting until you get a pleasing composition in the water, rather than wasting buffer capacity taking shots of the back of the osprey’s head. Once the osprey start to exit the water things start to happen really fast. The wings are enormous and it’s very easy to underestimate how far up the frame they will travel as the bird flies off. Using the central focus point makes sense because you have the fish to worry about at the bottom of the frame and the wings at the top, plus it is the most sensitive focus point in low light.
Gimbal Head Technique
Have you ever had that experience where something you thought you understood (and worked well for you) was completely wrong? Well this happened to me on this shoot, and here’s how! On Friday 25th September 2009, Geoff and I attended our very first raptor shoot with Mark Sisson (another phenomenal wildlife shooter and author). Arguably the very starting point of my journey into wildlife photography! I was using my new gimbal head for the very first time with my 70-200mm f2.8 VRI with 1.7x teleconvertor on my D3, and was having a great deal of difficulty getting a sharp shot! This was a tad disappointing given that I was using my best kit and the raptor wasn’t even moving! Mark came over and suggested I try a few things, namely switching my gimbal head from right facing (as I had it) to left facing. The benefit of this would be that I could lean down on the gimbal with my left hand to steady the shot.
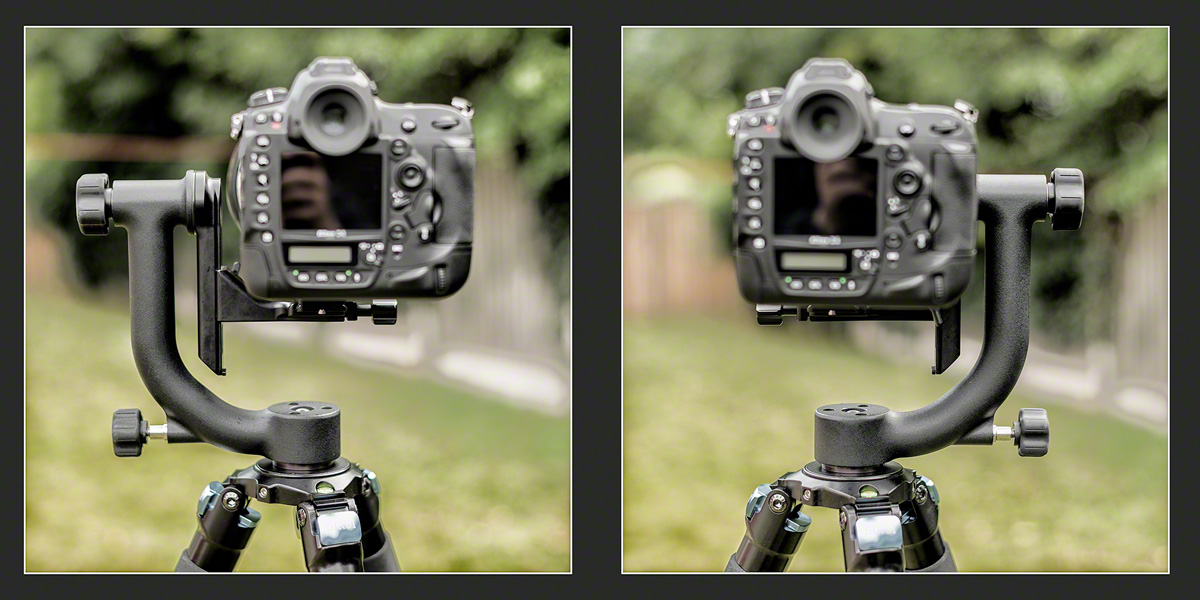
Left-Facing and Right-Facing Gimbal Positions..
This worked out pretty well for me and I’ve used it ever since. I went on to learn that steadying the lens with a hand on top was also useful, and a rubber eyecup to make it more comfortable to press the camera against your eyebrow also helped long-lens technique. Mark definitely put me on the road to better long lens technique, and I’ve been getting sharp shots with very long lenses ever since. But left facing is NOT the best for me, right facing is! Thanks Lee, for pointing this out, not least because I didn’t want to hear it, and you kept going irrespective of my arrogant unwillingness to listen! Here’s the crucial thing. I’m right eyed! This means that I sight with my right eye to the viewfinder but, if the gimbal is left facing, I cannot see a lot of what is coming in from my left-hand side because my open left eye is hampered by the locking ring and upright arm of the gimbal head.
In retrospect it’s all too painfully obvious. I have frequently been reliant on colleagues calling the arrival of wildlife subject matter that I haven’t yet seen. I’ve been amazed that they spot things so quickly when I don’t, I just thought I must be slow, or old, or needing stronger glasses, but actually, there may have been a more obvious reason all along — I was blind-sided by my gimbal head!! Actually, if you think about it, right-eyed people are at a disadvantage anyway because there is more camera body to the left of the viewfinder which tends to obscure the view from the open left eye anyway, so a left facing gimbal head just makes things worse.
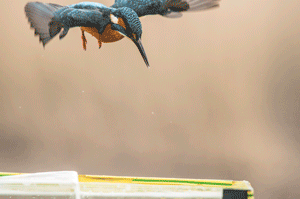
I think that the proof of the pudding was that I had no trouble at all sighting a (very small in the frame) kingfisher hovering over the pool, focussing and getting some sharp shots. See them below. The other clear advantage of using the gimbal head right-facing is that you have better access to the lens controls for VR-On and Off and Manual focus adjustment. I found myself more willing to adjust manual focus in the moment as it had been quite awkward with the left-facing setup.
The Images
Heron (the Vital Bit-Player)
Osprey (the Main Event)
Kingfisher (Proof I CAN Still Learn New Stuff)
The Ducks (Who Can Resist Them?)
So, in summary, I had a great time with Images in Nature and would recommend them to anyone interested in an immersive wildlife photography experience. Thanks again Lee!
Enjoy your photography,
until next time (woodland birds and red squirrel coming soon..),
R.

Feb
21
A Few Days Out
Birds of Prey / Field Craft / Garden Birds / Nature / Nikon D4 / Nikon D810 Posted by Robin
/
1 comments
A Few Days Out
Setting the Scene
It’s been quite a while since I could afford the time, and the cost, of having a few days out of my local area, just for the purposes of shooting wildlife! This trip had been planned for a few months and you often have to book very early just to get places. My pal Geoff and I have often gone with Natures Images (Mark Sisson and Danny Green) in the past, and their workshops are universally fantastic! This time we booked with Nature Photography Hides (Mark Hancock) for the hides in South West Scotland. We had used Mark’s hides in Worcester to shoot Kingfisher previously (on a Nature’s Images workshop), so knew they would be of good quality. The plan was to work with the Sparrowhawk hide, the Red Squirrel reflection pool and the Buzzard Hide. Unfortunately the reflection pool was frozen so our host, Alan McFadyen, swapped us to one of his personal hides to shoot Kingfisher in order to avoid disappointment. As it happened, that was to work out very well indeed! Alan was a great host, and very personable, and the hotel we stayed in (the Selkirk Arms Hotel in Kirkcudbright) were fantastic. Great food, and they pulled out all the stops to provide early breakfast and packed lunches for our demanding schedule.
Day One
We met with Alan in the small village of Ringford at 7.15am and moved on to the hides from there. We negotiated the Buzzard hide for the first day, and made our way up a short climb, through the snow, to a hide looking out into an initially very foggy scene.
And my was it cold!! The mist cleared to reveal a really beautiful view of the valley and yes the Buzzard did arrive and sit on an awesome perch. He was there for 20 minutes and we never took a shot!! There is a serious learning point here, which is this: Having taken due note of all necessary advice, sometimes you just have to go for it! We knew that he tended to be very twitchy before eating, and would usually fly off if he detected any lens movement from the hides. We were advised to wait until he had flown to the rocks to eat the rabbit or mice on the rocks. Unfortunately he had obviously eaten before arriving and had no interest in the free meal on the rocks. He was very twitchy on the perch and we might have only got one shot before he flew off. We will never know. The main thing is that we did no harm!
Feed on the Rocks
The Buzzard retreated to the distant tree line and seemed happy as Larry, preening and sunbathing. Just too far away for anthing other than a context shot. I would have struggled even for that were it not for the mega-resolution of the remarkable D810.
Buzzard in the Trees
Day Two
This was the bonus day of our plan for a few days out. Kingfisher diving shots. Wow! Alan has a couple of hides down in a secret location by the river estuary. One hide is actually in the river at high tide! Fortunately for us, we were in the dry hide as there is quite a large tidal surge during the day. Yet again the weather was perfect, sunshine but frosty and cold.
An Early Fright
We met Alan at the hotel and he asked what lens I’d be using. 600mm I said. He looked horrified. Haven’t you got anything smaller? 200mm is all you will need!! Fortunately I had my 70-200mm f2.8 VR2 with me, plus teleconvertors, and Geoff was using his 200-400mm f4. Drama over. I was concerned about the quality though, and whether I’d get enough background blur with this kit. As you can see by the final shots below, I needn’t have worried. Most of my shots were taken with my 1.7 teleconvertor, and if I hadn’t been shooting full frame then I wouldn’t have needed one at all. A zoom definitely helped too because I could swap from wider to narrower view depending on whether the Kingfisher was on the perch or diving into the tank.
So How does it Work?
It would take a remarkable amount of patience, luck and time to catch Kingfishers fishing in their completely natural habitat, so photographers increase their chances with a staged set that includes perches and fish tank. Et viola, now you have a place, and a 2 hour window of time, in which you can see a Kingfisher fishing. The utilitarian looking setup shown below is perfect for the job.
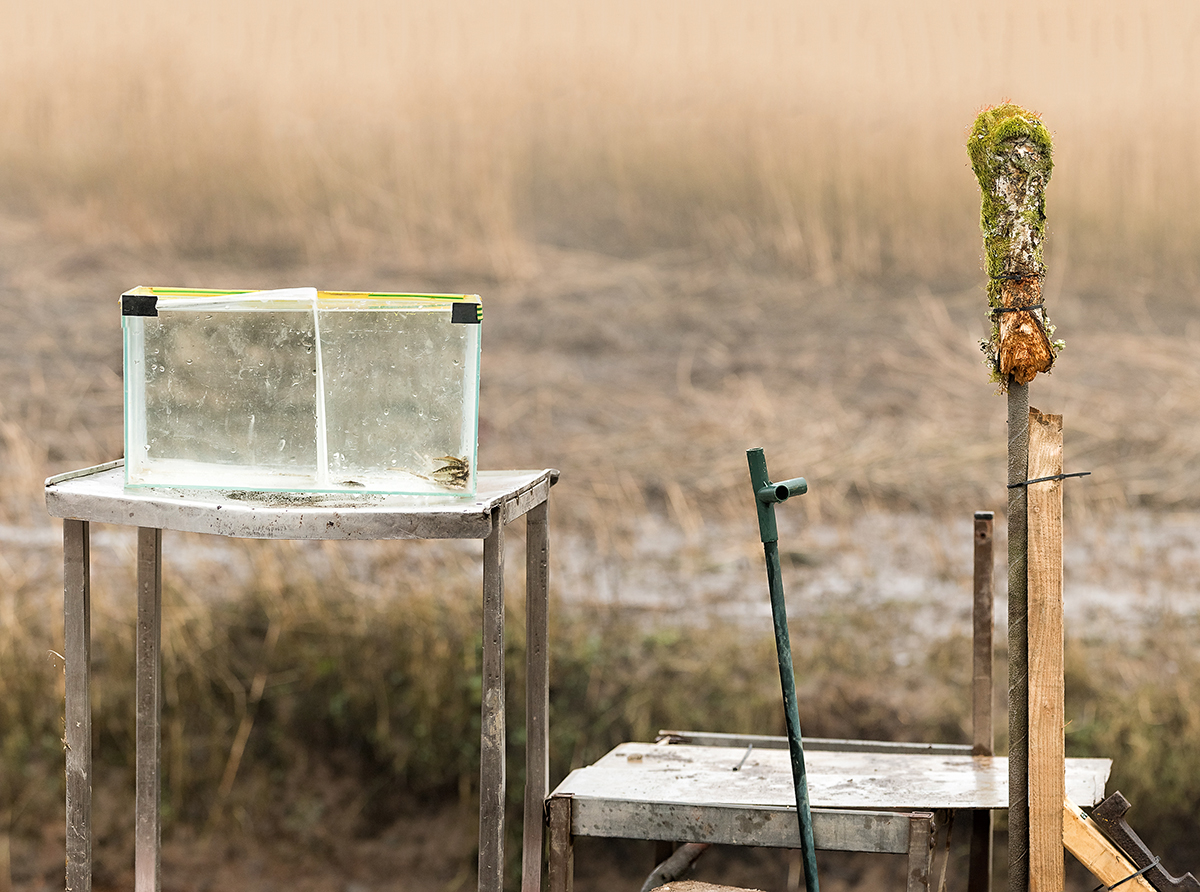
Riverbank Set for Kingfisher Fishing
As you can see, the river bank sits below and in front of the tank and perch. Beyond the tank you can see the reeds which are sufficiently far away to provide a very blurred out background when you are focused on the fish tank or perch. You can see the fish bait in the bottom corner of the tank.
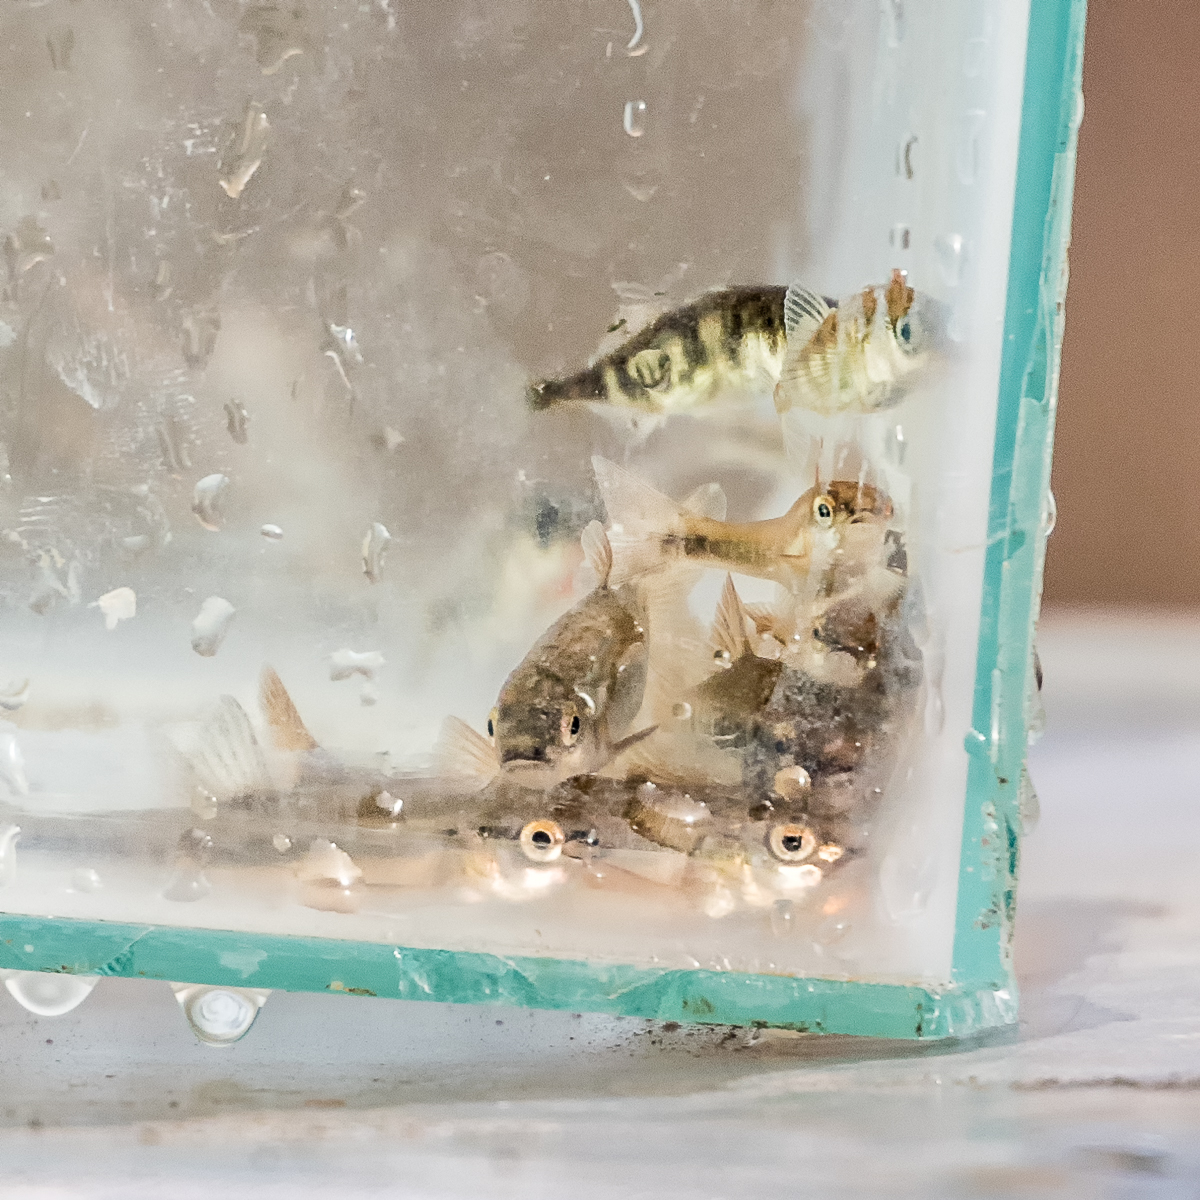
Kingfisher Bait
Taking a Shot
It took me all day to realize what I am about to tell you now. So if you want to know how to take diving Kingfisher shots, listen up!!
The Kingfishers know the deal. There are fish in that tank, and like an expensive fish restaurant, they can choose which one they want. Every two hours or so they need to feed, so along they come, as regular as clockwork. They land on the side of the tank and take a good look, they peer in, and look round, apparently sizing things up then — whoosh — with a splash they are in the tank and emerging with a fish. At least that’s what it looks like. But actually, that’s not what just happened, not even close!
To take an effective image of a diving or hovering Kingfisher you need a few things in place:
- An exposure of 1/2000 second or faster to freeze the motion
- To test the exposure in advance to ensure that you don’t get any blown highlights, or blown colors, on the Kingfisher itself
- Pre-focus on the mid point of the tank
- Your fastest frames per second set in camera
- A wide-enough field of view to capture the action
1/2000 Second Exposure
This can be a bit of an ask at the beginning and end of the day. Depending on your maximum aperture, your ISO might have to go way up. Let’s consider some scenarios. I was shooting a full frame Nikon D810 with my 70-200mm f2.8 zoom Nikkor. I ended up using my 1.7x teleconvertor which gave me sufficient reach for a reasonable crop on the perch shots, and a wide enough crop on the tank. This gave me an aperture of f4.8 which at the start of the day meant an ISO of 2500, 1/2500 second and a reach of 340mm. Had I been shooting cropped sensor then I would have had an effective reach of 300mm at f2.8 and an ISO of 1000 with 1/2500 shutter speed would suffice. Either scenario means minimal depth of field so precise focusing is essential.
I had my D4 available, and, despite the phenomenal dynamic range of the D810 sensor at low ISO, the D4 beats it from ISO 400 upwards. Did this matter? Actually, no it didn’t. What you need to remember is that at dawn, and dusk, the light becomes flatter and much less contrasty so dynamic range is less of an issue than noise is. Interestingly, despite the poor reputation of the D810 for noise at high ISO, it is still 2 years newer than the D4 and the difference is less than I might have expected (for noise).
Check Exposure
This is also crucial. The Kingfisher has very bright and iridescent colors that are very easy to blow out. This is one of those circumstances where you really need to use your 4-channel histogram display (RGB, R, G and B) to check than none of the channels are blown. You have a couple of choices here. Take a few shots to ascertain the best exposure value and then switch to manual mode. The down-side of this is that you will have to check the light levels during the day and adjust accordingly. This can be especially problematic if the sun is in and out behind clouds. Alternatively you can shoot aperture priority with negative exposure compensation. This is what I did in fact, using -0.7 ev exposure compensation. Again there is a caveat, which is that if the light becomes very contrasty (eg. in bright sunshine) you might need to increase the exposure compensation. If the light is very flat though you may have to reduce it, or even use positive exposure compensation . There’s no substitute for experience here unfortunately.
Pre-focus and Its Implications
You know where the edges of the tank are, and you know that the Kingfisher will fly in between them. Manual focusing is arguably the best, and Alan had a suitable target for us to pre-focus on. With manual focus you help optimise your frames per second because the camera doesn’t have to waste time focusing.
Focusing Target
I didn’t use manual focus though. This was because the perch and the tank were at different distances from my shooting position in the hide. With this in mind, I used my back focus button and set my shutter to release priority. This gives you the best of both worlds. You can pre-focus on the mid-point of the tank (it just so happened that there were some glue drops on the outside of the tank in the middle of the side face which worked perfectly), and fire at will when the Kingfisher dives. Or you can auto-focus on the bird on the perch if it lands there when it emerges from the tank.
Fastest FPS and Gotcha’s
I really wanted to use my D810 which gives 5 fps at full frame 36mp. Partly because it still feels very new, and I’m getting to know what it is capable of and also because I hoped for a few images that could be printed full detail at A2. I suspected that I would use the D4 first when the light was low, and the D810 when the light was better and the contrast higher, to optimize both noise performance and dynamic range. But actually, a new priority presented itself that meant I was willing to use the D810 from the start (see below). I only used the D4 at the end of the day when the light was really terrible and I needed to get my frame rate up (or so I thought).
I have a battery pack on my D810, and at Dx crop (15mp) it can shoot 7 fps. At full frame I was only getting 3 fps at the start of the day and, what I didn’t realize until I got home was that, I had my camera set to backup the main SD card to the secondary CF card (as opposed to overflow which I normally use). There’s no doubt in my mind that this slowed down the frame rate at full size, but was less of an issue at 1.2 crop (24mp) which then gave me 6 fps which was much more satisfactory.
A Wide Enough Field of View
I mentioned above that the Kingfisher appears to go off the side of the tank directly into the water, but that this is not what actually happens. In reality, faster than the human eye can register it, the Kingfisher flies up into the air and then dives down into the water to get the fish. The problem is that you just can’t see it so you don’t realize where you need to point your camera to get the best shots. Here’s an example of the sort of issue that occurs. First frame the Kingfisher is barely in shot, next frame he’s half into the water, so at 6 fps you are nowhere close to a satisfactory shot. It’s just happening too fast.
This took 1.5 seconds, start to finish
Here I’m burst shooting for 10 consecutive frames at 6 fps. You would need to be precise to a level of approximately 1/100 of a second in your timing to get the bird central in your frame every time. So what’s the trick? Well it boils down to this. To have a fighting chance you need your camera set to its fastest frame rate, and a wide-enough angle of view to improve your chance of getting an image in frame within any particular 1/10 second.
How do you do this? My advice is shoot portrait orientation with the base of your frame about twice the width of the tank to start with. Move wider if you still are not getting anything and shorter as you get better with your timing. The more pixels you have the better, but there is a tension between your number of pixels and your frame rate, and the size of the bird in the frame and your success rate. Simple as that!
Finally, how do you know when the Kingfisher will dive? Actually this is very straightforward, but can be easy to miss. The Kingfisher points his beak towards the fish a few times first and then gives a single longer neck stretch towards the fish and flies. As soon as you see that longer neck stretch start shooting and keep going until the Kingfisher has left the scene.
Putting it all Together
In the final analysis it just takes practice, once you have your settings. In reality you only need one good shot for a day’s shooting, so try to be patient. There’s a lot of waiting around between the bursts of action, but that’s wildlife for you! Don’t forget that Kingfisher are protected and don’t try any of this without the proper supervision. Definitely never approach a Kingfisher nest in the UK with your camera!
D4 or D810?
I think that you can use either camera successfully. There is clearly a difference between 6 fps and 10 fps in terms of the number of successful frames you can catch, but you can shoot a wider area on the D810, at 24mp, thereby increasing your success rate, so in the end there is not as much difference as you might think between the two. I was forced to switch to my D4 at the very end of the day in order to minimize noise, but I would still have come away with sharp shots even if I hadn’t switched.
Final Day
And what of the challenges on the final day? We were blessed with lovely weather yet again. A backdrop including some snow and woodland, fearsome cold (of course) and the expectation of a Sparrowhawk called Mad Max. Unfortunately Max didn’t show, but lots of other cool birds did. The Woodpeckers were spectacular. Did I have any problems, well yes in the sense that I needed to use my beanbag rather than my tripod, which works well enough, but I’m less used to it. The balance point on my Nikkor 600mm is on the focus ring, a terrible design flaw in my view, meaning that when you turn the camera to portrait orientation, the focus changes if the lens isn’t lifted completely off the bean bag (easier for body builders, less so for me), so you have to refocus. The 600mm Nikkor is a full 5kg in weight, even without its camouflage kit. Also, I had not brought my extension rings.
Extension rings I hear you ask. Are you crazy? You shouldn’t be shooting macro with a 600 you fool!! No, quite so. Here’s the thing. Some of the perches were set up for shooting with a 70-200mm or 70-300mm lens and they were just too close for the 600 Nikkor which has a minimum focus distance of 5m (autofocus), 4.8m (manual focus). You can bring this forwards (at the possible expense of infinity focus) by using an extension ring! Old-school, but useful..
And for the portrait shots..
Don’t forget that you can follow me on twitter or G+, but for now, until next time..
R.

Mar
26
Photographing Garden Birds in the Snow
This weekend was a busy weekend with several major commitments. I have to edit our local Parish News magazine and my daughter has a choir performance. Then there is the snow! What a fantastic opportunity to get some interesting new shots of the garden birds in a snowy setting. But here’s the rub, I’ve got so little time and the weather will probably be gone in time for my return to work. Photographing garden birds in the snow is tough but here is a tip. Shooting from the house can pay dividends and may impact on quality less than you think. It certainly allows you to keep dry and warm.
Does Shooting Through Double Glazing Have to Ruin your Images?
Shooting through your double glazed domestic window does present certain problems. It helps if they are reasonably clean, and you will have to accept a small loss of contrast and sharpness as a result of adding an extra barrier between yourself and your subject, but these effects may be less than you think if you take steps to make sure that contrast is not further reduced by shooting through reflections in the window before you. I have also found that, I suppose intuitively this would be true, that the sharper the lens I am using the better the result through the window.
Reducing Reflections

Room Setup
The traditional approach, for instance at a zoo, is to get your lens as close to the window as possible, to eliminate any light hitting the surface in front of the lens. This is pretty much your only recourse if you are shooting from outside in, but shooting from inside out increases your options. Clearly, you don’t want to have your lens touching the window when shooting garden birds for a couple of reasons. Firstly you will be presenting a man like image close to your subject that will frighten them and secondly you won’t be able to adjust position when your subject moves.

The Garden Outside
For my shots I discovered that I couldn’t focus on the nearest perch (my beloved antlers – thank you Jo!!) as it was too close (there is a way round this, see later) to the window anyway, so I needed to retreat into the room, way back from the window. I still had a good view, but there was more glass in front of me to reflect objects in the room. This had the added advantage of reducing my presence in the window. In fact, hiding behind my camera and the piano at the window (see production shot above) meant that I had frequent visitors to the perches. There were some reflections from objects in the room (my daughter’s playroom), but these were quite easily countered by turning off the lights in the room.
Our house has glass doors to capitalize on borrowed light, so I was getting an annoying reflection from the front door which also has glass panelling. Drawing the curtains over the front door removed these completely. In a way, you want your windows to be reflecting black, so another tip is cover up any highlights in the room you are shooting in with black sheets, either of paper, or perhaps a black panel reflector or two if you have them lying around. The ideal scenario would be a black painted room with no contents, though this is unlikely to find favour with the spouse or partner.
Finally it is best if the window that you are shooting through doesn’t have direct sunlight shining onto it as this reduces your chances of getting the light levels in your room down to a reasonable level, and causes reflections and flare on the window itself. It’s not so easy to fit a lens hood to a window frame!!
The Setup
For photographing garden birds in the snow I used the following setup. I had my D4 on a Gitzo Carbon Fibre Tripod (though any would have done), with a Wimberley Gimbal head Mk II, and a 600mm f4 Nikkor lens, though I could have used something like a 70-200mm f2.8 with a 2x teleconvertor. This would have had the advantage of a close focus point so I wouldn’t have had to be so far back in the room. On the question of how to make the 600mm nearest focus point closer to the front of the lens, the solution is simply to add an extension ring between the lens and the camera body. You will lose a small amount of light, and you may lose infinity focus, but this doesn’t really matter in a situation like this where nothing is too far away.
Gallery
Cheers,
R.
Mar
09
Shooting Garden Birds
Field Craft / Garden Birds / Nature / Photography / Photoshop / Slideshow Posted by Robin
/
0 comments
Frosty Mornings are so Cold

The Hide and Feeders
On a frosty Sunday morning in March (the 3rd 2013 to be precise) I had the urge to pop up my hide and go shooting garden birds. We do have feeders in our garden, to which we have a steady stream of Goldfinch visiting along with a variety of Tits (Blue, Great and this month Long-Tailed), but I had shot these before and was keen to try a different position in the garden. Our garden is L-shaped so there are a few different angles from which to shoot, and I have not yet tried them all. So the day before I visited one of our local garden centres and purchased some fresh feeders on sticks and placed them round the corner so as not to disturb the current visitors to our existing feeders. This turned out to be a very helpful strategy for reasons I did not yet fully appreciate. I did not particularly want to shoot Goldfinch, but rather a selection of other garden birds, but I expected them to make an appearance (ie the Goldfinch) round the corner if I put out more Niger seeds. You can probably see the three feeders on the right hand side, beyond the hide in the picture above. The feeders are stocked with, from left to right, high energy bird feed, peanuts and Niger seeds. You may also be able to see, by zooming in, that there are 3 perches attached to the poles underneath the feeders. Obviously the plan is to have the birds land on the organic looking perches for some of the shots. I can’t stand birds on feeder shots actually – but nevertheless everyone takes a few whilst your waiting for better shots on the perches – unless you are exceptionally disciplined.

A Gnarly Perch
Here is a close-up of one of the gnarly sticks used as a perch for shooting garden birds. Usually you need about 10m or so beyond the focus point in order to blur the background. For this reason, I positioned the perches so that, by shooting from the hide level, I would be taking in a background beyond the fence (mostly). It was a dull and overcast day, so the background was either distant tree foliage or dull sky. As it happened, towards midday the sun came out and I was treated to lovely blue skies as well. The day was bitter cold, so I set up with plenty of layers and my trusty flask of coffee in the hide and waited, and waited some more. The joy of shooting overcomes the feeling cold, but I was shivering for hours afterwards. Make sure you eat regularly to keep the cold out.
Happily there started to arrive a series to blue and great tits, mostly to the high energy feeder and the peanuts. Sadly, not one alighted on my special perches. Actually there is a bit to know about perch diameter. It is essential that the perches are not too wide as this hurts the bird’s foot musculature and they don’t stay on them very long. Moose Peterson says that being uncomfortable in this way also affects the bird’s eyes in an unhelpful way. So titrate the diameter of your perch to the size of your intended bird’s feet!! I wasn’t sure what to do. Was it just a matter of waiting (a very long time, as opposed to just a long one) or was there something that I could do to improve my odds?
Field Craft for Shooting Garden Birds
So here’s what I did. I took down the peanut feeder. It was getting a lot of traffic, but not so much the Niger seeds, and actually the peanut feeder had the least visually appealing perch. I also put an assortment of peanuts, meal worm and high energy feed on the top of the fence in the distance to see if I could encourage some birds onto that. Et Viola, a Great Tit landed on my gnarly perch. Boom he was gone. It was so unexpected I wasn’t ready and missed the shot. And then, something even more unexpected. Siskin. And at least 3 males. All loving the Niger seeds, greedily feeding on the built-in perches for minutes on end. Bright yellow and gorgeous. Visiting only from mid-March to mid-May, and completely unnoticed in the garden so far. Still no gnarly stick action though. But in-between plenty of birds on the fence in the distance, and still within reach of the 840mm combination of Nikkor 600mm plus 1.4x teleconvertor. These interventions did make a difference to my hit-rate on the organic perches, but even so these shots were few and far between. I could have put suet on the back of the thicker sticks, but I am loath to do this in case it shows up in the photograph.

Close-up of the Hide
So, what about the Hide? The hide is an F1 Fold Out Hide from Wildlife Watching Supplies. This is a cube shaped hunting style Hide with a built-in metal frame. It folds down to a small case that has two straps for easy carrying by hand, or on your shoulder, or back. It comes with pegs and guy ropes (although you usually don’t need to use the guy ropes). For shooting garden birds it really is very easy to put up, but if you are on your own it is necessary to peg the base out in order to pull up the roof frame. The hide is very well made and has viewing “windows” at the front and at the sides in addition to the rear. Each window has a cover attached by toggles (like an old duffel coat) and velcro’d on scrim netting. The inside is matt black coloured so provided you are wearing dull coloured clothes the animals don’t know that you are there. Clearly from this photograph you can see that the Hide cannot be said to be inconspicuous in my back garden, yet I am constantly amazed at how close birds, squirrels etc will approach. Sometimes too close for the 600mm to focus on!! I purchased my Hide with a handy portable chair (the C25 Fold-Out Chair). It has a handy shoulder strap, and a fabric pocket beneath the seat. The only down side is that there is no ground sheet, though I haven’t really found that one is essential.
The Photography
There was quite a range of lighting between the various places that the birds were landing so, at least until the sun came out, I was forced to select a pretty high ISO to keep the shutter speeds up to a reasonable level. I find that I can reliably shoot at a 160th with the 840mm set up on a tripod with gimbal head, and can get away with a 125th of a second on a good day. This meant sometimes rising to ISO 2500. When shooting garden birds that are fast-moving, I find it difficult to change the ISO at a moment’s notice, so this is something I tend to do in-between shots. I live in hope that practise will eventually make perfect for this issue. It’s certainly easier to change ISO with your eye to the viewfinder on the professional bodies like the D4. It’s strange, but I can adjust aperture and exposure compensation whilst juggling back focus and firing but really struggle with the left hand adjustment of ISO, which means I slightly lose control of the camera bracing and positioning is critical for rapid shooting within frame. But setting a high ISO in advance does let me increase depth of field for the brighter perches by stopping down, which I can do very quickly. Once the sun came out I was able to get down to ISO 200 for some of the shots again. Usually I shoot wide open at f4 or f5.6 with the 1.4x teleconvertor, but I have found it beneficial to stop down to f8 or f11 respectively to get slightly more feather and beak in focus, particularly when the bird is face-on.
The Photoshop
There isn’t a great deal to say about this. The images were prepared in Lightroom 4 and finished in CS6. All that was required was some mid-tone contrast adjustment via the ever amazing Color Efex Pro 4, and some sharpening using my usual sharpening actions in a 3-pass routine with additional local creative sharpening where required and sharpening for screen to finish. I must discuss sharpening as an issue in-depth some time.
Glad to be back in the warm,
Until next time,
Robin.
Recent Comments