Jan
26
I Just Cannot Believe It..
I must be getting old and Meldrew-like! I love the cold weather, and especially the snow, as an unparalleled opportunity to get outside with the camera. What I don’t like is the way that our weather forecasters seem incapable of even remotely predicting the time, place or extent of weather with any accuracy. Worse still, the very mention of the possibility (never mind the actuality) of snow throws the media into a frenzy with dire predictions of death and mayhem. These days my wife and I often have to travel, usually a long way and in different directions but that’s incidental, and an accurate weather forecast is pretty essential if snow is forecast. Can we get decent information? Certainly not.
And what about consistency of approach to travel information in the media and on the roads themselves. Forget it, no-one cares. On the M5/6 yesterday I saw plenty of signs for ‘Salt Spreading’, but never saw a grit spreader once. Neither, more worryingly, did I see any obvious grit on the road. Nor any warnings of snow on the road, or an advisory speed limit, despite several inches of snowy slush, harsh wind and appalling driving conditions!! I saw plenty of signs asking ‘is your vehicle prepared for winter?’ but for what purpose? So there we all were, driving in columns, much too fast, terrified to attempt to slow down or change lane in case a truck rear-ended you or the manoeuvre started a skid and a major pile-up. Astonishing. So I ask again was there an advisory speed limit? Were there warnings of snow? Of course not, no-one cares it seems. On the news this morning I hear that people were stuck in their cars overnight. I felt lucky to get home alive last night, this country beggars belief sometimes.
Less Moaning and More Photography
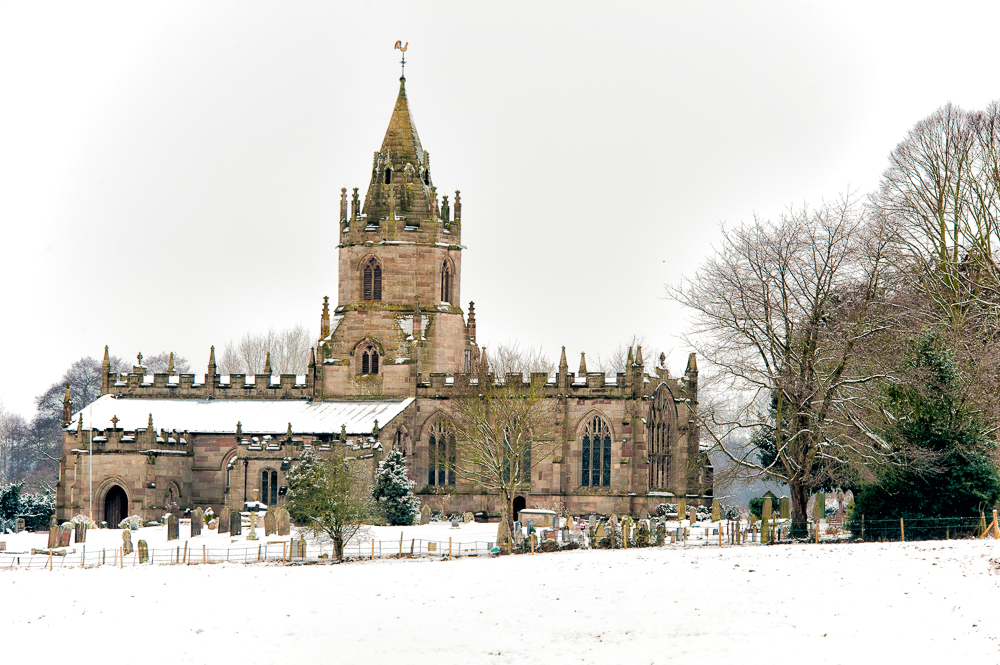 I did manage a couple of pictures however. I was quite attracted to the image of the Collegiate Church of St Bartholemew Tong pictured here. As you can see from the link it is a listed building with a very attractive facade. So who built Tong Church and when? It seems from their website that in 1409 Lady Isabel de Pembrugge obtained a Royal license from Henry IV to found Tong Church and build the present church so that masses could be said for Sir Fulke and her two other husbands, Thomas Peyteveyne and John Ludlow. Tong church is probably the third building on the site, and is a fine example of Perpendicular Gothic Architecture, with the exception of the Golden Chapel. It’s a real pity that it was so dull on the day I went past, this would look so much cleaner with a blue sky background. On well, you have to take what you can. If you would like to see it yourself it is off the Newport Road (A41) just off J3 of the M54.
Nighttime Snow HDR Stuff
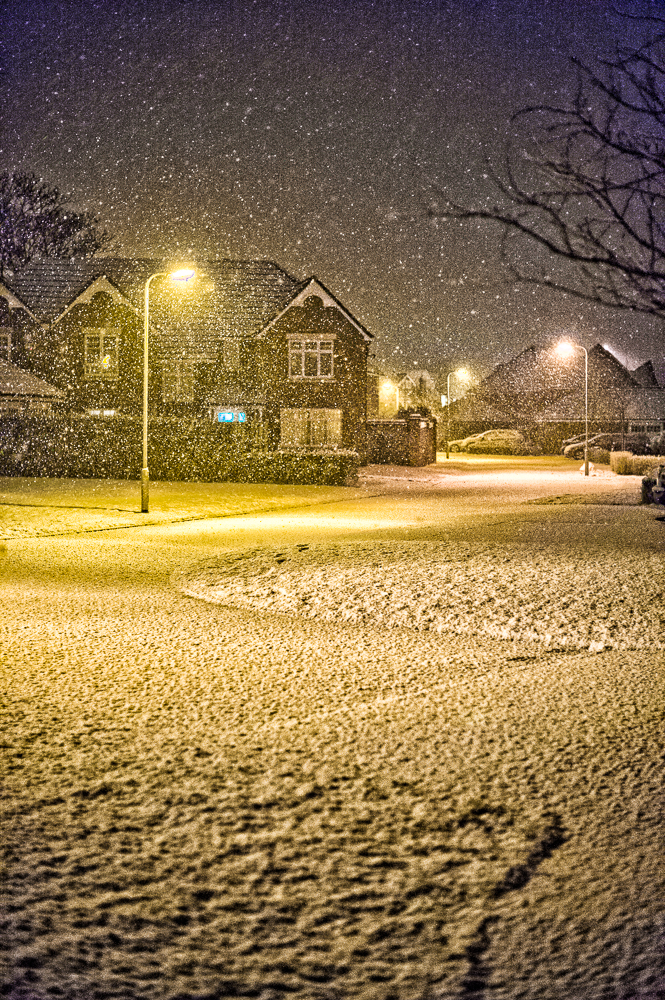 Many snow scenes are low contrast, and as such it is important to remember your positive exposure compensation to get clean bright whites, and to shoot to the right as far as possible. At night though, all that changes, particularly if you have things like streetlights in the scene. Here you may need HDR. One of the nice touches on the Nikon D4 is that you can select your bracket interval between 0.3 and 3.0 stops. Previously, on the D3 for example, you could only select 0.3-1.0 stops, so you would end up taking many more exposures just to get a good range. Now, many scenes can be captured automatically with a 3-image bracket of -2, 0, +2 stops. For this image, I pushed the boat out with a 5 image 2 stop bracket because of the deep blacks and the bright street lighting.
The shot was taken in full darkness using a 50mm f1.4 Nikor, hand-held at ISO bonkers (25,600), between 1/25 and 1/6400 of a second for the 5-image series. The shot was put together using lightroom 4 and CS6 Extended using the preset Scott 5 as a starting point in Merge to HDR Pro. It was then taken back to lightroom for further processing and then back to CS6 for extra tonal contrast thanks to Color Efex Pro 4. If you have never used Color Efex Pro 4 I can really recommend it to you, it is worth the asking price just for the tonal contrast feature, I use this on most of my images, even the wildlife pictures sometimes.
Jan
12
Twas Just Before Christmas
I had been working on my image collection to smarten up the galleries on this site. I even worked on separate thumbnails for maximum effect with each one individually centred. Took ages…
Having a little time over Christmas (a change to say the least) I thought I would go ahead and update TDI with the new galleries. Having not blogged since last March, I could barely remember how to enter admin mode (had even forgotten my password), so creating a new menu system was an even larger hurdle. Never mind, I was up for it… Unfortunately I realized that multi-level menus were out of the question with my previous theme as they were just as long as menus without sub-levels, and there were just t00 many galleries.
Repeat Performance..
So guess what. I had to re-organize my galleries to be larger and fewer. Took ages (and I was not amused once more!!). Worked hard, got it all done, felt very pleased, theme fell over. No slide show on the home page. Ahhhhh!!
No Help from Theme Authors..
I emailed the theme authors, but no reply. Emailed again, but still no reply. What a nightmare, looks like they have gone out of business – still economic times are hard and there might not be a very large market for something so specialized – but here’s the thing… I really liked that theme.
My choices were few. I could learn (actually re-learn) HTML and learn JScripting (for the first time), the WordPress architecture and something about theme writing and thus fix it myself. Or purchase another theme, re-do all my galleries, re-design my homepage and get to grips with unfamiliar settings. Neither seemed much fun, but I chose a new theme.
It took longer than I thought, but eventually themeforest came to the rescue with an excellent theme called Photolux from Pexeto Themes. It’s very popular, reasonably easy to use and very attractive with a simple style. I’ve been able to reuse my old galleries pro-tem so that’s a help, but not a permanent solution because the full-screen images that this theme can do look so much better.
But There’s More..
One of my plugin updates caused an internal server error taking me off-line. Nevertheless I’m delighted to say that everyone has been very helpful. The GoDaddy technical support was excellent (did you know that their European office is in London?), and the plugin author is being very helpful too.
Back to the Photography..
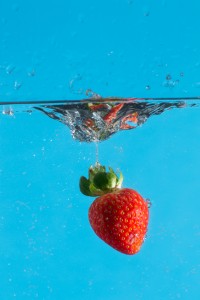
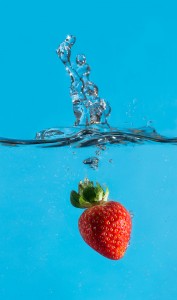 Well, things did take a turn for the better in the end, and I finally got the strawberry falling into water shot that I wanted. As much as I enjoy my wildlife photography, I do also enjoy the controlled circumstances of the studio, and I’ve had several goes at this shot previously. My daughter was keen to help out and took some of the shots herself with her D3100 and Sigma macro lens combination, so this is a combined effort. Unfortunately I didn’t quite have the correct kit to get the shot the first time round as I needed a longer container. This image is taken using a flat sided glass vase to hold the water, and they are available quite cheaply in many stores (see picture below). The strawberry is carefully chosen for size and shape, side lit with a small strobe and the background is lit with 2 other flash (it’s actually a piece of A3 blue card). It’s important that the vase is tall enough to get both the strawberry and the splash, and the position of the light is important because you don’t want any stray highlight reflections on the glass. The greenery on the top of the strawberry is best retained in my view. It may look untidy when the strawberry is out of the water, but usually looks fine when it is beneath the waterline, so you don’t have to be that fussy.
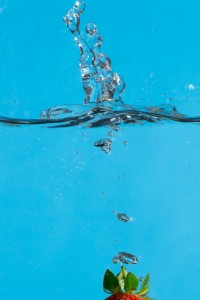
 It is not really possible to get this shot in one go because the splash occurs when the strawberry is much lower down in the vase, and therefore the angle of view of your macro (or telephoto) lens is too narrow to get it all in. So to get both the strawberry and the splash-back in this pleasing aesthetic you need to merge two shots in Photoshop. In order to make this possible shoot everything in manual in the same way you would with a panorama. Obviously you have to be quite patient to get both parts of this shot correct. Expect lots of missed strawberries mostly out of shot, lacklustre splashes and don’t forget to pre-focus on the strawberry in the centre of the vase before you drop it!! You will need to crop out the sides of the vase because this makes it very difficult to merge the two shots. The inside surface of the vase can get covered in distracting water-droplets as the number of trials increases so it is important to watch out for this and periodically wipe the inside surface with a piece of kitchen towel or similar. As with anything electrical and involving water, make sure your flash equipment is sufficiently distant not to get splashed. They can be covered by plastic bags if needs-be. I found that at the distance I was using no droplets landed near to the flash units.
Manual flash exposure tends to be more reliable than auto and don’t forget to use a manual white balance, plus any correction you might need post shot, for both images before attempting the merge. Given that it is the speed of the strobe flash that freezes the action it is important not to have too much ambient light for the ISO/Shutter Speed/Aperture combo that you are using in order to minimize the potential for speed blur. To judge this take a test shot with the flash turned off. the darker the frame the better. Here are the two shots I used and you can see clearly how the splash begins as the strawberry moves out of frame. As you can see I might have been better off shooting higher for the splash since the splash was almost cropped by the top of the frame. A good trick for centring the strawberries prior to focussing is to skewer them and hold them in place.
If you do this though, remember not to go right through the strawberry because this doubles the risk of being able to see the exit wound on the face of the strawberry, the top one is usually out of sight but one on the front of the strawberry may not be, as happened here. The clone tool came to the rescue easily enough, but it is best completely avoided if possible. Alternatively you can copy a patch of strawberry that is similarly lit up onto its own layer and then move it into place and mask the edges with a soft brush to obscure the repair. Don’t forget to match the spacing of the seeds though, otherwise the repair will look odd. Finally I painted out some of the more distracting water droplets on the inside face of the vase (this is an advantage of using a flat-lit plain coloured background), sharpened and saved the image.
For the sake of completeness, this image was taken with the following settings:
Focal Length = 220mm, Aperture = f11, Shutter Speed = 160th Second.
New Year’s Resolution
My new year’s resolution is to try to blog at least once a month and to always have a new image to show. I’m becoming curious about social networking (my wife says it’s a jolly good thing in business). I’d quite like one of those social media icons on my home page – but I’m not sure I can commit to the regular stream of content (however short or inane).
Best wishes,
R.
Recent Comments