Jun
03
Super-Resolution Imaging using a Fujifilm XT-20
Cameras / Computing / Fujifilm XT-20 / Photography / Super-Resolution Photography Posted by Robin
/
0 comments
Super-Resolution
Overview of Super-Resolution Techniques, What are we Discussing Here?
Super-resolution is a term with many modern meanings, but basically involves those techniques which add detail to poor resolution and grainy images. Fractal techniques for enlarging images have existed for many years, but are really just retaining existing detail, during enlargement, in a plausible way. More modern, single image, techniques however, can actually add extra detail that wasn’t there to begin with. Some techniques work by creating a dictionary of low resolution parts (for example in facial recognition) in which similar details are found (for instance an eye or a mouth) and patched together to form a complete picture. These new, but similar, parts are then substituted for higher resolution examples of the same details to create a higher resolution image overall. Whilst ingenious, this is a step removed from using the information within the image itself directly and not the subject of this discussion.
Another technique is known as resolution-stitching. In this technique a series of close-up images from a wider scene are taken and stitched together to make a higher-resolution whole. Taking the example of a landscape image, perhaps taken with a 24mm lens. The scene would be re-shot with a longer lens, say 100mm, in such a way that you have overlapping patches which can be stitched together using appropriate software. The longer the lens, the more detailed the final image will be. This is essentially the same as panorama photography and is also not the topic of this discussion. For the sake of completeness, when considering resolution stitching, there is a related technique attributed to the Wedding Photographer Ryan Brenizer called the Brenizer technique or sometimes the Bokeramah technique. This uses a telephoto lens, opened up to give a narrow depth of field, to take overlapping images to include the background such that the subject is very sharp but the background is blurred out, yet remains relatively wide angle. See Ryan in action via this B&H interview and video.
Finally, there are also artificial intelligence (AI) systems using a variety of neural networks and so-called deep learning which are also able to fill in missing detail in a range of images. One recent, well-known, example is Google’s RAISR (Rapid and Accurate Image Super Resolution) system as seen in this 2-minute papers video. For the interested reader there are a range of videos on neural networks in the YouTube Computerphile channel.
So what am I talking about? I’m talking about the super-resolution technique for photography popularised by Ian Norman from the photon collective in 2015. Take a look at Enhance! Superresolution Tutorial in Adobe Photoshop on YouTube and Ian’s excellent Peta Pixel piece A Practical Guide to Creating Superresolution Photos with Photoshop for more information on the technique and how it is applied.
Experiments with Super-Resolution
There’s little sense in me re-creating Ian’s work here, so I’ll move straight into my immediate reflections on reading his articles on super-resolution myself. I was away in Edinburgh for a long weekend and my immediate reaction was “I’ve got to try that!!” and “I wonder whether it will work with an X-Trans sensor camera” as I had my XT-20 with me. Only one way to find out, so I took a few random image bursts by way of experimentation.
Why the Worry About X-Trans?
I’ve read a great deal about the X-Trans sensor and am not sure what to make of the very partisan portrayals sometimes seen. From my own practical experience, I don’t find that the x-trans files are as easy to process when the shooting conditions have been difficult, and sharpening is often an issue unless you remember the tricks.
- Use Iridient X-Transformer to demosaic or..
- Turn off sharpening in Lightroom altogether, convert to a .tiff, then sharpen back in Lightroom or in Photoshop or..
- If sharpening in Lightroom has to be done, use the detail slider not the amount slider or..
- Use a different raw processor such as Capture One or On1 Photo Raw.
But actually, my concern was more about the green blocks of 4 pixels in the matrix. Would this effect the pixel averaging that takes place in the super-resolution process resulting in lower resolution than with a Bayer sensor? Would there be as much sub-pixel information available? This is the sort of situation where a little knowledge might be dangerous.
An Insight Into Sub-Pixel Imaging
I find it quite difficult to imagine how information can be gathered at a sub-pixel level when it is only captured at a pixel level. Looking into the research on image processing however, there are lots of different ways of extracting this information, even from a single image.
This paper by John Gavin and Christopher Jennison from 1997 called ‘A Subpixel Image Restoration Algorithm‘ gives a useful insight to the theory and practise. Indeed there are many applications in common usage including processing images of landscapes, remote sensing of active volcanos, locating and measuring blood vessel boundaries and diameters etc.
But will Ian’s process really reveal more detail, or simply smooth out the imperfections (noise) whilst placing the image on a larger canvas? Time for an experiment to find out whether super-resolution is a viable technique on X-Trans sensor cameras.
Technique
I used my Fujifilm XT-20 in manual shooting mode. The exposure was 1/250 second at an aperture of f8.0 for maximum sharpness. I used the highly respected ‘kit’ lens 18-55mm f2.8-4.0 set at 32.9mm. Several bursts of 25 images were taken, hand-held. For post processing I used Ian’s technique via specially constructed actions for 200% and 400% super-resolution. The original raw files were processed in Lightroom Clasic v7.3.1 using Auto settings, Camera ASTIA/Soft profile and the as shot auto white balance setting. Iridient X-Trans conversions were performed from within Lightroom. Final sharpening of the images was done via smart-sharpen with a setting of 300% at a radius of 2 pixels and no noise reduction. Detail shots were resized from the super-resolution images to 1200 by 800 pixels and saved via Lightroom’s export function as jpeg’s at 100% quality.
Image Results
Given the potential for artifacting in Lightroom, I generally demosaic special images in Iridient X-Transformer which, except for a single comparison just to see if there would be any difference, was the case here. So the Fuji raw files were demosaiced using X-Transformer prior to enlarging, aligning and then averaging using a smart object stack mode of mean. 5, 10, 15 and a full 25 images were enlarged to either 200 or 400%. Post enlargement, mild sharpening was applied using Smart Sharpen set at Amount 300, Radius 2 px and Noise Reduction 0%. Illustrative details from the scene are compared below. Representative details of the overall scene were selected and down-sampled to 1200 x 800 pixels for this section. This might not be the best way to demonstrate the improvements achieved by the super-resolution blending, but it does allow us to compare like with like.
Comparison results are set out as follows:
- Differences between Lightroom and Iridient X-Trans Demosaicing for the single image result.
- Differences between the 25 Image Blend at 200% size (96 mega-pixel equivalent) for Lightroom and Iridient X-Trans Demosaicing.
- 25 Image Blend at 400% (384 mega-pixel equivalent, Iridient X-Trans Demosaicing only).
- 200% and 400% with a 15 Image Blend.
- 200% and 400% with a 10 Image Blend.
- 200% and 400% with a 5 Image Blend.
- Please note that all blended shots are uncropped.
Single Image Results
Lightroom Demosaicing
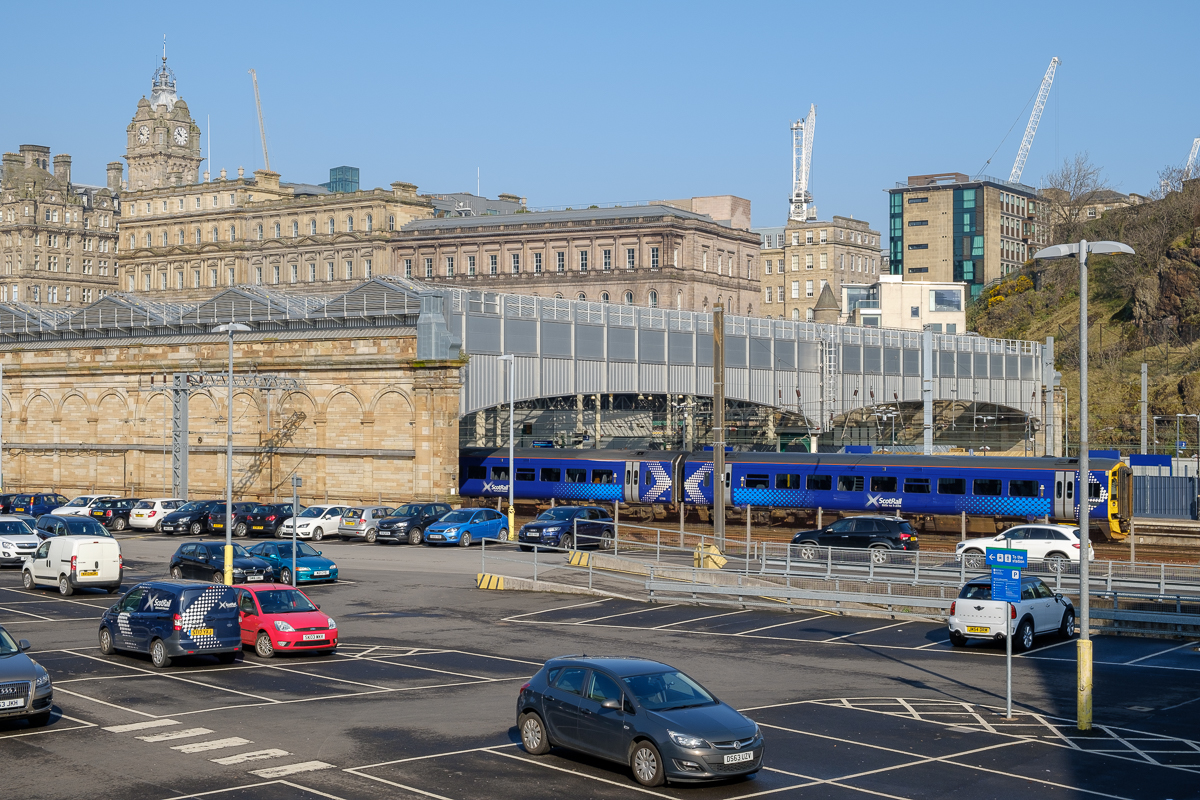
Waverley Station, Single Image..

Car Detail..

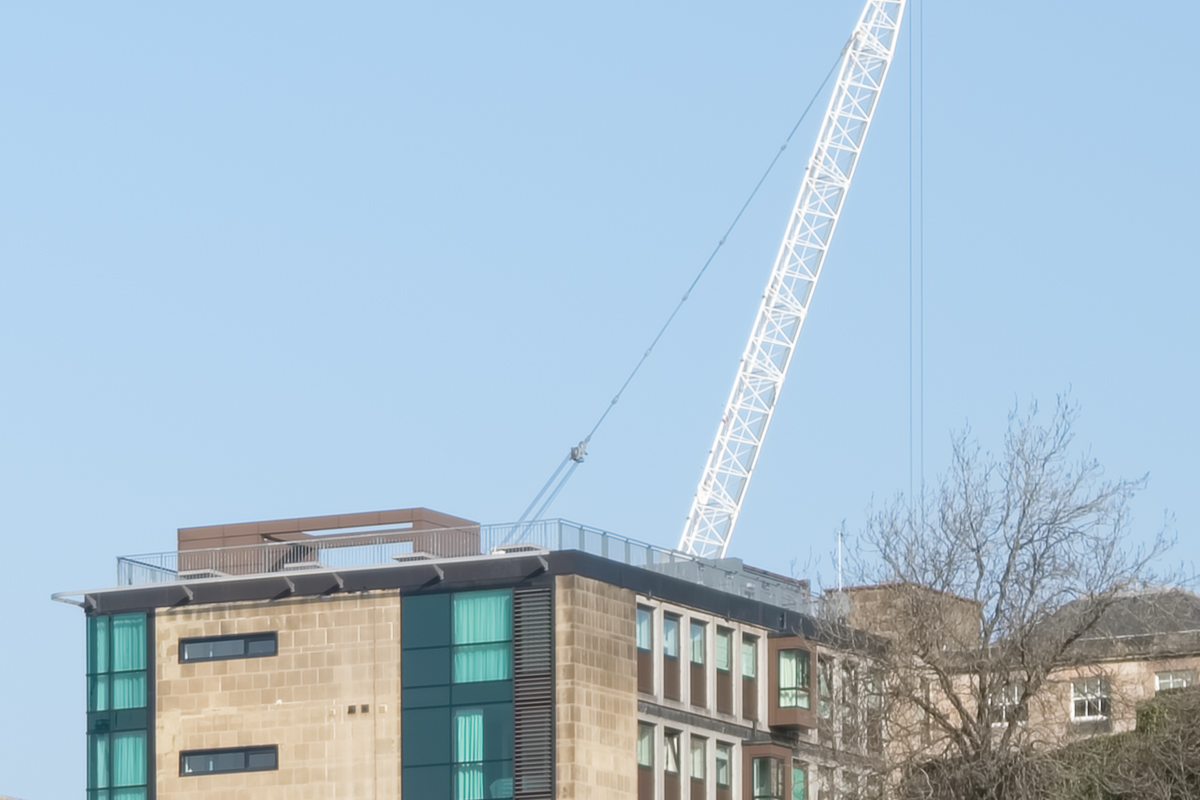
Crane Detail..

Clock Tower Detail..

Train Detail..
Iridient X-Trans Demosaicing
Waverley Station, Single Image..
Car Detail..
Crane Detail..
Clock Tower Detail..
Train Detail..
25 Image Blend Results
200% Lightroom Demosaicing
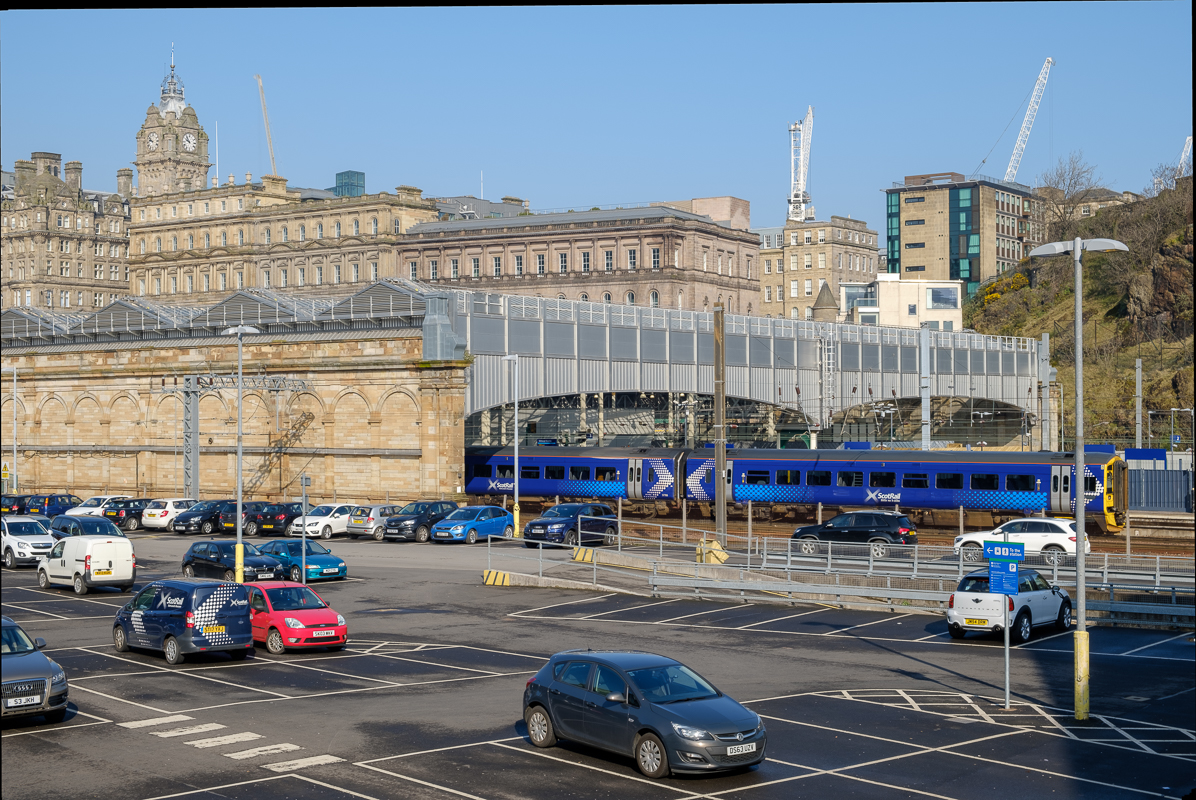
Waverley Station, Single Image..

Car Detail..

Crane Detail..

Clock Tower Detail..

Train Detail..
200% Iridient X-Trans Demosaicing
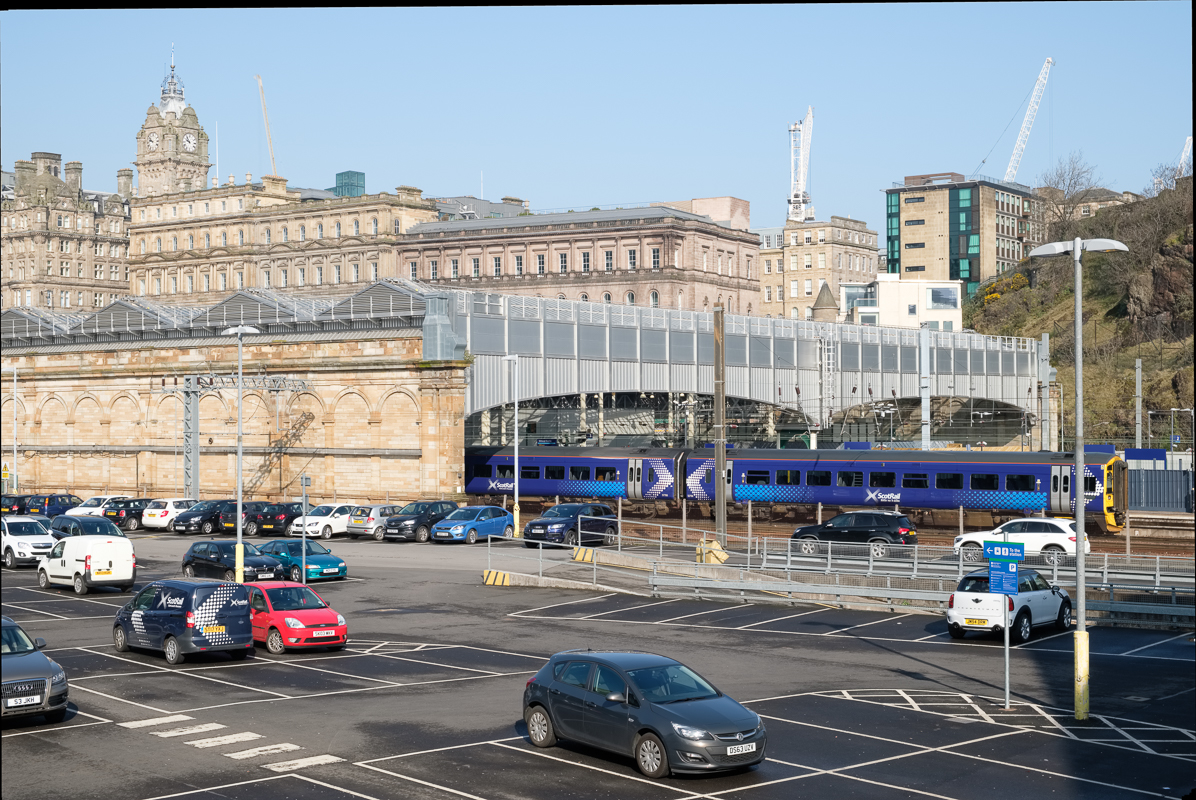
Waverley Station, Single Image..

Car Detail..

Crane Detail..

Clock Tower Detail..

Train Detail..
400% Iridient X-Trans Demosaicing

Waverley Station, Single Image..

Car Detail..

Crane Detail..

Clock Tower Detail..

Train Detail..
15 Image Blend Results
200% Iridient X-Trans Demosaicing

Waverley Station, Single Image..

Car Detail..
Crane Detail..

Clock Tower Detail..

Train Detail..
400% Iridient X-Trans Demosaicing

Waverley Station, Single Image..

Car Detail..

Clock Tower Detail..

Train Detail..
10 Image Blend Results
200% Iridient X-Trans Demosaicing

Waverley Station, Single Image..

Car Detail..

Crane Detail..

Clock Tower Detail..

Train Detail..
400% Iridient X-Trans Demosiacing

Waverley Station, Single Image..

Car Detail..

Crane Detail..

Clock Tower Detail..

Train Detail..
5 Image Blend Results
200% Iridient X-Trans Demosaicing

Waverley Station, Single Image..

Car Detail..

Crane Detail..

Clock Tower Detail..

Train Detail..
400% Iridient X-Trans Demosaicing

Waverley Station, Single Image..

Car Detail..

Crane Detail..

Clock Tower Detail..

Train Detail..
Summary of Image Findings
Lightroom versus Iridient X-Trans Demosaicing in the Single Image Test
In this test, the first observation is that the Lightroom processing gave a darker result than the Iridient X-Trans did. Looking carefully at the individual images, the detail in the Iridient rendering is very slightly better with less aliasing and more pleasing colour in the overall image. Moving on to the single image detail shots, it is very clear that the Iridient Demosaicing is superior. There is a noticeable level of extra detail with the images looking sharper with an oveall sheen and sparkle missing from the lightroom images which look muddy in comparison.
25 Image Blends at 200%
In the overall Waverley image there was again a difference in colour between the lightroom and Iridient X-Trans renderings with the Iridient looking more pleasing with better contrast and slightly less harsh aliasing. There was less false colour though the detail was fairly similar to my eye.
Comparing the Lightroom single image to the Lightroom 25 image blend there is a very noticeable increase in the clarity of the image. The car detail images have a sparkle to them that was missing in the individual rendering and the extra details in the car number plates and the chain link fence behind the cars is remarkable. There was little noise in the original Fujifilm XT-20 raw files which were taken at an ISO of 200, but the 25x image blends are totally noise free.
Comparing the Lightroom blend to the Iridient blend, there are further gains in image resolution and quality, to me most noticeable in the appearance of the chain fence where it overlaps the train wheels in the train detail image. The similarity of the colour of the rusty chain link to the false colour shadows under the train in the Lightroom image makes the link much more difficult to see in the Lightroom image.
25 Image Blends at 400%
I think that the key question here is whether there is any extra detail at all in a 400% size image compared to the 200% images. Here we are comparing simply between Iridient X-Trans demosaiced image blends only as I did not perform the 400% blends using a Lightroom render for reasons of time (more on the time aspect later).
To my eye, the 400% results were softer with less contrast, but noticeably less aliased and artefacts were fewer around small details like the number plates in the car detail image. It looked as though the 400% images might respond really well to a mid-tone contrast boost which may reveal this extra detail more clearly. The 400% 25 image blend took six and a half hours to render (after many failures to complete and certain tweaks being necessary to my computer hardware). As such the small gains may not be worthwhile as a routine workflow.
Reducing the Number of Blended Images
Reducing the number of images from the 20s to the teens may improve the speed of processing considerably, but is the lost quality acceptable. How many images do you really need. Ian Norman likes to use about 20 images which clearly works well, so I have started from 15 images working down in 5s.
Looking particularly at the Car Detail shots at 200%, there is an improvement in detail above that of a single shot even with 5 images. The improvements in detail and contrast improve incrementally the more images you add. 15 images is quite acceptable, though 25 gives a surprising amount of extra contrast and detail.
Going through the same exercise with the 400% images there is much less difference in contrast and detail as you increase the number of blended images. At 400% even 5 blended images gives a substantial increase in detail over the single image, so given the time in processing there may be little advantage in going to much larger frame numbers.
Practical Difficulties with Super-Resolution
With a 24 mega-pixel camera sensor, at 200%, you are essentially creating a 96 mega-pixel image (12,000 x 8,000 pixels). With a 400% super-resolution image you are creating a 384 mega-pixel image (24,000 x 16,000 pixels). Each 24 megapixel layer in your super-resolution stack will be 137 megabytes in size at 100%, so for a 25 image stack that’s 25*137 megabytes. Increase to 200% size and this becomes 25*549 megabytes file size or at 400% size a massive 25*2.15 gigabytes.
Needless to say that these file sizes are problematic for Photoshop to work with. It can do it, but it needs a massive amount of memory to do so. Way more memory than an average domestic PC will have.
Out of Memory?
I have a decent specification PC even though it is now a few years old (see link). But I was unable to process 400% super-resolution images with 25 layers because I kept getting out of memory messages half way through. It took a while to work out precisely which memory was running out, but it turned out to be both the Photoshop scratch disk and the Windows page file.
Of Scratch Disks and Page Files..
My PC uses a 500 GB M.2 SSD for the operating system and programs and, by default, Windows uses the operating system drive for its virtual memory management. Photoshop also uses the operating system drive for its scratch disc. Basically, my C: drive was filling up with virtual memory files and grinding to a halt. As good fortune would have it, I have a second, empty, high speed M.2 drive in my system so I was able to relocate both the Windows page file and my Photoshop scratch disc to that 500 GB drive. Sadly that still wasn’t enough space for these gigantic files and I had to add slower hard-drive capacity to the Photoshop scratch disc list after which all was well. Nevertheless, having had to wait six and a half hours for photoshop to finish, I only ran one 400%, 25 layer, file through the process. This is definitely a major limiting factor.
Is Super-Resolution Worth Doing?
My analysis is that it is worthwhile for some types of imagery:
- When you are in a push, especially in situations requiring high ISO to reduce noise as well as improve detail.
- For architecture and some indoor shots.
- For landscape photography in calm weather.
- In situations where you might want to make a very large print.
- When you don’t have a high resolution camera available, or where resolution stitching is not viable because you don’t have a long lens handy.
- In situations where extreme upscaling is necessary (400%) the availability of 5 images or more for this process gives a significant lift to the detail of the image.
Nevertheless there are situations in which you couldn’t use the technique, for instance where there was a lot of movement in the scene, or where every image is substantially different. Notwithstanding this some authors have used long-exposures for blurring water with this technique, so in some circumstances movement per se may not be an absolute barrier. It may also be used where small changes in perspective mean that the images can still be aligned (although there will be more waste within the image).
Final Thoughts
Iridient X-Transformer does not respect the Lightroom processing settings, but does use the in-camera film simulation. I would have been better off not making any development changes in Lightroom to ensure that judgements of the differences in resolution and contrast were not colored by them.
Jan
09
Building a New PC
Photography can be an expensive hobby these days! Whilst it is perfectly possible to shoot small jpegs and to print them at a booth in your local store, most serious photographers are shooting RAW images in large numbers, and using Photoshop CC 2015 and Lightroom (or similar) to edit them. If you do any video work, or perhaps need to do some print work with InDesign, suddenly you need acres of storage space and a high-end workstation to make the process flow. 5-years ago, in another Christmas project, I built my first decent PC using an SSD for the operating system and the, then current generation of, Intel i7 chip. This has served me very well, even to the point of adopting Windows 10, but the final nail in the coffin was the recent update to Creative Cloud 2015. These days I use plugins extensively (On1 and the Google Nik Collection) but the combination was only useable with extreme patience! So time for an upgrade. Time for me to set about building a new PC.
Lots of things change over a five year period, in life as in PC tech. My partner in crime Geoff keeps in touch with the hardware developments and is an avid subscriber to Micro Mart Magazine. He put together an initial specification, as the basis for discussion, and together we researched further and finessed our individual computer builds. I’ve been using a Dell monitor for the last 8 years, and it’s been great, but I also took the opportunity to upgrade to a slightly larger 27 inch model with 100% Adobe RGB (and sRGB) colour (Dell UltraSharp Premier Colour UP2716D) on the grounds that it would be better for my eyesight as well as my colour correction. Apparently the colour profile is fabulous straight out of the box. We’ll see and I will comment further once I’ve a few hundred more hours photo-editing under my belt.
The Components
Building a new PC is not a cheap way of getting a good computer, but it is the perfect way to choose precisely the specification, and the supplier of the components, that you want for your build. You need leave nothing to chance! My list of components was, as follows:
| Asus X99-Deluxe u3.1 Motherboard |
| Intel i7 5930 Processor |
| 32GB: 4*8 GB DDR4 Memory |
| Samsung Pro 500Gb M.2 SSD |
| 4TB Seagate Hybrid HDD * 3 |
| Corsair RM 1000W Fully Modular 80+ Gold Power Supply |
| ASUS GTX 970 Geforce Graphics Card |
| Samsung DVD Writer SATA |
| Fractal Define R4 Case |
| Windows 10 OEM |
| Noctua NH-Ul4S Slim U-Series Single Tower CPU Cooler |
| Wireless Keyboard and Mouse |
| Monitor Dell UP2716D |
The Suppliers
The order was fulfilled promptly by Amazon, Scan and Ebuyer without fuss, though the packaging on the Dell monitor was water damaged on arrival, but the contents were dry and untouched. Close to Christmas, it did not seem worth taking the risk of sending it back and risking not being able to complete my build during the holidays, so I kept it.
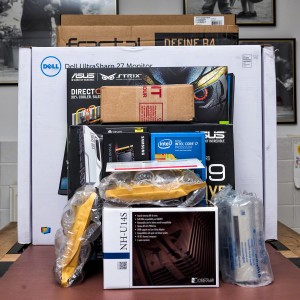
The Grand Unboxing..
It’s a little beyond the scope of this article to describe the full detail of my build, but I will share some of the highlights. Firstly make a big pile of boxes and admire. Next unwrap the goodies and make sure you have everything you need for your build, and that you have looked at the Motherboard manual to know where the different connections are for the Power supply, Fan headers, SATA and SATA Express ports etc. Make sure you also know which memory slots to use if you aren’t using all of them, and finally make sure you understand any restrictions on the PCIe slots for peripherals.
The next thing to do is to think really hard about the order in which you want to do things in order to make it easy for yourself. For instance, it’s easier to fit the processor to the motherboard before you fit the motherboard into the case. Also, when you’re building a new PC, it is easier to fit some of the cables to the motherboard before you fit it inside the case. Which cables to fit depends on your specific board configuration and also your particular case. The Fractal Define R4 is an excellent case. It’s very well made and quite a bit wider than the Cooler Master I used for my previous build (I could hardly fit the GTX 970 in that case) so there is more breathing room than in some boxes. Nevertheless space will be tight in some scenarios, and you don’t want to be forcing cables onto headers as this will stress the motherboard and lead to breakages.
Putting It All Together
It was fun to photograph the various parts as a memento of the build. The Intel i7 5930 Processor was gorgeous to behold, and the Asus X99 Deluxe u3.1 Motherboard looks so stylish that it begs to be lit and viewed through a transparent case (not that I’m keen on that sort of ostentatiousness usually, but you can see why people do that stuff).
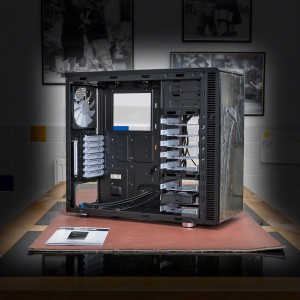
Fractal Define R4..
Here is the case with the sides removed. Apologies for the industrial strength vignette, it does focus you on the case though. The R4 has some lovely detailing with it’s white fans and drive bays etc. It comes with a box full of screws and a manual leading to an easier build experience.
Another benefit of the R4 is that you can fit extra fans in the top (2 fans) and side (1 fan) should you need them for extra cooling. It’s vital to ensure a stable cooling environment if you are minded to overclock your system. The speed of a processor depends on how many things it can do linearly per second (Clock Speed), and how many things it can do in parallel (Cores and Threads). The overall speed of the processor also depends upon the speed at which it can write out to, and retrieve from, it’s supporting memory systems so the RAM bus speed is also crucial. So what is clock speed (and thus overclocking)? Clock speed, or rate, is usually given as a frequency in gigahertz (GHz) these days and it’s the number of times a second that a processing step occurs. Some programming operations can take more than one step so there isn’t necessarily a one to one relationship between the clock frequency and the execution of lines of computer code. As far as graphics processing is concerned though, the faster the better, and the more parallelism the better (at least in graphics cards and some video editing software).
More About the Motherboard
Asus X99 Motherboard..
Asus are manufacturing a range of motherboards with the so called X99 Architecture. So what does this mean? The new intel Core i7 processor and intel X99 chipset were designed to provide the ultimate desktop PC platform for extreme gamers, enthusiasts and content creators. It has special features which enable it to be overclocked and give great performance for gaming and digital content creation. This includes 6 and 8 core processors on the, so called, LGA2011-v3 socket (that’s an LGA2011 without a processor fitted on the left). Performance is boosted via Intel’s Turbo Boost 2.0 technology and Intel Hyper-Threading technology. As well as ultimate performance, the X99 architecture also maximises input/output and storage capabilities. The Intel i7 5930 processor used here (6 Cores), for instance, and it’s big brother the i7 5960 (8 Cores) have 40 PCIe (PCI Express) Gen 3 lanes, 10 SATA ports (for your disk drives), 14 USB ports (a key factor for me) and 20 MB of Smart Cache. Intel Rapid Storage technology delivers excellent storage performance and features to improve system responsiveness.
More Memory
The new Core i7 processor with the Intel X99 chipset also gives us quad-channel DDR4 memory at 2133 MHz that can support up to 4 unbuffered dual inline memory modules per memory channel with a max DRAM density of 4 GB and 8 GB. So this board can have up to 64 GB of memory in total!
Content Creation
With up to 40 lanes of PCI Express 3.0 the X99 platform gives you the flexibility to plug in up to 4 discrete graphics cards to provide dramatically reduced editing time for RAW photos and HD video. Given that I have a spare GTX 970 now, I may add that into my build once I’m happy that everything is running in a stable setup.
Unlocked Processors
This means that the user can performance tune the processor and memory frequencies themselves, without having to run any other part of the system above specifications (and hence risking, for instance, heat damage from large voltages).
Peripherals
The X99 chipset has integrated USB 3.0 support and the Rapid Storage technology allows the full Serial ATA (SATA) interface to go up to speeds of 10 Gb/s in keeping with the next generation of fast solid state drives. There is also a Rapid Recover technology that helps users to recover their data and return their system to an operational state and a Dynamic Storage Accelerator which speeds up the performance of your SSDs by dynamically adjusting the system power management to give up to 15% performance boost.
Specific Asus X99 Deluxe u3.1 Benefits
On top of the X99 specification, Asus have built in a number of other benefits
- Easy-fit 10 Gb/s USB 3.1 type A card
- 3×3 (3T3R) 802.1 ac Wi-Fi, up to 1300 Mb/s
- Fan Extension Card
- Dual 32 Gb/s ultrafast M.2 x4 (onboard plus PCIE add-in card)
- 5-Way Optimization by Dual Intelligent Processors. One click overclock and cooling
- Crystal Sound II (a fine implementation of the Realtek ALC1150 8-Channel High-Definition Audio CODEC)
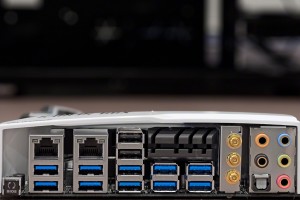
All the I/O You Will Ever Need..
Why Wi-Fi?
What on earth was I thinking when I specified Wi-Fi for a Desktop Computer that would never leave my office next to the superfast broadband router cable? Actually it was just an indulgence in the long term, but very necessary at the point I was doing the build. My office is far too small to build a new computer in and I couldn’t afford, at the point I did this build, to be without a computer. Wi-Fi lets you connect to the internet and get on with your install, until such time that you have a stable setup. I have known network cables to fail sometimes, usually when you haven’t got a spare one to hand and the shops are shut! If that ever happens, I’ll have a very useable setup using wireless.
The Build
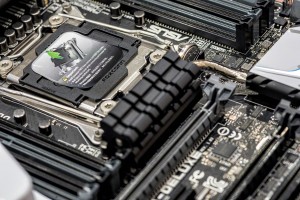
Install the Intel i7 5930 into the LGA2011-v3 Socket
The Connected Side of an i7 5930..
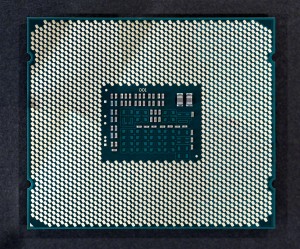
I haven’t tried to count the number of pins in an LGA2011-v3 socket, or the number of gold plated connectors on the back of the i7 5930, but there look to be, quite literally, hundreds. In fact, apparently, the clue is in the name, there are 2,011 contact pins in the socket. The Asus X99 Boards have extra pins to help them manage the overclocking functions, which, I suppose, must mean that there are more contact patches on the i7 Haswell-E Processors than there are in the standard v3 socket.
Ok, I admit it, my curiosity has been piqued. How many contact patches are there on my i7 5930? I did count them in the end after all. There were 2,092 including the 8 patches in the inner square, and excluding the triangular patch that tells you which way round the processor sits in the socket. How did I count them? I used Photoshop’s count feature (once I’d located the count tool which is not shown by default in CC 2015, presumably because hardly anyone uses this very useful feature much these days).
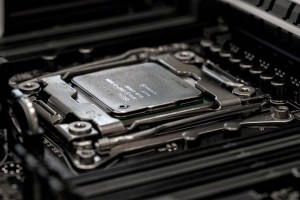
i7 5930 Processor in-situ..
To insert the processor you lift up the two retaining springs which allow the hinged cowling to swing up. You remove the plastic pin cover and then place the processor with the triangular marker aligned with the mark in the socket. Next you replace the cowl and the springs (which do require quite a strong force to replace).
Next simply admire to taste. The top of the processor looks just as cool as the contact face after all. You won’t get to see this again (hopefully) because soon we are going to have to install the heat-sink, which first requires you to place a dollop of thermal paste on top of the processor so that you don’t get a metal to metal contact with the heat-sink. Things have moved on since my last build, the heat-sink is no longer a small fan assembly atop the processor, but now a massive radiator with a fan the size of the extractor unit in my en-suite bathroom. No-seriously, it’s pretty much that large!! Or a water cooler of course. I used the Noctua NH-Ul4S Slim U-Series Single Tower CPU Cooler.
Fitting the Motherboard and Power Supply
When building a new PC, to fit the motherboard, you first screw in the mounting posts to the relevant pre-threaded holes in the casing assembly. Next, as mentioned above, you may wish to fit a few of the necessary cables to the more difficult to reach motherboard headers and SATA cable sockets.
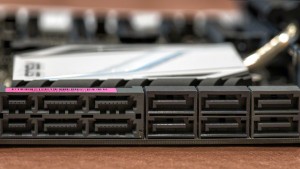
SATA and SATA Express Sockets..
Then you drop the motherboard into the case and fix carefully by screwing through the motherboard into the mounting posts that you previously secured. These fixings also serve to earth the board to the cabinet in several places.
Next comes the power supply. In this case a Corsair RM 1000W fully modular 80+ gold power supply. It’s worth investing in a high quality power supply because of the extra stability of the voltage supplied, and a decent wattage, particularly if you plan to have more than one graphic card, or to expand to the max. Generally the fan faces into the casing when fitted and vents waste heat out of the back of the unit.
Fitting the CPU Fan
Noctua are recognized as making the best fans, and many people swap out their case fans for Noctua ones. They are very quiet and provide a constant pressure. The radiator towers can be single or double thickness with one or two fans (push, versus push-pull). I have it on good authority that for the thin tower version adding a second fan makes very little difference to the CPU temperature (Linus Tech Tips).
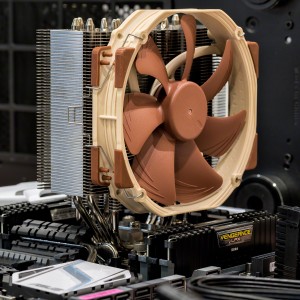
The Beast..
I’m using the Noctua NH-Ul4S Slim U-Series Single Tower CPU Cooler here, and even this seems massive compared with previous fans I have used. I’d be grateful for an extra fan this size in my en-suite bathroom! This fan gets great reviews for running silent, and for it’s cooling power, so it is ideal for a machine that will be overclocked. It may be that a water-cooler would be better still, but that seemed overkill for this application. Somehow it seems a bit risky to place a water system into a box of electrical components? I’m sure they must be durable and safe though.
The other advantage of this single-tower fan is that it allows easy access to the memory modules which can be easily fitted and removed without having to move the cooling assembly. The fan itself is held in place with easy to remove clips to further improve access. Of course there is another benefit to having a second fan on your cooler tower, which is to provide built in redundancy so that, should it fail, your precious overclocked system will have an extra margin of safety, but at the price of (purchasing an extra fan, obviously) a small amount of extra noise.
Fitting a CPU cooler requires a small blob of thermal compound, and this comes supplied with the Noctua NH-Ul4S Slim U-Series Single Tower CPU Cooler, along with all the other bits and bobs to fit it with.
Memory
In this build I’m using 32GB (4*8 GB) DDR4 Memory in the form of Corsair Vengeance LPX 2666 Mhz DDR4 which comes in at a great price point. It’s Quad Channel and Intel XMP certified. So what does that mean? Vengeance LPX memory is designed for high-performance overclocking. It uses an aluminium heat spreader for faster heat dissipation and it’s low profile design fits into most microATX and MiniITX systems.
Intel Extreme Memory Profile (XMP) allows you to overclock RAM including compatible DDR3 and DDR4 memory to perform beyond its standard specifications. This is designed to help enhance the gaming features built into other Intel technology.
Four channel? This just means that for any given amount of memory (32 GB in this case) you can have a kit that fits that memory into 4 memory card slots (or channels) on the motherboard in order to get the fastest throughput of data. The Asus X99 Deluxe U3.1 motherboard has two sets of 4 memory-bus slots for this purpose.
How does XMP work?
Predefined and tested Intel XMP profiles can be loaded via the BIOS, or a specific tuning application, through the computer’s operating system. Intel has developed a certification program for memory vendors to test their products for compatibility against the Intel Extreme memory Profile. Intel provide an Extreme Tuning Utility to help with the overclocking process. Asus motherboards come with the AI Suite 3 which serves the same purpose.
Fitting the Graphics Card
The ASUS GTX 970 Geforce Graphics Card slots into one of the 5 PCIe 3.0 slots, then gets power from the power supply. For building a new PC the Motherboard Manual guides you on which slots to use according to whether you want to use a single or multiple graphic cards, and a special linking cable is supplied to sync the cards together if multiple cards are used. Slot 1 or slot 3 would normally be used for a single card, and slots 1 and 3 for a dual card setup. Slot 4 is added for a triple card setup.
Fitting the Disk Drives
When building a new PC, this is fairly straightforward. I have a single M.2 memory module (Samsung Pro 500Gb M.2 SSD) and 3 hybrid drives(4TB Seagate Hybrid HDD) to fit. The M.2 SSD slots into the Motherboard, vertically, with a special bracket, and the 3 hybrid drives go into 3 of the 8 drive bays using the provided screws into the removable mounts. It’s best not to tighten these much as they pass through rubber grommets to provide a less rigid mount.
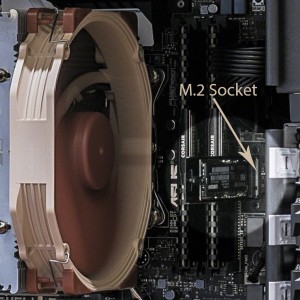
M.2 Slot with SSD Card in Place..
So why choose three 4TB spinners? I’ve been keeping my photos on two external 4TB USB drives recently, and JPEG backups of my favourite images on my Dropbox Pro Account. These drives, one for storage and the other for backup, are 60% full now, and have been quite slow with my D810 files in Lightroom. My old PC only had USB3.0 so, with the optimised USB 3.1 I was hoping for a marked increase in speed. I’m doing more and more photography with my D810, so I reasoned that it’s time to move my storage back to fast internal drives (one for storage and one for backup) for the new stuff. The third drive is for all my non-photography stuff and the backups for that are on yet more external drives. It’s not a perfect strategy, but it’s good enough for what I’m needing to do.
There’s good future proofing with the ASUS board. As SATA Express drives become available I can upgrade to those without shedding the drives I’ve got fitted at the moment, and the spare M.2 slot, via the PCIe card, means that as super-fast SSD storage comes down in price and the drive capacities rise, which they are bound to do, over the next year or two, I can consider adding a further SSD without prejudicing anything else. The future expandability looks very good indeed.
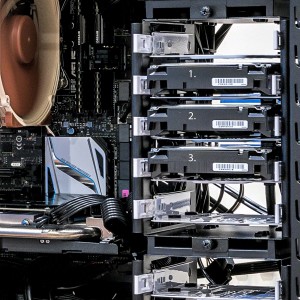
3 Spinners All in a Row..
Each hybrid drive needs power and a data connection into the SATA ports. These come in at the back, and space is a little tight, so you need to use an angled SATA cable to avoid any pressure being put on the connection when the side is replaced on the case.
According to Seagate, “SSHDs fuse the strength of SSD and HDD into one affordable and powerful device”. This gives you the combined reliability of both in the hybrid drive product. These drives have 4TB of hard disk storage and a very decent 8GB of fast integrated NAND Flash. Basically, the hybrid drive works out which files you are using frequently and uses the SSD to cache them without you having to do anything. As you are probably aware, SSDs have a limited write life, they hate being written to, but you can read from them as many times as you like. The main wear factor for a spinning disk (HDD) is starting them up and shutting them down, though reading and writing have small but equal wear overheads. The benefits of SSD are that they are resistant to fragmentation in the sense that it matters not where various pieces of file reside in terms of speed of access, whereas on a hard disk drive fragmentation is problematic and slows access times down dramatically. HDDs are better for storing large amounts of data, but access is much slower. So in terms of wear, caching data to the SSD cuts some wear and tear on the HDD. You can check out the detail of the technology here.
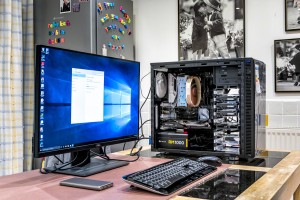
Testing..
This is where the rubber meets the road. Plugging in the monitor and the power supply and pressing the on button! No problem, it all worked.. Next install Windows 10, setup the wireless connection and update everything. Install the motherboard and graphics card drivers and then the hardest part of the build is installing all of the software and copying over all my data from the internal drive of the outgoing PC. Fortunately, with 8 drive bays, it was a simple matter to remove my data drive from my old PC and install it into the new one for a rapid copy and paste. Lots of my software is licensed however and needs to be deactivated from the old PC before it can be activated on the new build, but the Wi-Fi made this easier than it would have otherwise been because I could run both PCs at the same time.
Testing and Installing Windows 10
And herein started the real ordeal. I had several problems which involved corruption to vital windows files that were not that easy to fix, and, for stability sake, I ended up doing 2 complete installs before everything worked as it should. There is a bios update for the Asus board which will undoubtedly improve stability and I will flash the bios with the update once I’ve been running the new build for a few weeks and feel I really understand the stability issues.
Overall Impressions
I’m very pleased with the new build and I will certainly be keen on building a new PC in the future. Things I like about this build:
- It’s much quieter than the old one, so much so that the hum from my powered 50w Genius Multimedia Speaker System became very noticeable and distracting. It’s been necessary to research an alternative and in the end I went with a pair of Audioengine A5+ (powered) Speakers. These play very nicely with the Crystal Sound II on the Asus X99 Deluxe U3.1. It’s said that the Audioengine D1 24-Bit DAC/Headphone Amp can improve quality still further by circumventing the built-in Crystal Sound System, so I may look into that further at some point.
- The Dell UP2716D Monitor is a real step up with an excellent built-in profile straight from the box. It’s sharp and clear with excellent colour and a decent fit for my desk. Much less tiring for my eyes.
- USB 3.1 is noticeably faster on my external WD 4TB drives, making Lightroom much more useable even on my huge back-catalogue of photographs.
- I’m loving the increased performance of Lightroom and Photoshop CC 2015, including my plugins, all in all it’s much more useable now.
- I have learned lots about the up-to-date technology in general and building a new PC in particular. Next time I might go with a transparent case and multi-coloured lighting plus a CPU water-cooler!!
Problems
There have only been minor issues so far. Windows 10 didn’t want to recognize my old HP LaserJet P2200. I’m not sure what the problem was at its core, but it was resolved by switching the USB lead into a USB 2.0 port instead of a 3.0.
Until next time,
R.
Recent Comments