
Mar
26
Photographing Garden Birds in the Snow
This weekend was a busy weekend with several major commitments. I have to edit our local Parish News magazine and my daughter has a choir performance. Then there is the snow! What a fantastic opportunity to get some interesting new shots of the garden birds in a snowy setting. But here’s the rub, I’ve got so little time and the weather will probably be gone in time for my return to work. Photographing garden birds in the snow is tough but here is a tip. Shooting from the house can pay dividends and may impact on quality less than you think. It certainly allows you to keep dry and warm.
Does Shooting Through Double Glazing Have to Ruin your Images?
Shooting through your double glazed domestic window does present certain problems. It helps if they are reasonably clean, and you will have to accept a small loss of contrast and sharpness as a result of adding an extra barrier between yourself and your subject, but these effects may be less than you think if you take steps to make sure that contrast is not further reduced by shooting through reflections in the window before you. I have also found that, I suppose intuitively this would be true, that the sharper the lens I am using the better the result through the window.
Reducing Reflections

Room Setup
The traditional approach, for instance at a zoo, is to get your lens as close to the window as possible, to eliminate any light hitting the surface in front of the lens. This is pretty much your only recourse if you are shooting from outside in, but shooting from inside out increases your options. Clearly, you don’t want to have your lens touching the window when shooting garden birds for a couple of reasons. Firstly you will be presenting a man like image close to your subject that will frighten them and secondly you won’t be able to adjust position when your subject moves.

The Garden Outside
For my shots I discovered that I couldn’t focus on the nearest perch (my beloved antlers – thank you Jo!!) as it was too close (there is a way round this, see later) to the window anyway, so I needed to retreat into the room, way back from the window. I still had a good view, but there was more glass in front of me to reflect objects in the room. This had the added advantage of reducing my presence in the window. In fact, hiding behind my camera and the piano at the window (see production shot above) meant that I had frequent visitors to the perches. There were some reflections from objects in the room (my daughter’s playroom), but these were quite easily countered by turning off the lights in the room.
Our house has glass doors to capitalize on borrowed light, so I was getting an annoying reflection from the front door which also has glass panelling. Drawing the curtains over the front door removed these completely. In a way, you want your windows to be reflecting black, so another tip is cover up any highlights in the room you are shooting in with black sheets, either of paper, or perhaps a black panel reflector or two if you have them lying around. The ideal scenario would be a black painted room with no contents, though this is unlikely to find favour with the spouse or partner.
Finally it is best if the window that you are shooting through doesn’t have direct sunlight shining onto it as this reduces your chances of getting the light levels in your room down to a reasonable level, and causes reflections and flare on the window itself. It’s not so easy to fit a lens hood to a window frame!!
The Setup
For photographing garden birds in the snow I used the following setup. I had my D4 on a Gitzo Carbon Fibre Tripod (though any would have done), with a Wimberley Gimbal head Mk II, and a 600mm f4 Nikkor lens, though I could have used something like a 70-200mm f2.8 with a 2x teleconvertor. This would have had the advantage of a close focus point so I wouldn’t have had to be so far back in the room. On the question of how to make the 600mm nearest focus point closer to the front of the lens, the solution is simply to add an extension ring between the lens and the camera body. You will lose a small amount of light, and you may lose infinity focus, but this doesn’t really matter in a situation like this where nothing is too far away.
Gallery
Cheers,
R.
Mar
09
Shooting Garden Birds
Field Craft / Garden Birds / Nature / Photography / Photoshop / Slideshow Posted by Robin
/
0 comments
Frosty Mornings are so Cold

The Hide and Feeders
On a frosty Sunday morning in March (the 3rd 2013 to be precise) I had the urge to pop up my hide and go shooting garden birds. We do have feeders in our garden, to which we have a steady stream of Goldfinch visiting along with a variety of Tits (Blue, Great and this month Long-Tailed), but I had shot these before and was keen to try a different position in the garden. Our garden is L-shaped so there are a few different angles from which to shoot, and I have not yet tried them all. So the day before I visited one of our local garden centres and purchased some fresh feeders on sticks and placed them round the corner so as not to disturb the current visitors to our existing feeders. This turned out to be a very helpful strategy for reasons I did not yet fully appreciate. I did not particularly want to shoot Goldfinch, but rather a selection of other garden birds, but I expected them to make an appearance (ie the Goldfinch) round the corner if I put out more Niger seeds. You can probably see the three feeders on the right hand side, beyond the hide in the picture above. The feeders are stocked with, from left to right, high energy bird feed, peanuts and Niger seeds. You may also be able to see, by zooming in, that there are 3 perches attached to the poles underneath the feeders. Obviously the plan is to have the birds land on the organic looking perches for some of the shots. I can’t stand birds on feeder shots actually – but nevertheless everyone takes a few whilst your waiting for better shots on the perches – unless you are exceptionally disciplined.

A Gnarly Perch
Here is a close-up of one of the gnarly sticks used as a perch for shooting garden birds. Usually you need about 10m or so beyond the focus point in order to blur the background. For this reason, I positioned the perches so that, by shooting from the hide level, I would be taking in a background beyond the fence (mostly). It was a dull and overcast day, so the background was either distant tree foliage or dull sky. As it happened, towards midday the sun came out and I was treated to lovely blue skies as well. The day was bitter cold, so I set up with plenty of layers and my trusty flask of coffee in the hide and waited, and waited some more. The joy of shooting overcomes the feeling cold, but I was shivering for hours afterwards. Make sure you eat regularly to keep the cold out.
Happily there started to arrive a series to blue and great tits, mostly to the high energy feeder and the peanuts. Sadly, not one alighted on my special perches. Actually there is a bit to know about perch diameter. It is essential that the perches are not too wide as this hurts the bird’s foot musculature and they don’t stay on them very long. Moose Peterson says that being uncomfortable in this way also affects the bird’s eyes in an unhelpful way. So titrate the diameter of your perch to the size of your intended bird’s feet!! I wasn’t sure what to do. Was it just a matter of waiting (a very long time, as opposed to just a long one) or was there something that I could do to improve my odds?
Field Craft for Shooting Garden Birds
So here’s what I did. I took down the peanut feeder. It was getting a lot of traffic, but not so much the Niger seeds, and actually the peanut feeder had the least visually appealing perch. I also put an assortment of peanuts, meal worm and high energy feed on the top of the fence in the distance to see if I could encourage some birds onto that. Et Viola, a Great Tit landed on my gnarly perch. Boom he was gone. It was so unexpected I wasn’t ready and missed the shot. And then, something even more unexpected. Siskin. And at least 3 males. All loving the Niger seeds, greedily feeding on the built-in perches for minutes on end. Bright yellow and gorgeous. Visiting only from mid-March to mid-May, and completely unnoticed in the garden so far. Still no gnarly stick action though. But in-between plenty of birds on the fence in the distance, and still within reach of the 840mm combination of Nikkor 600mm plus 1.4x teleconvertor. These interventions did make a difference to my hit-rate on the organic perches, but even so these shots were few and far between. I could have put suet on the back of the thicker sticks, but I am loath to do this in case it shows up in the photograph.

Close-up of the Hide
So, what about the Hide? The hide is an F1 Fold Out Hide from Wildlife Watching Supplies. This is a cube shaped hunting style Hide with a built-in metal frame. It folds down to a small case that has two straps for easy carrying by hand, or on your shoulder, or back. It comes with pegs and guy ropes (although you usually don’t need to use the guy ropes). For shooting garden birds it really is very easy to put up, but if you are on your own it is necessary to peg the base out in order to pull up the roof frame. The hide is very well made and has viewing “windows” at the front and at the sides in addition to the rear. Each window has a cover attached by toggles (like an old duffel coat) and velcro’d on scrim netting. The inside is matt black coloured so provided you are wearing dull coloured clothes the animals don’t know that you are there. Clearly from this photograph you can see that the Hide cannot be said to be inconspicuous in my back garden, yet I am constantly amazed at how close birds, squirrels etc will approach. Sometimes too close for the 600mm to focus on!! I purchased my Hide with a handy portable chair (the C25 Fold-Out Chair). It has a handy shoulder strap, and a fabric pocket beneath the seat. The only down side is that there is no ground sheet, though I haven’t really found that one is essential.
The Photography
There was quite a range of lighting between the various places that the birds were landing so, at least until the sun came out, I was forced to select a pretty high ISO to keep the shutter speeds up to a reasonable level. I find that I can reliably shoot at a 160th with the 840mm set up on a tripod with gimbal head, and can get away with a 125th of a second on a good day. This meant sometimes rising to ISO 2500. When shooting garden birds that are fast-moving, I find it difficult to change the ISO at a moment’s notice, so this is something I tend to do in-between shots. I live in hope that practise will eventually make perfect for this issue. It’s certainly easier to change ISO with your eye to the viewfinder on the professional bodies like the D4. It’s strange, but I can adjust aperture and exposure compensation whilst juggling back focus and firing but really struggle with the left hand adjustment of ISO, which means I slightly lose control of the camera bracing and positioning is critical for rapid shooting within frame. But setting a high ISO in advance does let me increase depth of field for the brighter perches by stopping down, which I can do very quickly. Once the sun came out I was able to get down to ISO 200 for some of the shots again. Usually I shoot wide open at f4 or f5.6 with the 1.4x teleconvertor, but I have found it beneficial to stop down to f8 or f11 respectively to get slightly more feather and beak in focus, particularly when the bird is face-on.
The Photoshop
There isn’t a great deal to say about this. The images were prepared in Lightroom 4 and finished in CS6. All that was required was some mid-tone contrast adjustment via the ever amazing Color Efex Pro 4, and some sharpening using my usual sharpening actions in a 3-pass routine with additional local creative sharpening where required and sharpening for screen to finish. I must discuss sharpening as an issue in-depth some time.
Glad to be back in the warm,
Until next time,
Robin.
Feb
28
The Machinery for Drop Collision Photography

Splash Art Kit Mk II
First off, I was alerted to this new drop-image possibility by a review in Amateur Photographer (January 26th edition). The kit in question is the SplashArt Kit Mark II, manufactured by High Speed photography Ltd, 31 Roebuck Lane, Buckhurst Hill, Essex IG9 5QN. Their website is www.phototrigger.co.uk. Tel: 07905 836280. My pal Geoff was similarly taken and, without further ado, purchased said item and brought it round for a test shoot for which I supplied the set and the lighting.
There are 4 dials on the control box, with line markers but no scale markings or labeling, so it all seems like guesswork to start with. From left to right (and top to bottom) the dials control; the size of the first drop, the time delay between drops, the size of the second drop and the camera delay adjustment. There is a small micro-switch that controls the mode (1 drop, 2 drops or 3) and is responsible for firing off a round of drops and triggering your camera. As others before me have said, the apparatus is reminiscent of the retort stands we used to have in school chemistry lessons with an additional gizmo attachment at the end. The drop container looks like a small sandwich box of the type popular in supermarkets now, though this does not impede its functionality. Un-clipping the top to add colourants to the drop mixture will move the retort stand however, so you will need to refocus if you do.
For lighting the drop collision photography I used 2-3 SB900 strobes set to 1/128 power fired through a translucent (clear) plastic A4 ring binder cover (with the ring binder removed) to backlight the drops. I would have liked to use a translucent plastic sheet similar to those used on light-boxes or x-ray viewers, but I did not have time to source this for our shoot. I angled both strobes at 45 degrees, to begin with, both at the same height. I quickly realized that a diagonal spread of light would be better so moved one of the lights onto a light stand.
The Technique

Setting up the Focus Point
In order to start our drop collision photography, we set the SplashArt kit to 1 drop mode to find the focusing point. First time out I used the knife-edge method, but I have now found a better way. I used the dual threaded spigot that comes with my flash brackets. It has a thread each end and is shaped like a small metal reel. It is reversible so that it can be attached to two sizes of thread and then acts as the spigot that you clamp your bracket onto in the same way that you would use the top of a formal light-stand. I placed this in the drip tray and fired off a series of drops adjusting the position each time until the drops fell inside the small threaded end. This works much better because you don’t need a second person to hold it still whilst you focus and can get a more accurate result. When using a macro lens it is quite difficult to get the whole splash in focus, and this way you know where the front and back of the drip will fall, so you can focus on the front edge, back edge or in between according to what you prefer to be most sharp. As you can see, this drop was slightly to the right of the threaded hole at this point (greater splash to the right). It was also a 2 drop scenario because we hadn’t yet switched the SplashArt kit to single drop mode. You will notice that the drop is red colored. We didn’t start off this way, we began with clear water in the tray and the dropper, but this shot from later on in the shoot was necessary to reposition the camera focus following moving the drip container in the process of putting pink food colouring into the top and stirring it.
The next logical step was get a feel for where the drops fell in the two drop mode and how much camera delay would be required to get a pit, crown, or a pole.

Pit

Crown

Pole
Once this is done, the next step is to control the spacing between drops so that there is a collision. The size of the drops that collide seems important and I think that similar settings on the dials for the first and second drops (first and third dials) helped me get a satisfactory result with the SplashArt Kit. The sign that you are approaching the correct timing between the drops is when you start to see some action at the tip of the pole, for example:

Finding the Collision Point

Repeatability
Once this point is reached a smaller further closing of the gap between drops may be necessary, and thereafter just plenty of trials, until you get some attractive results. All the shots you see here in the slide show were made first time out with the SplashArt Kit Mark II. One session of 4 hours or so got us all these shots (minus a coffee and brief lunch break of course). There is a lot of variability between shots. I don’t know whether this is because the timer cannot perfectly control the drip valve, or whether there are timing issues with the flash. My SB900 strobes, as usual, were fired using my trusty Flex Mini TT1 with AC3 controller and TT5 trigger combination. This gives on-camera control of the distant flash which makes for less walking round the studio (kitchen) and speeds things up a little. I suspect that there is no particular issue with the flash timings (but can’t completely rule it out) as at no point do I see a double drop image which means that both flashes trigger at the same time. Not bad when the flash duration is 1/38500 of a second!!
More on the Lighting
As you can see from the slide show, and the production images, I have used a selection of coloured gels on the strobes along with changing up the position of the strobes relative to the translucent plastic background. I must admit that my selection of gels is a bit limited, but the combinations were:
- White on White
- CTO (orange) on White
- CTO on Blue
- CTO on Red
I have also got green gels (to colour match for flourescent lights) which might also have looked good but I didn’t think to try. Needless to say there are a couple of approaches to white balance settings in this situation. You can use tungsten or cloudy settings for, instance, to produce a uniform rich yellow or blue colour. Alternatively, as I did here, you can use the preset flash white balance to produce an overal neutral result but then gel the flashes to produce the colours. This is my preferred approach because, although it requires multiple strobes, you do get greater flexibility.
It would be possible to set up a single coloured, or patterned multicoloured (perhaps printed out on a home inkjet printer), background, and reverse light that to get similar results to the multi-strobe effect.
For water drop collision images you do really need to backlight. For milk images you can front light, and for the closeups you see in the slide show this was really necessary to counter some of the shadows produced by side lighting. In fact I ended up using three strobes. A single backlight and two front lights. The front lights were camera right at 45 degrees and camera left at 45 degrees but much higher up to light into the extensive crowns. We might have been ok with a single front strobe placed centrally and above the camera in order to throw the shadows behind the splash.
More on the Fluids
Since my first attempt at drop collision photography, I have been reading Corrie White’s Comprehensive Water Drop Photography Guide. You will find a lot more detail on what you might do to water to thicken it, and some further tips on lighting milk etc. What I have realized is that it is easier to get spectacular crowns, and some really interesting graphic shapes, using the thicker substrate of milk, than it is with water. In fact, as Corrie points out, there are some things that you just can’t do with water alone. Clearly thickening water with sugar or guar gum also has side-effects to the look of the resulting solutions, so sticking with plain water is probably best. Nevertheless the old school physics fact that water is densest at 4 degrees centigrade is worth knowing and using here. So next time I will definitely try using very cold water and placing some ice cubes in the drip dispenser and into the drip tray.
Colourings
We only had red food colouring at our disposal this time out. Clearly there are many others that you could purchase fairly cheaply. I have heard that some people use printer inks, but this may be quite expensive. Red looks great in contrast to the white milk. One tip for the milk shots using coloured drops, you need to stir the drip tray in between trials to whiten up the milk again. You could also put colouring into the drip tray and experiment with the two colours mixing together in the drip stem. I really do think that you are limited only by your creativity.
Things to Try
- I really fancy having a go at splashes inside bubbles. Wow. Can’t wait.
- Splashes where the drip container is a crystal glass, or similar, and can be seen in the shot.
- Odd looking colour combinations.
- Several splashes composited into the same shot.
Until next time,
Robin.

Dec
31
The Merlin (Falco columbarius) is a small species of falcon from the Northern Hemisphere. A bird of prey once known colloquially as a pigeon hawk in North America. The Merlin is 24–33 cm (9.4–13 in) long with a 50–67 cm (20–26 in) wingspan. Compared to other small falcons, it is more robust and heavily built. Males average at about 165 g (5.8 oz) and females are typically about 230 g (8.1 oz).
Dimorphism is common among raptors; it allows males and females to hunt different prey animals and decreases the territory size needed to feed a mated pair. The male Merlin has a blue-grey back, ranging from almost black to silver-grey in different subspecies. Its underparts are buff- to orange-tinted and more or less heavily streaked with black to reddish brown. The female and immature are brownish-grey to dark brown above, and whitish buff spotted with brown below.
Dec
31
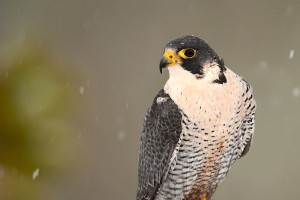
Peregrine Falcon (Falcon peregrinus)
This fine Peregrine falcon was photographed at Aviemore at the beginning of 2011. Falco peregrinus, sometimes also called the Duck hawk, is renowned for its speed and can reach 325 km/h (200 mph). Peregrines can be found nearly everywhere on Earth, except extreme polar regions, very high mountains, and most tropical rainforests. Its diet consists almost exclusively of medium-sized birds, the Peregrine will occasionally hunt small mammals, small reptiles, or even insects. Reaching sexual maturity at one year, it mates for life and nests in a scrape, normally on cliff edges or, in recent times, on tall human-made structures. The Peregrine Falcon became an endangered species in many areas because of pesticides, especially DDT. Since the ban on DDT from the early 1970s, populations have recovered, supported by large-scale protection of nesting places and releases to the wild.
Dec
30
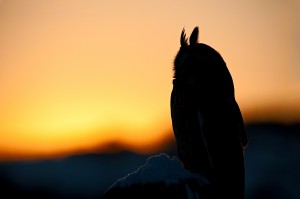
Back in January 2010 I was out on an organized trip to get images of birds of prey in the winter landscape. We had a lovely clear day and plenty of snow for our trouble although I ended up going on my own as my colleague had dropped out at the last minute for fear of injury interfering with a forthcoming holiday to Australia.
The Long-eared Owl (Asio otus) is a species of owl which breeds in Europe, Asia, and North America. This species is a part of the larger grouping of owls known as typical owls, family Strigidae, which contains most species of owl. The other grouping of owls are the barn owls, family Tytonidae. This nocturnal species is perhaps most easily seen perched in a tree in its daytime roost, sometimes in small groups during the winter months.
Dec
30
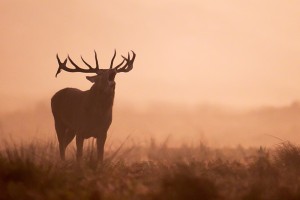
There had been no mist pre-dawn at Bradgate park for several weeks so I was lucky to bag this shot during the October rut. During our visit we had several days of glorious sunshine and plenty of opportunities to view the deer in moments of intimacy and aggression.
Dec
30

On one of the early morning forays into Bradgate park last October (2011) we were waiting for a lone, and inconsiderate, photographer to move out of the way so that the deer could move into the beautiful early morning light and mist. Eventually he did come and join us but in the meantime I was able to get this spectacular silhouette of this grand old tree. My wife’s first reaction was, you’ve ‘photoshopped’ that in!! Not so, it was the real thing.
Dec
30
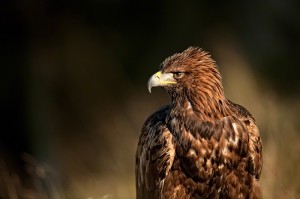
Golden Eagle (Aquila chrysaetos)
This October (2011), Loughborough proved an excellent location to meet with like-minded photographers to document the rut at Bradgate Park and to shoot some birds of prey nearby. We stayed at the Horseshoe Cottage farm, an excellent warm and homely experience, in a recently restored 200 year old stone farmhouse and barns in Leicestershire’s beautiful Carnwood Forest. We arose at 5.50am to catch the sunrise and worked through the day, breaking only for food, to catch the sunset. The deer were in fabulous form and we caught a number of stags rutting nearby.
Recent Comments