
Apr
13
The World in a Droplet
Focus Stacking / Macro / Photography / Photoshop / Retouching / Water Droplets Posted by Robin
/
0 comments
The World in a Droplet
Macro Photography can be a Challenge
The Basic Premise
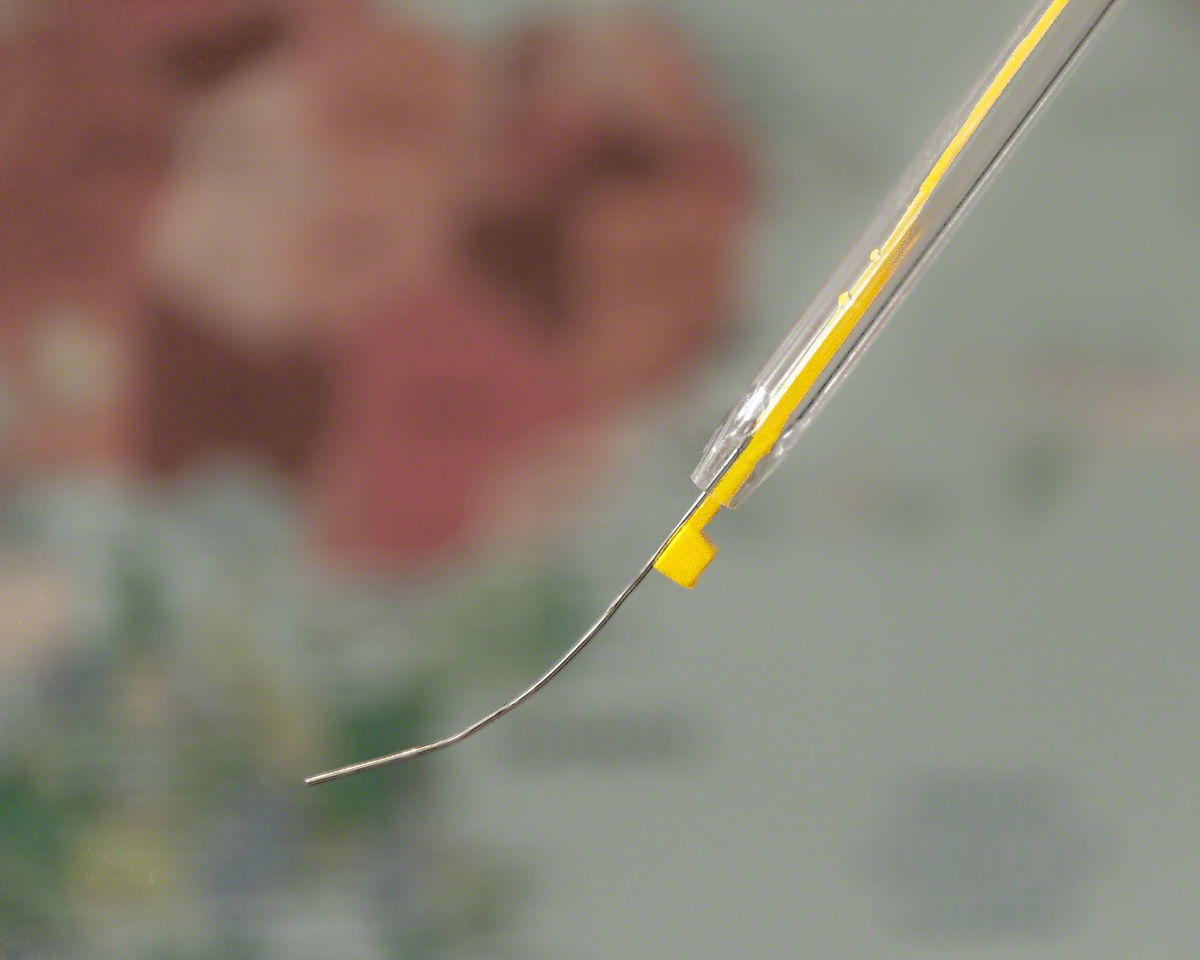
My inspiration for the world in a droplet idea came as a result of seeing an image of a drop of water on a hypodermic needle on the web. You could see a thin reflection on the base of the droplet, which was very small in the frame, but you couldn’t see what it was. I had the idea that I could have the reflection of a world atlas in the droplet and, of course, larger in the frame.
Testing the Theory
Although I was confident that I could pull this off, I knew it might be difficult. I thought I could get the magnification, but I wasn’t sure about the rest. How to get a drop on a wire (I don’t have a hypodermic needle), how to get the map reflected and what about the necessary depth of field. A pilot project seemed the thing to test the theory. I didn’t take any production shots of this, so you will have to use your imagination.
Daylight seemed perfect, so I set up on the surface by the kitchen window. I took my floor stand (a light stand) and, using electrician’s tape, fixed a cardboard tube from a roll of aluminium basting foil leftover from the Christmas turkey. To this I taped an empty Bic biro carcass with a blue paperclip wedged into the end, and bent it into a sort of hook shape. Using a second biro carcass, I poured water into the open end until I got a droplet on the end of the paperclip hook. Actually, I didn’t realize how lucky I was to get this to happen quickly because it proved a nightmare to reproduce when I did the final world in a droplet image.
Equipment wise, I used my old D300 Nikon as it would give more magnification than a full frame (the droplet was only 1.5-2 mm wide). I fitted an old 75-300 mm Nikkor lens, and using a set of reversing rings, fixed an old 50 mm f1.8 Nikkor to the end. I quickly found that I had more reach than I really needed so zoomed the 70-300 to a wider setting, and took my shot.
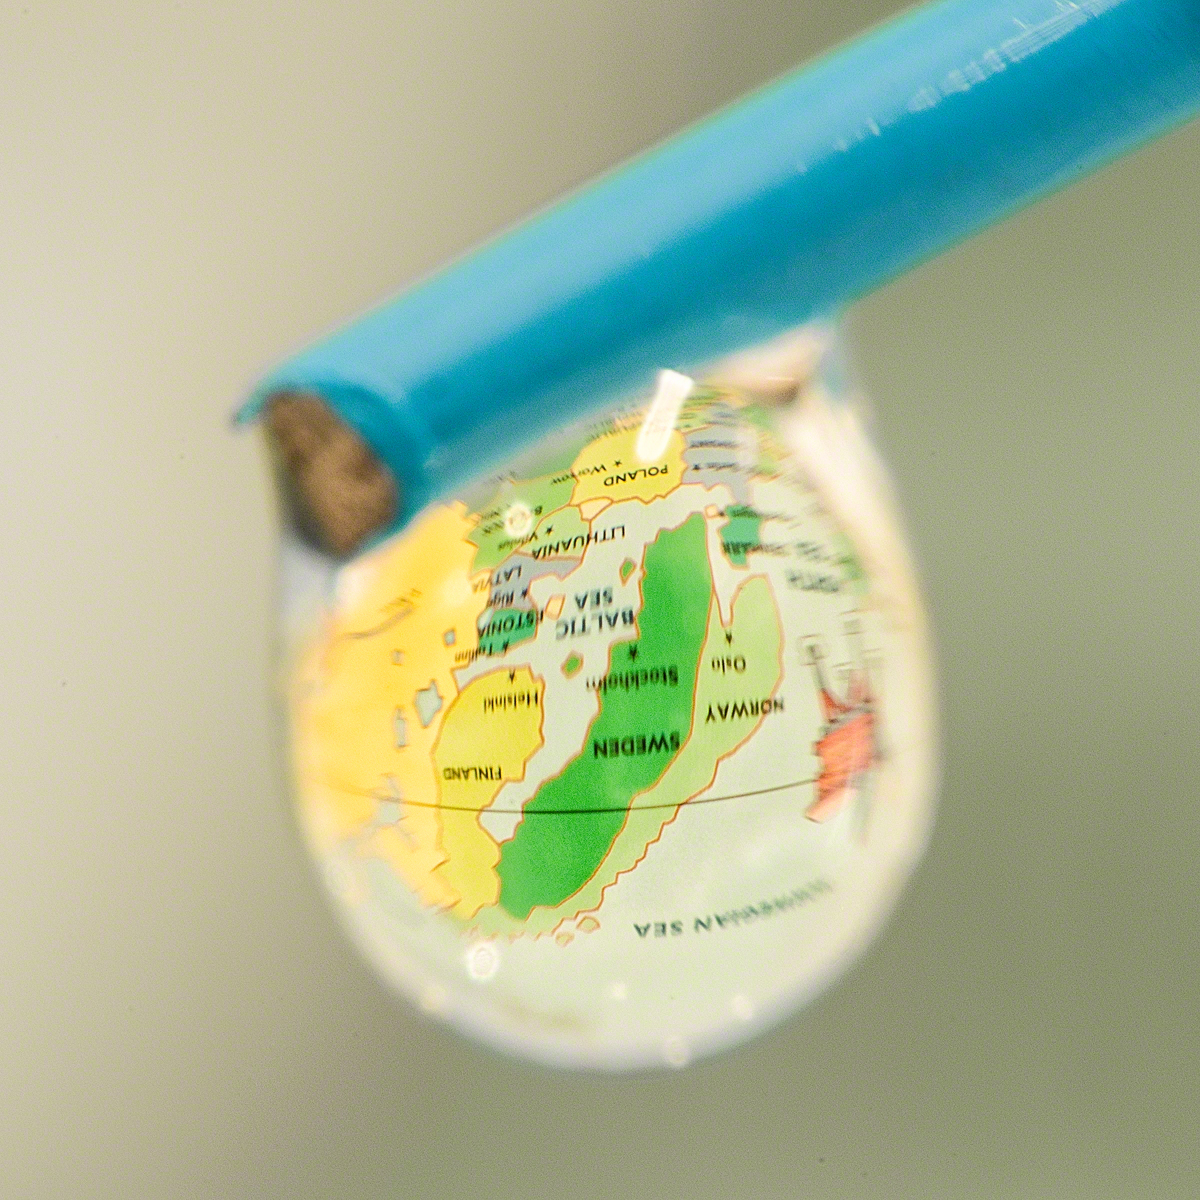
First Stab..
So what did I learn? Firstly, I’d have been better off setting up somewhere other than the backlit kitchen window, because I was getting a lot of flare and unwanted reflections in the droplet and had to shutter out the window. Secondly, focusing is really difficult because there is so little depth of field. If you move the tripod it can take an age to even locate the droplet again, never mind focus on it. You aren’t able to clearly see the text on the map when you focus on the droplet, so it is very hard to get it sharp (at least with my eyes). Partly because you can’t define the letters, partly because it’s hard to make fine enough adjustments to the focus (more on this below).
Secondly, the map image appears to be on the rear surface of the water droplet, so you have to focus there to get the map sharp. This means you can’t see sharp edges on the droplet itself, and the paper clip is not properly in focus. In fact the paperclip would have been better parallel to the plane of focus to avoid so many depth issues. When I do this for real, I will have to use focus stacking.
Thirdly, the map was upside down in the droplet (of course you idiot!!), so that needs turning upside down before you start.
Doing it for Real
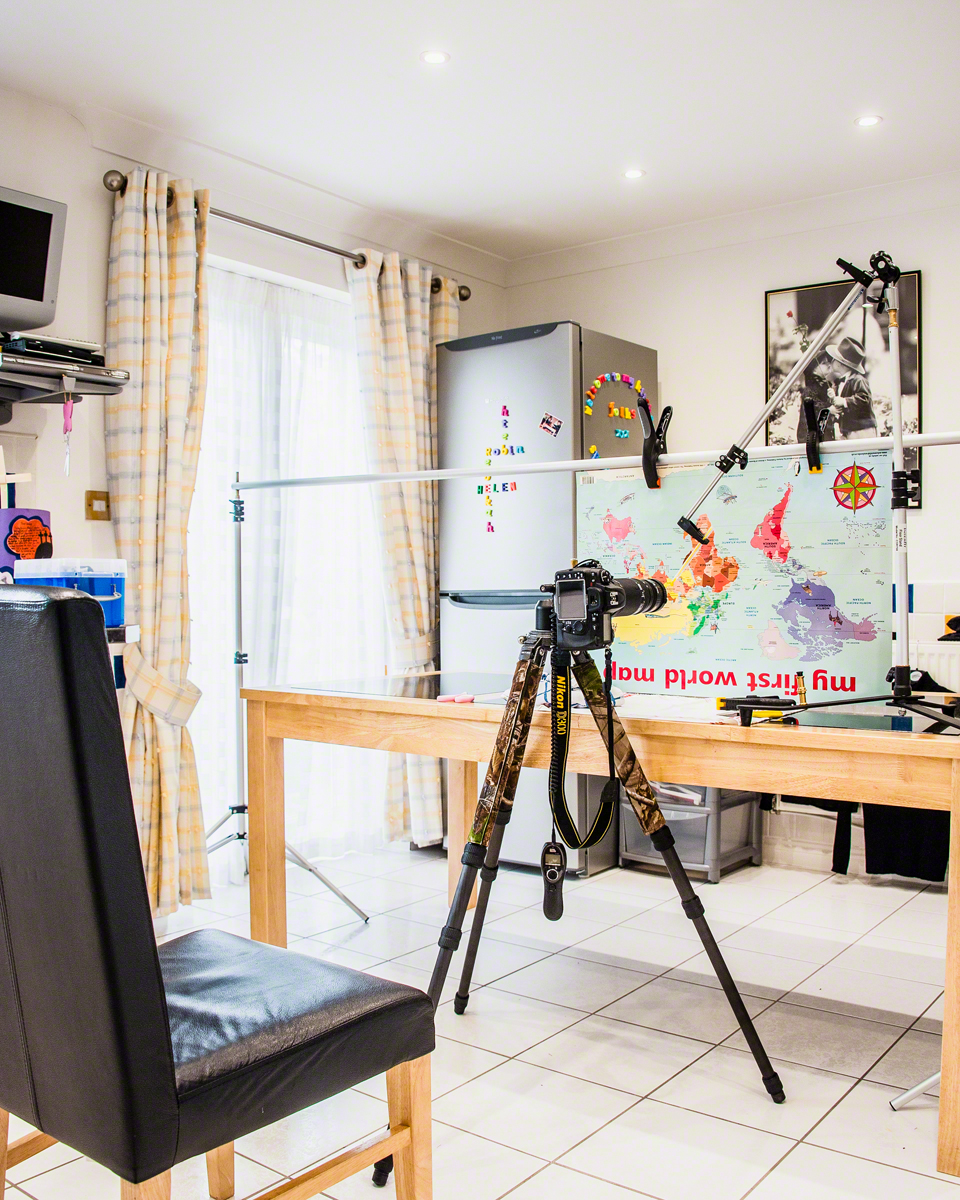
Household chores notwithstanding, it was a few days before I got to try this again. Time to approach things more professionally and turn the house upside down in the process! Clearly this is best when your wife is out for a few hours. I wanted a more adjustable setup as I’d had real problems changing the position of the map first time round. I wanted to be able to adjust the field of view in the droplet, so that meant adjusting the position for and aft, as well as from side to side. Secondly, I wanted to be able to position the wire with the drop on it a little more precisely (there was no adjustment on the cardboard tube setup) too. Finally I wanted the droplet to be side lit to avoid flare.
Getting the Droplet on the Paper Clip
This was the hardest part of the shoot bar none! After much trial and error I came up with the setup shown. I was able to use an old Lastolite reflector holder on my floor lighting stand as shown. This worked out fabulously because the spring grip made the perfect holder for the biro, which could then be slid backwards and forwards for perfect positioning in the frame. My only regret was it took a couple of hours, and a roll of electician’s tape, for me to realize I could do this!!

Getting the droplet on the paperclip proved difficult, but here are a few tips. The angle of the biro carcass needs to be quite steep so that water runs out of the end quite quickly. This makes it more likely to run around the curve of the paperclip, and consequently to leave droplets. Too slow and it just drops out of the end of the tube (counter-intuitive to be sure). Don’t forget to place a cloth underneath to catch the drops! The attachment system for the clip that worked best, and I tried many, was to have a cable tie underneath the clip as shown below. The cable tie slows the water down and ensures that it is running over the paperclip.
The Photography, Getting in Close
Firstly, don’t forget to turn the map upside down if you haven’t already. Given the size of the droplet (approximately 2 mm) you need considerable magnification to fill the frame. My solution was to use a reversed 50 mm lens on the end of a longer lens. The longer the second lens, the greater the magnification. I used an old 75-300 f4.5-5.6 Nikkor from my film camera days. You will need a reversing ring to join them together, and I purchased mine (52 mm to 62 mm) from a UK company, SRB Photographic (formerly SRB-Griturn) that make and sell a wide variety of these specialist items.
Both lenses were focused at infinity, and the 50 mm aperture was set to f1.8. I’m not certain that a wide open aperture leads to the best quality/depth of field, but that will be an experiment for another day. The 75-300 zoom was set to f32 and I used the zoom control to finesse the magnification.
To focus, I moved the camera / lens setup back and forth on a Manfrotto 454 Micropositioning Sliding Plate. You can just see the lock screw poking out above the D300 on the tripod in the picture above. It can be surprisingly difficult to find an image at this magnification so be patient!
It goes without saying that to avoid camera shake you should use a remote release and mirror lock up.
Watch-Out!! Don’t Damage the Lens…
The rear element of the 50 mm Nikkor is flush with the back of the lens which is problematic. It is very easy to flick the paperclip onto it, and there is a risk of scratching the lens or getting water into the electronics. Even though this was a very old lens, I didn’t want to damage it, so after a few near misses I decided to use my smallest Kenko auto-extension tube as a lens hood for the back of the lens. I used the shortest one in order to minimize the risk of extra vignetting.
Focus Stacking
Depth of field at this magnification is very narrow and both the map, the paperclip and the edge of the droplet need to be sharp in the final image, so take separate images at each depth. The front of the droplet is unnecessary as it would obscure the view of the map. Using the 454 it was possible to get the 3 images required for the blend.
Post Processing
The images for the focus stack will be pin registered if you haven’t moved the tripod, so they can be loaded as layers into Photoshop without issue from Lightroom (or whichever way you choose). Any adjustments in Lightroom or Camera Raw should be made to each of the images before stacking them. In Photoshop, the sharp paperclip and map images can then be blended into the final image using layer masks. Here I took the opportunity to desaturate the background (i.e. the full sized map) a little to make the map inside the droplet all the more prominent. After that, some sharpening using your preferred method or plug-in finalizes the image.
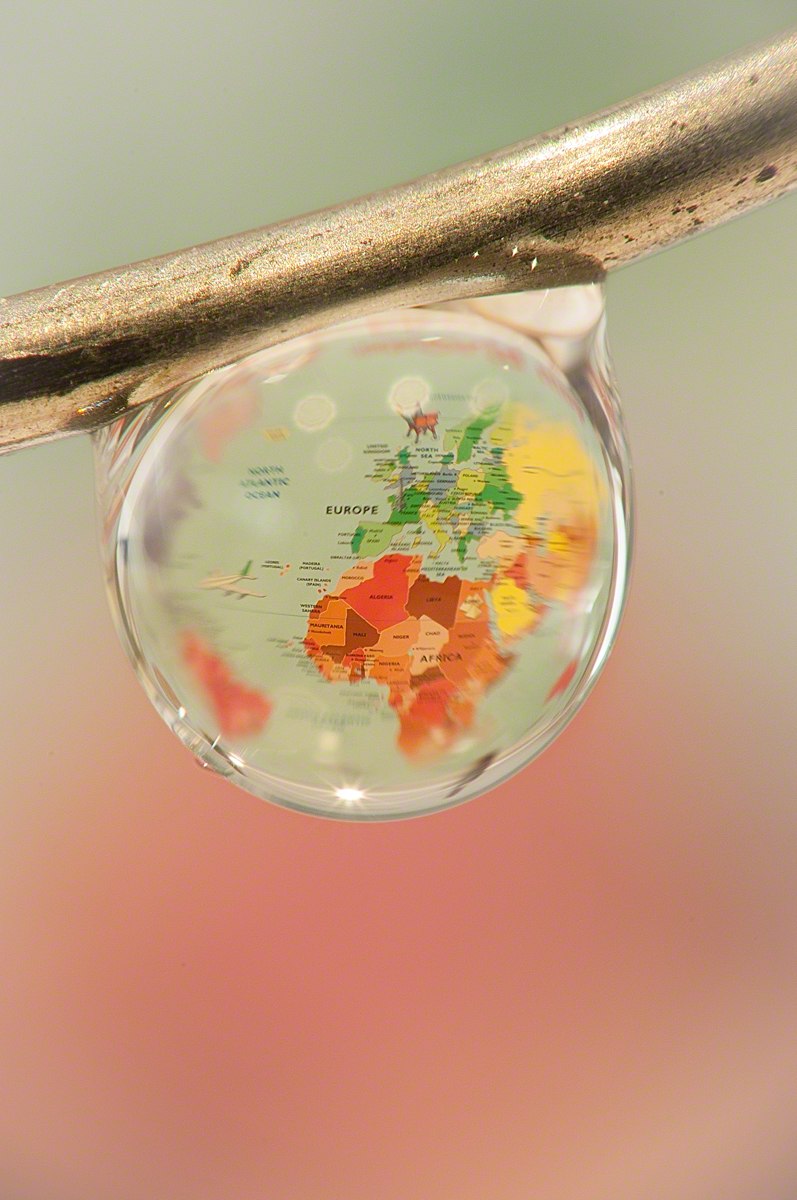
The World in a Droplet!
Cheers, R.
Feb
28
The Machinery for Drop Collision Photography

Splash Art Kit Mk II
First off, I was alerted to this new drop-image possibility by a review in Amateur Photographer (January 26th edition). The kit in question is the SplashArt Kit Mark II, manufactured by High Speed photography Ltd, 31 Roebuck Lane, Buckhurst Hill, Essex IG9 5QN. Their website is www.phototrigger.co.uk. Tel: 07905 836280. My pal Geoff was similarly taken and, without further ado, purchased said item and brought it round for a test shoot for which I supplied the set and the lighting.
There are 4 dials on the control box, with line markers but no scale markings or labeling, so it all seems like guesswork to start with. From left to right (and top to bottom) the dials control; the size of the first drop, the time delay between drops, the size of the second drop and the camera delay adjustment. There is a small micro-switch that controls the mode (1 drop, 2 drops or 3) and is responsible for firing off a round of drops and triggering your camera. As others before me have said, the apparatus is reminiscent of the retort stands we used to have in school chemistry lessons with an additional gizmo attachment at the end. The drop container looks like a small sandwich box of the type popular in supermarkets now, though this does not impede its functionality. Un-clipping the top to add colourants to the drop mixture will move the retort stand however, so you will need to refocus if you do.
For lighting the drop collision photography I used 2-3 SB900 strobes set to 1/128 power fired through a translucent (clear) plastic A4 ring binder cover (with the ring binder removed) to backlight the drops. I would have liked to use a translucent plastic sheet similar to those used on light-boxes or x-ray viewers, but I did not have time to source this for our shoot. I angled both strobes at 45 degrees, to begin with, both at the same height. I quickly realized that a diagonal spread of light would be better so moved one of the lights onto a light stand.
The Technique

Setting up the Focus Point
In order to start our drop collision photography, we set the SplashArt kit to 1 drop mode to find the focusing point. First time out I used the knife-edge method, but I have now found a better way. I used the dual threaded spigot that comes with my flash brackets. It has a thread each end and is shaped like a small metal reel. It is reversible so that it can be attached to two sizes of thread and then acts as the spigot that you clamp your bracket onto in the same way that you would use the top of a formal light-stand. I placed this in the drip tray and fired off a series of drops adjusting the position each time until the drops fell inside the small threaded end. This works much better because you don’t need a second person to hold it still whilst you focus and can get a more accurate result. When using a macro lens it is quite difficult to get the whole splash in focus, and this way you know where the front and back of the drip will fall, so you can focus on the front edge, back edge or in between according to what you prefer to be most sharp. As you can see, this drop was slightly to the right of the threaded hole at this point (greater splash to the right). It was also a 2 drop scenario because we hadn’t yet switched the SplashArt kit to single drop mode. You will notice that the drop is red colored. We didn’t start off this way, we began with clear water in the tray and the dropper, but this shot from later on in the shoot was necessary to reposition the camera focus following moving the drip container in the process of putting pink food colouring into the top and stirring it.
The next logical step was get a feel for where the drops fell in the two drop mode and how much camera delay would be required to get a pit, crown, or a pole.

Pit

Crown

Pole
Once this is done, the next step is to control the spacing between drops so that there is a collision. The size of the drops that collide seems important and I think that similar settings on the dials for the first and second drops (first and third dials) helped me get a satisfactory result with the SplashArt Kit. The sign that you are approaching the correct timing between the drops is when you start to see some action at the tip of the pole, for example:

Finding the Collision Point

Repeatability
Once this point is reached a smaller further closing of the gap between drops may be necessary, and thereafter just plenty of trials, until you get some attractive results. All the shots you see here in the slide show were made first time out with the SplashArt Kit Mark II. One session of 4 hours or so got us all these shots (minus a coffee and brief lunch break of course). There is a lot of variability between shots. I don’t know whether this is because the timer cannot perfectly control the drip valve, or whether there are timing issues with the flash. My SB900 strobes, as usual, were fired using my trusty Flex Mini TT1 with AC3 controller and TT5 trigger combination. This gives on-camera control of the distant flash which makes for less walking round the studio (kitchen) and speeds things up a little. I suspect that there is no particular issue with the flash timings (but can’t completely rule it out) as at no point do I see a double drop image which means that both flashes trigger at the same time. Not bad when the flash duration is 1/38500 of a second!!
More on the Lighting
As you can see from the slide show, and the production images, I have used a selection of coloured gels on the strobes along with changing up the position of the strobes relative to the translucent plastic background. I must admit that my selection of gels is a bit limited, but the combinations were:
- White on White
- CTO (orange) on White
- CTO on Blue
- CTO on Red
I have also got green gels (to colour match for flourescent lights) which might also have looked good but I didn’t think to try. Needless to say there are a couple of approaches to white balance settings in this situation. You can use tungsten or cloudy settings for, instance, to produce a uniform rich yellow or blue colour. Alternatively, as I did here, you can use the preset flash white balance to produce an overal neutral result but then gel the flashes to produce the colours. This is my preferred approach because, although it requires multiple strobes, you do get greater flexibility.
It would be possible to set up a single coloured, or patterned multicoloured (perhaps printed out on a home inkjet printer), background, and reverse light that to get similar results to the multi-strobe effect.
For water drop collision images you do really need to backlight. For milk images you can front light, and for the closeups you see in the slide show this was really necessary to counter some of the shadows produced by side lighting. In fact I ended up using three strobes. A single backlight and two front lights. The front lights were camera right at 45 degrees and camera left at 45 degrees but much higher up to light into the extensive crowns. We might have been ok with a single front strobe placed centrally and above the camera in order to throw the shadows behind the splash.
More on the Fluids
Since my first attempt at drop collision photography, I have been reading Corrie White’s Comprehensive Water Drop Photography Guide. You will find a lot more detail on what you might do to water to thicken it, and some further tips on lighting milk etc. What I have realized is that it is easier to get spectacular crowns, and some really interesting graphic shapes, using the thicker substrate of milk, than it is with water. In fact, as Corrie points out, there are some things that you just can’t do with water alone. Clearly thickening water with sugar or guar gum also has side-effects to the look of the resulting solutions, so sticking with plain water is probably best. Nevertheless the old school physics fact that water is densest at 4 degrees centigrade is worth knowing and using here. So next time I will definitely try using very cold water and placing some ice cubes in the drip dispenser and into the drip tray.
Colourings
We only had red food colouring at our disposal this time out. Clearly there are many others that you could purchase fairly cheaply. I have heard that some people use printer inks, but this may be quite expensive. Red looks great in contrast to the white milk. One tip for the milk shots using coloured drops, you need to stir the drip tray in between trials to whiten up the milk again. You could also put colouring into the drip tray and experiment with the two colours mixing together in the drip stem. I really do think that you are limited only by your creativity.
Things to Try
- I really fancy having a go at splashes inside bubbles. Wow. Can’t wait.
- Splashes where the drip container is a crystal glass, or similar, and can be seen in the shot.
- Odd looking colour combinations.
- Several splashes composited into the same shot.
Until next time,
Robin.
Feb
26
Context

A Single Drop…
I’ve seen a lot of fantastic drop collision photographs recently, both on the net and in magazines. It seems clear that there are at least two levels of water drop photography, the random ‘hit and hope’ style of droplet photography (without the collisions) and the more engineered droplet collision photographs made with the assistance of some complicated electronic hydraulic systems. Markus Reugals is perhaps the grand father of the more technical approach, and another fine water drop artist is Corrie White.
Having read a little about water drop photography, I decided to have a go at the hit and hope style which is much less technically demanding but more reliant on good timing and good luck. A little research indicated that I didn’t need too much equipment and if I was prepared to be patient I could still get some good results. All I needed was a plastic bag, some water, a drip tray, a small strobe, camera and tripod and I would be good to go. If I could throw in a coloured background in addition then the world was my oyster. The set-up would prove to be a little Heath-Robinson, but nonetheless effective for that. I knew that those nicknacks would come in helpful at some point, and if I was to consider purchasing some mechanical drop making machinary, I at least needed to know what other technical issues might arise.
Practicalities
Here’s how I went about it.
- Firstly I set up a turkey basting tray on the surface in the kitchen.
- Next I filled this with water and suspended a resealable sandwich bag filled with tap water about 35cm above.
- I placed a pin hole in one of the sandwich bag corners, and let it drip into the basting tray at a steady rate.
- Next I set up my flash heads. You need these to be very close to the water-drops to get good exposure because you want to use the lowest possible manual flash setting that your guns will provide. I used 3 Nikon SB900s on a Joe McNally Lastolite TriFlash, set to 1/128 power, though I could have got good results with just one flash head, albeit at a higher ISO. This gives me approximately 1/38500 of a second.
- Then I set an A2 sheet of coloured cardboard against the wall behind the tray and aimed the flashes towards it. In this way the droplets were both side and backlit both by direct flash and a coloured wash of light from behind. Ideally you would shoot through an opaque perspex to both soften and spread the light. Coloured gels can then be used to create interesting colour wash in the background and on the water surface.
- Finally I set up my D4 on a tripod with a 105mm Micro NikKor and focussed on the drops as they hit the water. To get better accuracy I placed a sharp knife blade in the exact position of the falling water droplets and focussed on that. You need to attach a remote release, and depending on the camera body and system you are using you may use the built-in light control or perhaps radio triggers. In this instance I used Flex tt5 radio triggers as the D4 does not have a built-in commander flash. Alternatively I could have used a separate flash gun to provide the remote control.

Splash and Drop…
Then all you have to do to start your water drop photography is watch the drips fall, and fire a few test shots to get the correct exposure. Obviously you need to obliterate the ambient light with the combination of shutter and aperture (I was using 1/250th second and f11) in order to avoid any ghosting. Watch out for your highlights. There is a tension between too much specular highlight and detail in the drops and the general brightness of the pool. After an initial trial I found that I was having to shoot downwards at too steep an angle. To counter this I needed to shoot from further back so I hooked up my 2x teleconvertor to the 105mm and this gave an effective focal length of 210mm and a greater distance from the droplet.There is a further issue with the positioning of the water droplets. I found it more convenient to have drops fall towards the front of the drip tray in order to have the frame filled to the top by the pool in the background. Otherwise the edge of the tray might be visible. I wasn’t brave enough to shoot into a pool with a meniscus!! Secondly there is considerable variation in the exact landing spot of the drops wich can easily vary by 5mm or more front to back, making critical focus a bit of a lottery. The higher the water in the tray, the flatter you are able to keep your lens. There needs to be some angle to ensure that the background does not include the edge of the tray (unless you have a 6 foot drip tray that is). Nevertheless the variation in focus drop to drop is countered by taking a lot of shots. Once you get your eye in, you can improve your success rate substantially. I did end up taking 765 shots in all, but there was quite a lot of experimentation to get my final set up.
Photoshop Embellishments…

Embellished Drop and Splash…
As lovely as this image was fresh out of the camera, it was crying out for that something extra to really make it pop. Looking carefully at the top of the splash column I could see that there was a specular flare highlight at the top. If I had used f16 or f22 this might have been substantial enough on its own, but in this instance it required a helping hand.I have used a few techniques here. First of all I created a starburst in Photoshop (white on a black background), and then I sized and placed it into position on a separate layer. Change the blend mode to screen to drop the blacks out and Robert is very definitely your mother’s brother!! Photoshop has a lens flare feature (Filter | Render | Lens flare) but how do you get this into your image? Again the trick is to create a new layer. Fill it with black. Create your lens flare on the black layer (I used the flare for a 105mm prime). Change the blend mode to screen, reposition and set the opacity to taste to finish.
Sharpening is another interesting issue. If your droplet shot lacks that critical crispness, and quite a few will do, one way to counter this is to use octave sharpening. I first learned about this technique in a book by Lee Varis called Skin. The edition of the book that I have was published by Sybex in 2006. The book claims to be the complete guide to digitally lighting, photographing and retouching faces and bodies, and it really does do a good job at this. There are a few useful sharpening techniques that I would recommend you check for yourselves but the octave sharpening routine has general applicability above and beyond portraiture. The point of the technique is that you use multiple sharpening layers (4 in this case) to minimize the visibility of wide halos. Unsharp mask values are set, in order, at radius 0.5px, 1.0px, 2.0px and 4.0px all at an amount of 500%. Each layer has a luminosity blend mode, and the opacity is set at 100%, 50%, 25% and 13% respectively.

Starburst…
There are plenty of online tutorials on how to make a starburst. The basic technique is to start with a white line on a black background. Apply motion blur to the line to get a lovely fade effect on the ends, then copy, rotate and resize the line to get the final effect. If you save your creation you can use it again at any point where a convincing starburst is required. If you create a large starburst, you can reduce the size without loss of quality.Over the last few days I have been experimenting with an electro-mechanical dropper and can confirm that there will be a part 2 to this article. Wow!! Here’s a taster, until next time…
And For Next Time…

Something for the Future…
Cheers for now,
Robin.
Recent Comments