
Aug
26
Photographing Osprey
Birds of Prey / Field Craft / Garden Birds / Nikon D4 / Nikon D810 / Photography / Wetland Birds Posted by Robin
/
2 comments
Photographing Osprey

Full Gas: Osprey Leaves with Trout..
I’m just back from an osprey shooting workshop in the Scottish Highlands. Photographing osprey is a new experience for me, and there are a number of differences in approach to assimilate. But first let me describe the workshop in general terms, before moving into the particulars of the photography, and telling you a secret or two about my personal journey in photography!
Images In Nature
My long-time shooting buddy Geoff and I had booked the Osprey Workshop with Images In Nature earlier in the year. Images in Nature, run by Lee Mott, offers small group nature photography workshops and tours. We stayed in the Osprey Hotel where we were very well looked after by proprietor Sue and her husband John. Lee is a hugely personable, experienced and knowledgeable photographer. He talked us through what to expect the night before, showing us pictures of the venue, describing the hides and, of course, discussed camera settings and the itinerary.
Itinerary and Venues
Photographing 0sprey involves an early start as you ideally need to be in-situ before sunrise. We were to meet outside the Osprey Hotel at 4:40 am and drive the 11 miles or so to the Rothiemurchus Estate in the Cairngorms National Park, Aviemore. The purpose built hides are based in the Rothiemurchus Fishery where they look over a purpose built pond, well stocked with rainbow trout, for the osprey to dive for and catch. You can book the hides at Rothiemurchus independently if you wish, and the Wild Scotland link gives you a sense of what is available. I can, however, unreservedly state that these are the best designed hides that I have shot from in the UK.
View from the Hide..
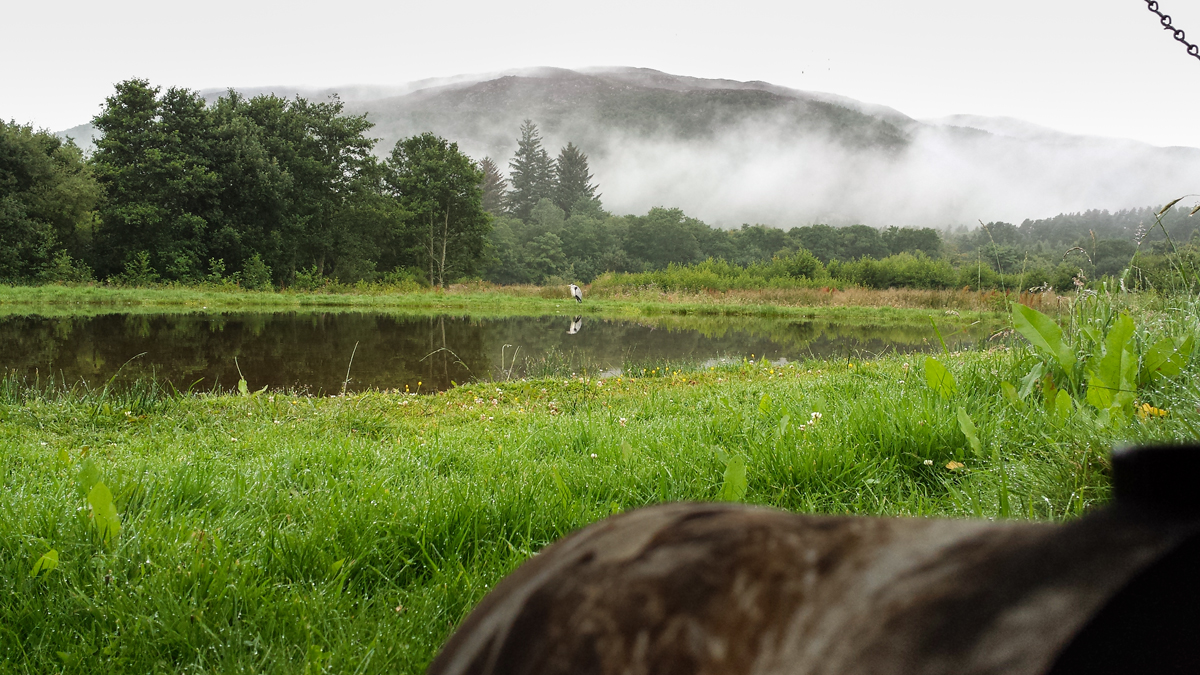
On arrival at the fishery, we had a quick coffee and were installed within the hides by 5.30am. There are 4 hides around the fishing pool. The best hide choice depends on the prevailing wind direction because the osprey prefer to take off into the wind (as it helps with lift) and, hopefully, it also helps the photographer to be positioned to see the bird moving towards the camera rather than away from it. During our time at Rothiemurchus the conditions were very still, so we picked one of the middle hides to see what happened. The scenery is spectacular giving multiple possibilities for decent backgrounds and different shot styles. Osprey are not the only visitors to the pond, we had a visit from a field mouse, a family of mallard, rooks, kingfisher and several heron so there is always plenty going on in-between the drama of the osprey diving shots.
After the morning shoot, it was back to the hotel for a fabulous full Scottish breakfast (thank you Sue) and then back to the Rothiemurchus estate to shoot red squirrel, and more traditional garden birds, in the forest in the afternoon.
Key Technique Issues for Photographing Osprey
There are a number of issues to consider, namely, camera settings, fieldcraft and good lens technique.
Camera Settings
Ok, we are only talking Nikon here (I can’t speak for Canon shooters, but if you do shoot Canon you may find these Arthur Morris links useful – Getting the Right Exposure, Camera Settings, Tele-Extenders).
Autofocus Settings
AF-C priority selection = release. Dynamic AF area 9 points. AF activation = AF on only. AF Point selection = 51. AF Continuous and Focus Tracking with Lock on (3-normal). Back button focus is mandatory (well not mandatory, but certainly a lot easier). It’s only fair to say that Lee disagreed with me on the Focus Tracking setting, which he prefers to be set to 1-short or off altogether. I find that I sometimes lose the focus point on the bird and then my focus snaps to the background, or something in front of the bird, before I can get it back again, losing me time and plenty of good shots. For me Focus Tracking is best left on 3-normal or even 5-long (which I use for my red kite shots). If I had Lee’s experience and skill I could probably get away with 1-short, but that’s the benefit of being a professional, you get loads more practice! Use what works for you. It goes without saying that you will be shooting above a 1/500th second so Vibration Reduction should be set to off.
Aperture, Shutter Speed and ISO
As I have mentioned in my blog before, exposure is a perennial difficulty when shooting birds in flight, especially ones like osprey with an intrinsic high dynamic range against a rapidly changing background. I like to shoot manual for this, and so too on this occasion!
At 5.30am in mid-August it is pretty dark so you are dancing a very thin line in order to get useable pictures. Lee’s, very sensible, approach is to start off wide open at 1/500th second with whatever ISO gives a decent exposure. Clearly you risk subject movement at a 1/500th second but, in a way, this can paradoxically enhance a shot with an osprey taking off from the water because it gives a dynamic sense of movement and action with blurring of the wing-tips and water splashes, but still good potential for tack sharp eyes and fish. As the light improves you can increase shutter speed up towards 1/1600 and then reduce ISO to reduce noise. I tend to make 1/1000th second shutter speed my initial priority and then reduce ISO and increase shutter speed in tandem. It’s a percentage game really. Finally, if the sun comes up (it doesn’t always) you can also increase aperture from f2.8, f4.0 or f5.6 (depending on what lens/teleconvertor combination you have) up to about f7.1 for optimal depth of field. On two of the days we had mostly dull and overcast weather and I never got out of f2.8 on my 300mm Nikkor.
Avoiding blown highlights remains something of a tricky issue, and even shooting manual, you have to take account of changing contrast levels in the scene and leave more leeway as the contrast increases. So in dull flat light you can expose further to the right than you can in bright sunlight for a given exposure reading taken from an average tone in advance. As I have said before, I will often use a patch of grass, but this is not always available, and the direction that it is lit from (and how wet it is) can all give a misleading result. I don’t think there is a hard and fast answer to this. On this occasion I knew more or less where the osprey were going to dive and I used the whole scene to take my initial exposure via matrix metering, leaving 1/2 to 1/4 of the histogram width in leeway (i.e. shooting markedly to the left) according to the contrast in the scene. On other occasions I might use spot metering, it just depends on what’s around to take a reading from.
In the interest of full disclosure, we had a heron at the poolside for the majority of the shoot and this was perfect as a cross check for blown highlights. Still, heron images beats endless photos of an empty perch by a huge margin!!
Lens Choice
The Rothiemurchus setup is really excellent and the birds are fishing very close to you. I used my 300mm f2.8 on my D4 (better for me on this occasion, given the light, than the D810, at least until the sun came out!) without any teleconvertor assistance. This was perfect! In fact, I could probably have used my 70-200 f2.8. The wingspan of the osprey can be up to 6 feet so it is really easy to get clipped wings as they fly past. It may be that a 70-200mm with a 1.4x tc would be the perfect setup to begin with – but hey, I’m addicted to sharpness, so what can I say, I used the 300mm!
Fieldcraft
Osprey Landing..
The Rothiemurchus Fishery setup is particularly helpful for photographing osprey because they provide an experienced gillie to spot for the photographers. The gillie watches the osprey and keeps the hides informed on what the osprey are doing via two-way radio communication. The gillie tells you when they are circling over the pond and when they are diving. These guys are all very experienced (we had 3 different gillies over the 3-morning shoot, all excellent) and they don’t waste your time getting unnecessary hopes up. They all know the osprey behaviour well and can often recognize the different birds by sight. The heron can be problematic photo-bombers if they are standing opposite the hides. The gillies would even tell us when it was safe to leave the hide to move them away. It took me a while to realise that this was an opportunity for heron flight shots (but it was 5.30 am after all!).
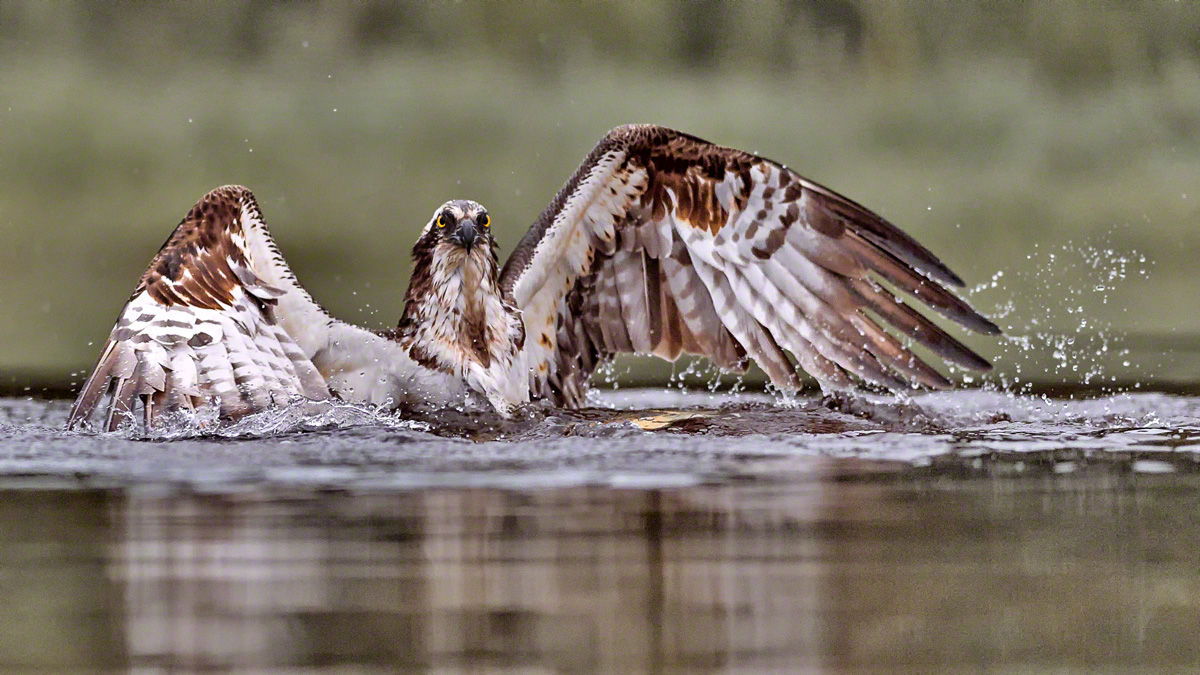
It’s really important that you do not track, and photograph, the osprey in flight before they dive for fish because this tends to spook them and that bird will not return that day. Luckily, during the osprey season, there are many local pairs of birds with young to feed so you do typically get quite a few opportunities. It is crucial to wait until the osprey has hit the water, then you get focus and keep it as the bird exits the water and flies away with the fish (hopefully). The osprey will be in the water for a few seconds as it has to kill the fish and then manipulate it into a carrying position before exiting. The osprey can move through 180 degrees during this process so it’s worth waiting until you get a pleasing composition in the water, rather than wasting buffer capacity taking shots of the back of the osprey’s head. Once the osprey start to exit the water things start to happen really fast. The wings are enormous and it’s very easy to underestimate how far up the frame they will travel as the bird flies off. Using the central focus point makes sense because you have the fish to worry about at the bottom of the frame and the wings at the top, plus it is the most sensitive focus point in low light.
Gimbal Head Technique
Have you ever had that experience where something you thought you understood (and worked well for you) was completely wrong? Well this happened to me on this shoot, and here’s how! On Friday 25th September 2009, Geoff and I attended our very first raptor shoot with Mark Sisson (another phenomenal wildlife shooter and author). Arguably the very starting point of my journey into wildlife photography! I was using my new gimbal head for the very first time with my 70-200mm f2.8 VRI with 1.7x teleconvertor on my D3, and was having a great deal of difficulty getting a sharp shot! This was a tad disappointing given that I was using my best kit and the raptor wasn’t even moving! Mark came over and suggested I try a few things, namely switching my gimbal head from right facing (as I had it) to left facing. The benefit of this would be that I could lean down on the gimbal with my left hand to steady the shot.
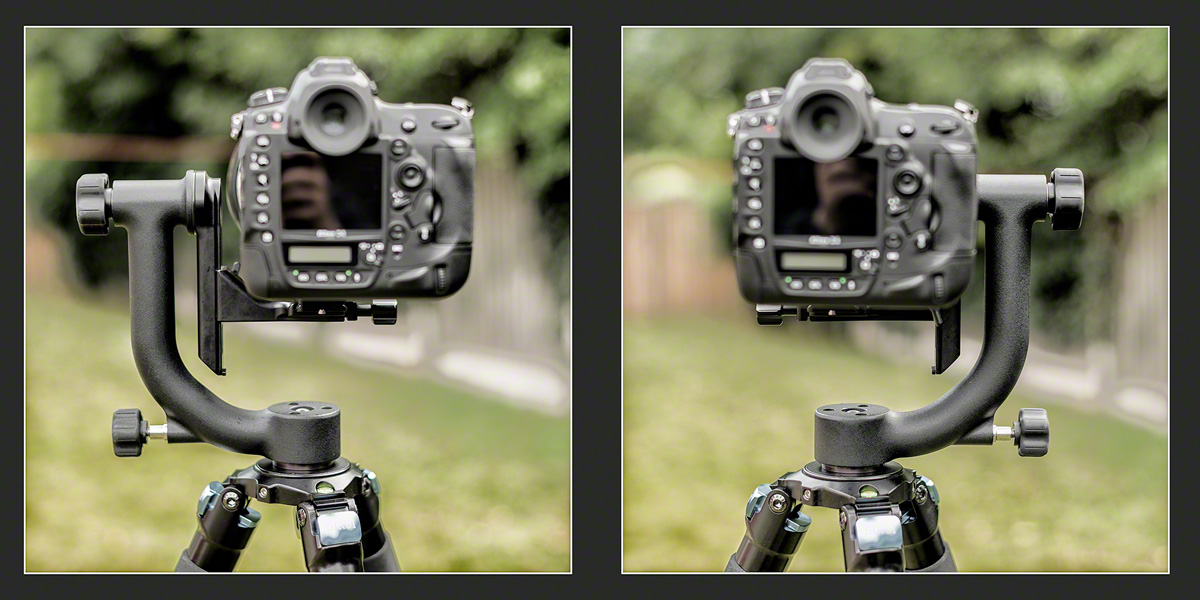
Left-Facing and Right-Facing Gimbal Positions..
This worked out pretty well for me and I’ve used it ever since. I went on to learn that steadying the lens with a hand on top was also useful, and a rubber eyecup to make it more comfortable to press the camera against your eyebrow also helped long-lens technique. Mark definitely put me on the road to better long lens technique, and I’ve been getting sharp shots with very long lenses ever since. But left facing is NOT the best for me, right facing is! Thanks Lee, for pointing this out, not least because I didn’t want to hear it, and you kept going irrespective of my arrogant unwillingness to listen! Here’s the crucial thing. I’m right eyed! This means that I sight with my right eye to the viewfinder but, if the gimbal is left facing, I cannot see a lot of what is coming in from my left-hand side because my open left eye is hampered by the locking ring and upright arm of the gimbal head.
In retrospect it’s all too painfully obvious. I have frequently been reliant on colleagues calling the arrival of wildlife subject matter that I haven’t yet seen. I’ve been amazed that they spot things so quickly when I don’t, I just thought I must be slow, or old, or needing stronger glasses, but actually, there may have been a more obvious reason all along — I was blind-sided by my gimbal head!! Actually, if you think about it, right-eyed people are at a disadvantage anyway because there is more camera body to the left of the viewfinder which tends to obscure the view from the open left eye anyway, so a left facing gimbal head just makes things worse.
I think that the proof of the pudding was that I had no trouble at all sighting a (very small in the frame) kingfisher hovering over the pool, focussing and getting some sharp shots. See them below. The other clear advantage of using the gimbal head right-facing is that you have better access to the lens controls for VR-On and Off and Manual focus adjustment. I found myself more willing to adjust manual focus in the moment as it had been quite awkward with the left-facing setup.
The Images
Heron (the Vital Bit-Player)
Osprey (the Main Event)
Kingfisher (Proof I CAN Still Learn New Stuff)
The Ducks (Who Can Resist Them?)
So, in summary, I had a great time with Images in Nature and would recommend them to anyone interested in an immersive wildlife photography experience. Thanks again Lee!
Enjoy your photography,
until next time (woodland birds and red squirrel coming soon..),
R.

Aug
02
Kingfishers Fishing for Fish
Nature Photography Hides Diving Workshop
Nature Photography Hides recently hosted a diving workshop for a group of 4 intrepid souls (myself included) at their new Hide and Diving Pool setup. This is so new that it’s not publicised on the website yet, but nonetheless available, and worth the trip down to Bromsgrove in the West Midlands to see Kingfishers fishing first hand, and photograph the process in detail. The set is sited down on the river bank. In the distance is a large buff coloured fence which blurs out as a background nicely. In front of the tank is a sheltered mount for the cameras, secured by four Arca Swiss style tripod heads. The sloped roof keeps the rain off, and the height of the mounts leaves the cameras in position to shoot parallel to the water surface.

Diving Pool
The tank itself has a relatively shallow surface and a deeper centre portion in which the fish swim. This cuts down the area in to which the Kingfishers will dive (the rest is too shallow), which is important because of the limited depth of field. The cameras are fired by remote control from the hide itself which is in front of the setup visible here.
Just above the diving tank there is a perch holder, which is again positioned in order that the Kingfisher will dive into the tank facing backwards from the Hide. This way they turn in the tank and fly out either sideways along the length of the river, or towards the hide, for better looking shots. No one wants to see the Kingfisher’s backside as it flies away from the camera. In order to get sharp shots the cameras have to be set up in a very particular way, at their highest frame-rates. See ‘Camera Settings’ below for more information.
Camera Settings
To catch the Kingfishers fishing we need the birds to be in the correct place at the right time. You can’t alter the camera settings once you are in the hide, and you must try not to disturb the birds by going in and out of the hide too frequently. So we were using manual focus, having pre-focussed on the most likely diving spot.
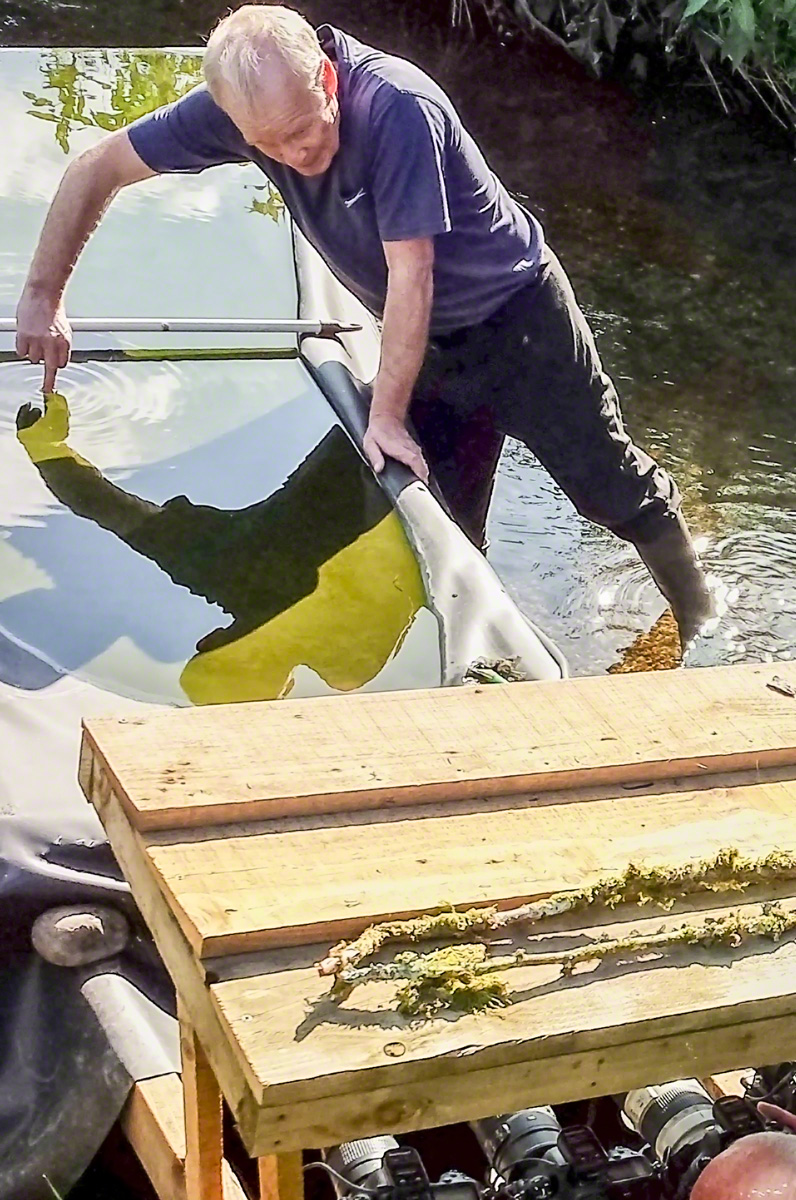
The Tricky Task of Focussing..
Our guide, Mick, was really helpful in making sure that we got everything right, and all came away with some excellent shots. Here Mick is holding a bar across the centre of the pool and using a handy finger knuckle placed mid tank for us to focus on (you can just see a head at a camera in the lower right hand corner). This is crucial because we were all using 70-200mm lenses at 200mm on full frame bodies. As you can see from the pictures, the Kingfishers were about 1.5m away, and this would mean a depth of field of about 2cm at f8 so there is no room for error and a certain amount of luck is still required.
F8 is about all you can afford in the dance between exposure value and ISO. To guarantee sharp shots you need a shutter speed of about 1/2500 of a second. We set auto ISO and aperture priority (i.e. to keep the camera set at f8) and a minimum shutter speed of 1/2500 s in the auto-ISO settings. We had great light and, with a 1 stop negative exposure compensation set to avoid blown highlights, the ISO ranged between a minimum of 720 and a maximum of 11,400 during the day. This said my keepers were evenly spread between ISO 800 and 7,200. No problem at all for the D4. You still need to take lots of shots however, because only some of them will be critically sharp and in frame. This depends partly on your timing, but mostly on where the Kingfisher dives and where he comes out again.
Participants were mostly shooting Nikon (1 D4s, 2x D4s and a Canon 5d MkIII). We were all using the Hahnel Giga T Pro II Wireless Timer Remote (by complete coincidence) and were able to set separate channels in order not to fire each other’s cameras. We were also able to help each other out because 3 of us hadn’t got much experience with the remote trigger, presumably purchasing them for this workshop! They worked flawlessly throughout the day though so they can be recommended as a reliable radio trigger.
Two Camera Setup
Having a perch, as well as a diving tank, gave the opportunity to shoot two cameras simultaneously (slightly tricky the first few times). This is made easier by the remote control, but you do have to watch that the handset doesn’t time out because it defaults to single shot when you first turn it on. This can be deceptive because you do get 3 shots if you hold the button down and, with other cameras firing at the same time, it’s easy to think that you are shooting continuously when you are not. So this is me in the hide with my D810 feeling very lucky indeed (though looking like I’ve just seen an alien)!

Selfie..
Not the best picture of myself I’ve ever taken, but I suppose given the conditions, my old Galaxy S4 did a decent enough job with it’s microscopic sensor, lens and 8 bit jpeg files. I’d probably just realised that my shutter speed was too high!
For the perch shots, given the very short distance to the perch, from the hide, it suited me to use my 300mm f2.8 with 2x teleconverter rather than my usual 600mm f4. I have been caught out once or twice recently by the 5m minimum focus distance on the 600. The 300mm Nikkor can focus down to 2.2m, which was crucial here. I must say that even with the 2x teleconverter the results are still very sharp, but you do lose 1 stop of light (f5.6) compared to f4 with the 600. This isn’t really a problem provided you keep your brain engaged!
One of the worries, with a shoot like this, is that you will miss a crucial setting on the camera. Prior to arriving at the hotel the night before, I had set both camera bodies up for the diving shots (i.e. auto-ISO and a minimum shutter speed of 1/2,500). You don’t need that kind of speed on the perch shots, unless you want to capture an in-flight arrival or departure from the perch. It’s not that there is really a problem with auto-ISO per se, but you do need to remember to tone down the minimum shutter speed, or better still (for me anyway) move to aperture priority with a fixed ISO. I prefer to use VR on the D810 with a shutter speed close to 1/500th second for the Perch Shots. This is plenty stopping power for subject movement and camera shake, providing me the sharpest results on the high-res sensor. On the D4 my VR threshold on the 600mm is 1/160th second (I prefer 1/250th second if I’m shooting with the 1.4 teleconverter) but this doesn’t give a tack sharp result on the D810 so I like to go higher. Obviously above 1/500th second you can introduce shake with the VR so you need a shutter speed to match the reciprocal focal length (1/600th s or above in this case).
The End Result
The setup above may appear Heath-Robinson, but it is just perfect for the task. Take a look!
Until next time..
Cheers,
R.
Recent Comments