
Apr
13
The World in a Droplet
Focus Stacking / Macro / Photography / Photoshop / Retouching / Water Droplets Posted by Robin
/
0 comments
The World in a Droplet
Macro Photography can be a Challenge
The Basic Premise
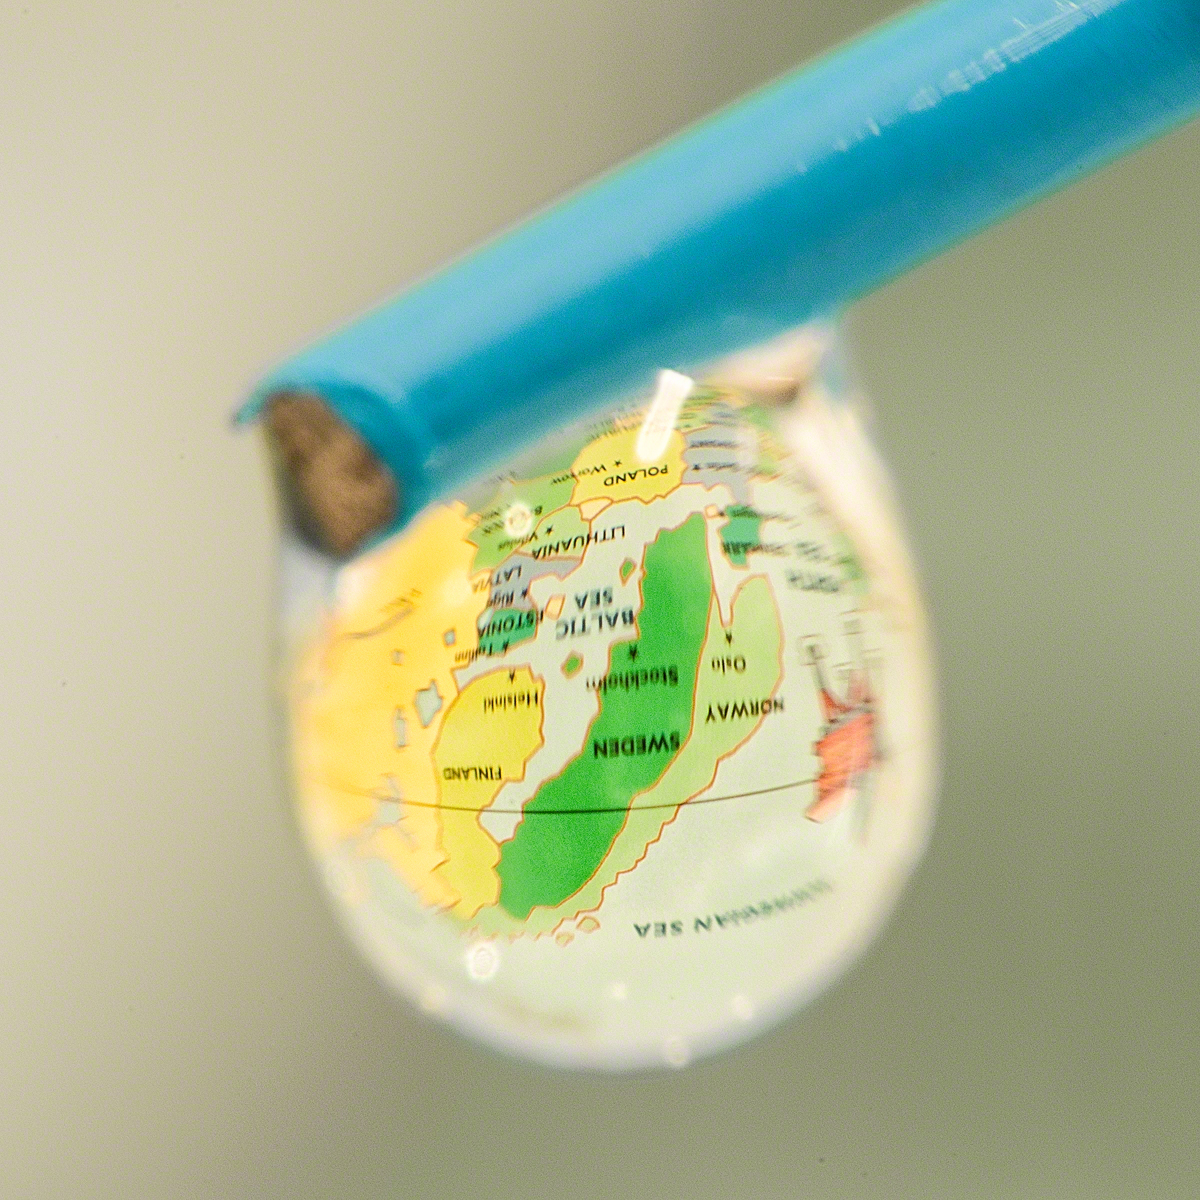
My inspiration for the world in a droplet idea came as a result of seeing an image of a drop of water on a hypodermic needle on the web. You could see a thin reflection on the base of the droplet, which was very small in the frame, but you couldn’t see what it was. I had the idea that I could have the reflection of a world atlas in the droplet and, of course, larger in the frame.
Testing the Theory
Although I was confident that I could pull this off, I knew it might be difficult. I thought I could get the magnification, but I wasn’t sure about the rest. How to get a drop on a wire (I don’t have a hypodermic needle), how to get the map reflected and what about the necessary depth of field. A pilot project seemed the thing to test the theory. I didn’t take any production shots of this, so you will have to use your imagination.
Daylight seemed perfect, so I set up on the surface by the kitchen window. I took my floor stand (a light stand) and, using electrician’s tape, fixed a cardboard tube from a roll of aluminium basting foil leftover from the Christmas turkey. To this I taped an empty Bic biro carcass with a blue paperclip wedged into the end, and bent it into a sort of hook shape. Using a second biro carcass, I poured water into the open end until I got a droplet on the end of the paperclip hook. Actually, I didn’t realize how lucky I was to get this to happen quickly because it proved a nightmare to reproduce when I did the final world in a droplet image.
Equipment wise, I used my old D300 Nikon as it would give more magnification than a full frame (the droplet was only 1.5-2 mm wide). I fitted an old 75-300 mm Nikkor lens, and using a set of reversing rings, fixed an old 50 mm f1.8 Nikkor to the end. I quickly found that I had more reach than I really needed so zoomed the 70-300 to a wider setting, and took my shot.
First Stab..
So what did I learn? Firstly, I’d have been better off setting up somewhere other than the backlit kitchen window, because I was getting a lot of flare and unwanted reflections in the droplet and had to shutter out the window. Secondly, focusing is really difficult because there is so little depth of field. If you move the tripod it can take an age to even locate the droplet again, never mind focus on it. You aren’t able to clearly see the text on the map when you focus on the droplet, so it is very hard to get it sharp (at least with my eyes). Partly because you can’t define the letters, partly because it’s hard to make fine enough adjustments to the focus (more on this below).
Secondly, the map image appears to be on the rear surface of the water droplet, so you have to focus there to get the map sharp. This means you can’t see sharp edges on the droplet itself, and the paper clip is not properly in focus. In fact the paperclip would have been better parallel to the plane of focus to avoid so many depth issues. When I do this for real, I will have to use focus stacking.
Thirdly, the map was upside down in the droplet (of course you idiot!!), so that needs turning upside down before you start.
Doing it for Real
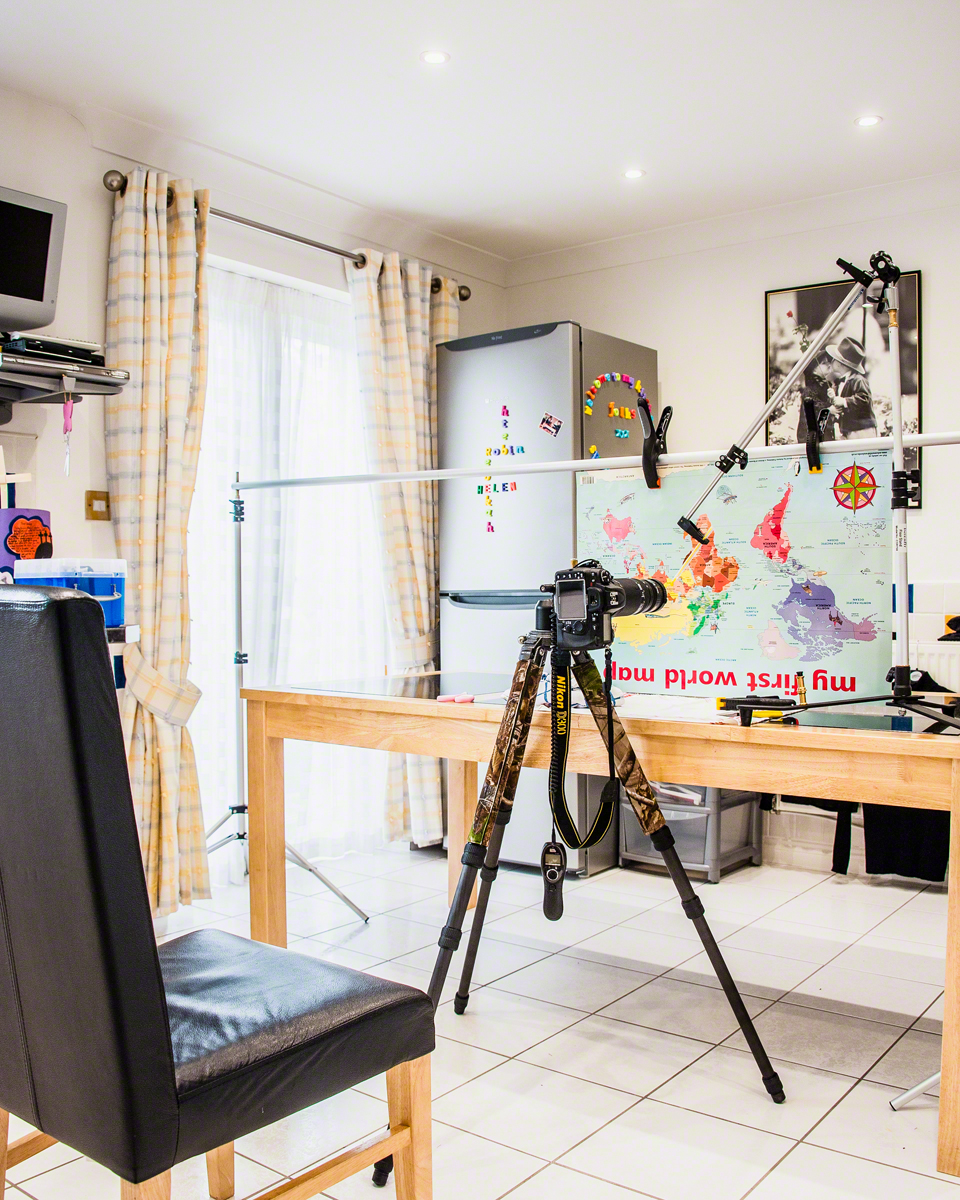
Household chores notwithstanding, it was a few days before I got to try this again. Time to approach things more professionally and turn the house upside down in the process! Clearly this is best when your wife is out for a few hours. I wanted a more adjustable setup as I’d had real problems changing the position of the map first time round. I wanted to be able to adjust the field of view in the droplet, so that meant adjusting the position for and aft, as well as from side to side. Secondly, I wanted to be able to position the wire with the drop on it a little more precisely (there was no adjustment on the cardboard tube setup) too. Finally I wanted the droplet to be side lit to avoid flare.
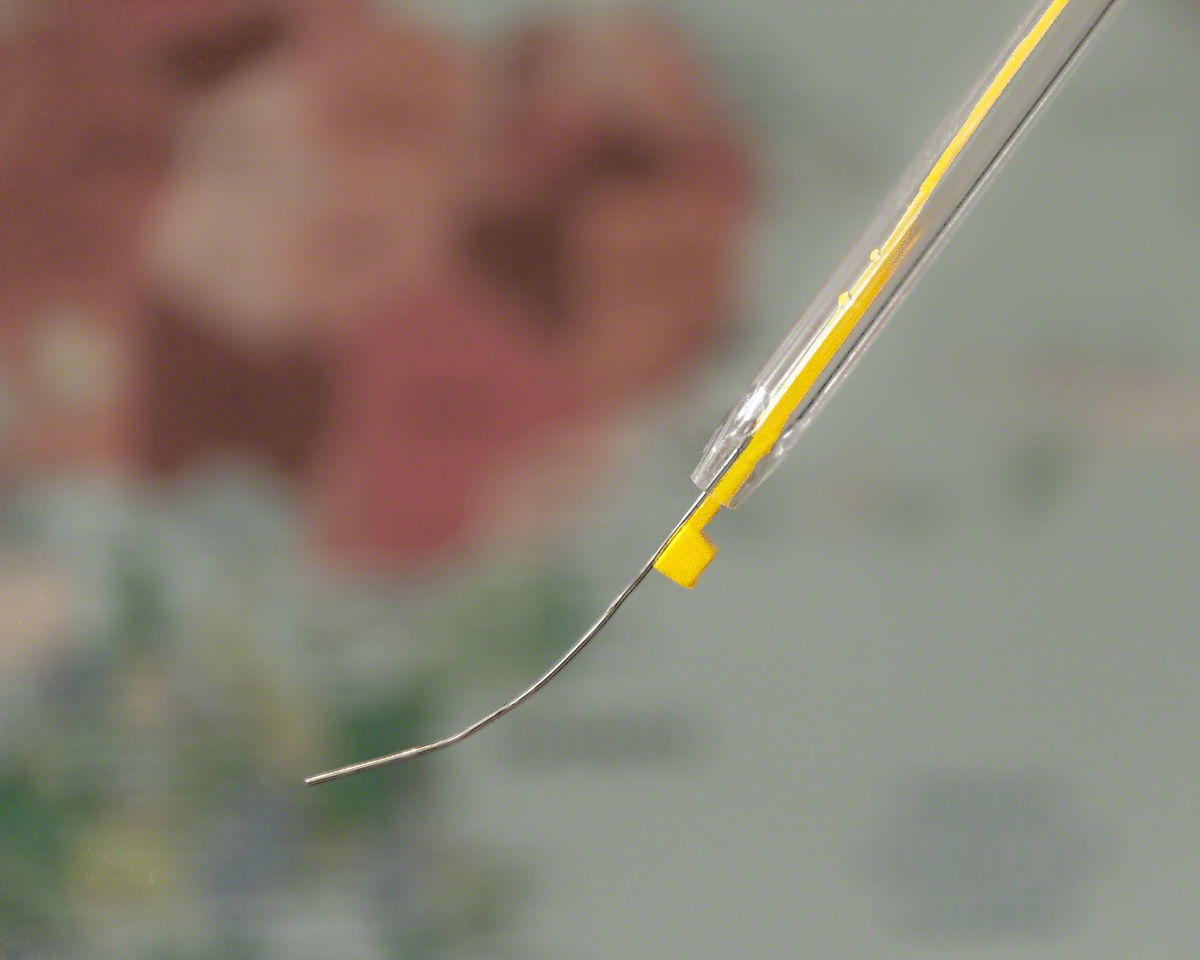
Getting the Droplet on the Paper Clip
This was the hardest part of the shoot bar none! After much trial and error I came up with the setup shown. I was able to use an old Lastolite reflector holder on my floor lighting stand as shown. This worked out fabulously because the spring grip made the perfect holder for the biro, which could then be slid backwards and forwards for perfect positioning in the frame. My only regret was it took a couple of hours, and a roll of electician’s tape, for me to realize I could do this!!

Getting the droplet on the paperclip proved difficult, but here are a few tips. The angle of the biro carcass needs to be quite steep so that water runs out of the end quite quickly. This makes it more likely to run around the curve of the paperclip, and consequently to leave droplets. Too slow and it just drops out of the end of the tube (counter-intuitive to be sure). Don’t forget to place a cloth underneath to catch the drops! The attachment system for the clip that worked best, and I tried many, was to have a cable tie underneath the clip as shown below. The cable tie slows the water down and ensures that it is running over the paperclip.
The Photography, Getting in Close
Firstly, don’t forget to turn the map upside down if you haven’t already. Given the size of the droplet (approximately 2 mm) you need considerable magnification to fill the frame. My solution was to use a reversed 50 mm lens on the end of a longer lens. The longer the second lens, the greater the magnification. I used an old 75-300 f4.5-5.6 Nikkor from my film camera days. You will need a reversing ring to join them together, and I purchased mine (52 mm to 62 mm) from a UK company, SRB Photographic (formerly SRB-Griturn) that make and sell a wide variety of these specialist items.
Both lenses were focused at infinity, and the 50 mm aperture was set to f1.8. I’m not certain that a wide open aperture leads to the best quality/depth of field, but that will be an experiment for another day. The 75-300 zoom was set to f32 and I used the zoom control to finesse the magnification.
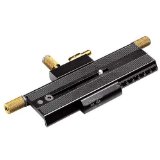
To focus, I moved the camera / lens setup back and forth on a Manfrotto 454 Micropositioning Sliding Plate. You can just see the lock screw poking out above the D300 on the tripod in the picture above. It can be surprisingly difficult to find an image at this magnification so be patient!
It goes without saying that to avoid camera shake you should use a remote release and mirror lock up.
Watch-Out!! Don’t Damage the Lens…
The rear element of the 50 mm Nikkor is flush with the back of the lens which is problematic. It is very easy to flick the paperclip onto it, and there is a risk of scratching the lens or getting water into the electronics. Even though this was a very old lens, I didn’t want to damage it, so after a few near misses I decided to use my smallest Kenko auto-extension tube as a lens hood for the back of the lens. I used the shortest one in order to minimize the risk of extra vignetting.
Focus Stacking
Depth of field at this magnification is very narrow and both the map, the paperclip and the edge of the droplet need to be sharp in the final image, so take separate images at each depth. The front of the droplet is unnecessary as it would obscure the view of the map. Using the 454 it was possible to get the 3 images required for the blend.
Post Processing
The images for the focus stack will be pin registered if you haven’t moved the tripod, so they can be loaded as layers into Photoshop without issue from Lightroom (or whichever way you choose). Any adjustments in Lightroom or Camera Raw should be made to each of the images before stacking them. In Photoshop, the sharp paperclip and map images can then be blended into the final image using layer masks. Here I took the opportunity to desaturate the background (i.e. the full sized map) a little to make the map inside the droplet all the more prominent. After that, some sharpening using your preferred method or plug-in finalizes the image.
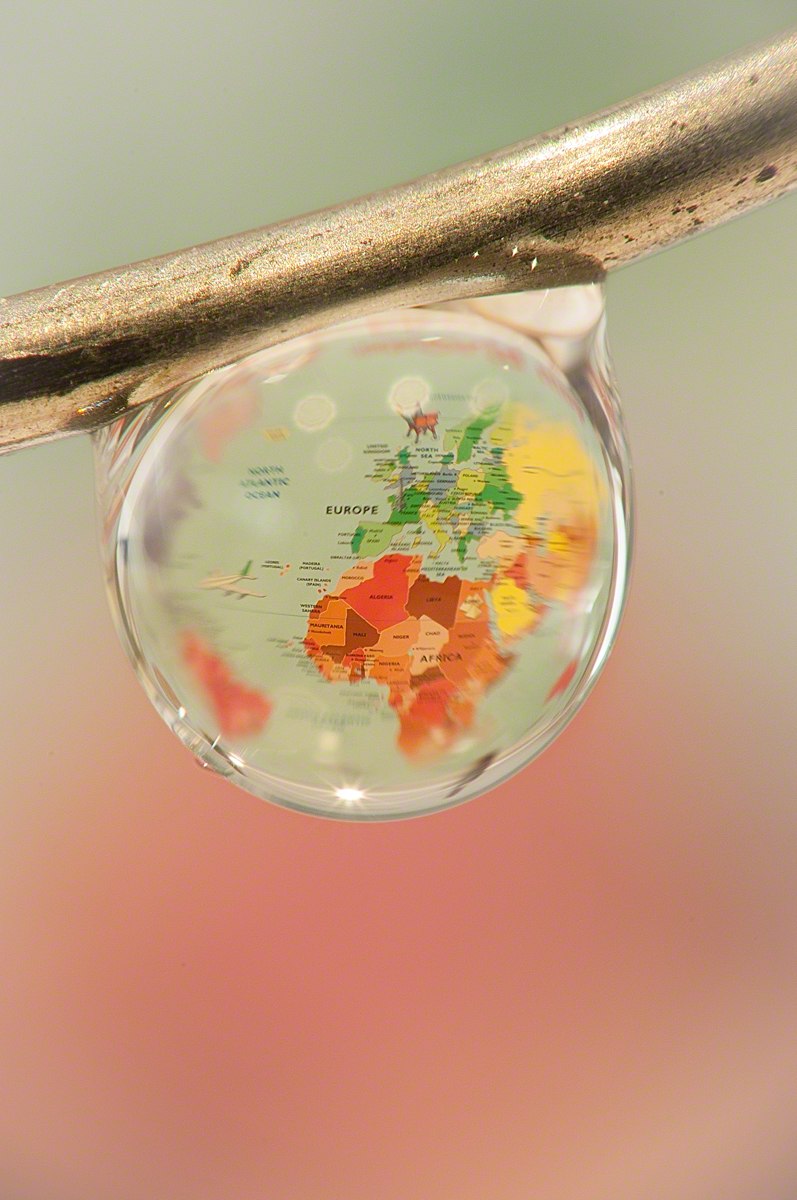
The World in a Droplet!
Cheers, R.

Apr
09
Shooting Red Kites at Gigrin Farm
Time-off is Precious!
It’s been a while, in fact, as I think about it, I haven’t been to Gigrin since I purchased my D4. The last time I was there would have been 7th April 2011, 3 whole years ago to the day. Since I adopted cycling as a new pastime there has been increased pressure on my photography time, to a point where it can be months between structured shoots. But this week, I’ve booked in a couple of days shooting, of which this was the first.
Facilities at Gigrin
Hides for Photography & Filming
There are a range of Hides for the photographer. The ground level hides are adequate for photography for those with compact cameras and DSLRs, whilst the tower hides have been built for photographers with more professional equipment in mind. The Gateway hide is around 4m closer to the kites than the towers. The tower hides have a partial roof as protection, and a bench fitted to the rear of the hide with coat hooks on the left-hand side. This arrangement is ideal for panning overhead and gives a superb view of the kite’s surroundings. Newcomers to the tower hides should be aware that there is a green line on the floor that marks the most forward standing position so as not to frighten the birds.
Disabled Access
Four of the hides are wheelchair friendly, with ramps and internal access, and there is parking for up to four vehicles right outside the hides for those unable to walk the 100m from the regular car park. There is even a wheelchair accessible photographic hide with the same roof arrangements as the towers.
The Red Kite Shop
In the handy Red Kite Shop you can purchase a range of goods including binoculars, note pads, mugs, bird feeders and Red Kite clothing (T-shirts, Sweatshirts, Fleeces, Caps) books, paintings and videos.
The Photography
Equipment
For our trip, we booked the larger tower hide, and I shot with my D4 and 600mm F4. To begin with I was using my 1.4 teleconverter as well, but, to be honest, that amount of reach really handicaps you because it restricts you to birds beyond the feeding zone where there is sufficient space in the viewfinder to pick them up and pan with them. You need too much precision to pick up birds in the middle distance, and this is unrealistic unless you are a seasoned professional wildlife photographer. Birds near-to will have their wings cropped, also not a good look! My pal Geoff was shooting with a D4 and a 200-400 F4, he had also started with a 2x teleconvertor but also found that he was better off without one.
Focusing
To begin with it is very difficult to track the birds. You must practice shooting with both eyes open (to help you lock on, and see the best action coming) and over half an hour or so you will find you can pick the birds up in the viewfinder more easily. Even then you are at the mercy of your camera for finding focus. Always use continuous auto-focus and the highest frame rate that your camera can manage. To make life easier we were both shooting with Gimbal Heads. I found it best to focus on the tree line first. This makes the acquisition rate much higher when you target a bird in flight because the distance is much closer to that of the bird.
Another problem comes with losing focus when the birds dive for food. Red Kites do not land on the ground (though interestingly one did just that on Monday, and it is the first time I have ever seen it), so they dive steeply and swoop down picking up their food (or prey) in one really fast action. I found that I would lose the birds on the way down, and when I found them close to the ground again I had lost focus. I think that one technique that may help you with this is to stop focusing once the bird dives, then pick it up again on the floor. This works because the Kite will be at about the same distance from the camera and you won’t have been risking a refocus on the background as you swing the camera downwards once the bird has gone. On Nikon professional cameras you can adjust the timing of the refocus pause, which can also help you stay on the target.
I find that the best technique is to pick up a Kite in the distance, then follow it until it has filled the frame, or done something interesting. It is very tempting to take thousands of photographs of very distant birds because they seem larger to your eye than they do to the lens, but by being patient you can get some good shots that fill the frame. Make sure to start shooting just before the kite is large enough in the frame because they move very quickly and you can end up with clipped wings. Be careful to avoid shots of the bird flying away from your viewpoint or turning away from the lens. Some of your best shots will be obtained once the birds have thinned out (and the other visitors have gone home). This is because you are sufficiently practiced by then, and there are fewer birds to contaminate your shots. If possible you want to get the kite with space to fly into the frame. It can help to use the central focus point because it is more sensitive and also guarantees space in the frame, which ever way the bird is travelling, if you focus on the head.
Finally, don’t forget to try some vertical shots, and shots with more than one bird. Odd numbers seem to work better than evens for this.
Settings
In a change to my usual practice of using a couple of manual exposure settings (one for light and the other for shade) described elsewhere, I used a different technique due to the very flat lighting conditions. I set my camera to auto-ISO, with a minimum speed of 1000th of a second, then set a manual exposure of 1600th second at f4. I took a couple of test shots (repeated through the afternoon) to judge the exposure compensation that I would need shooting against the white sky. This ranged from 0.3 – 1.0 stops as the afternoon wore on, but this gave great results and I didn’t need to worry when the sun came out for the odd shot.
I usually turn vibration reduction off for shutter speeds above 500th second, but (in the heat of the moment, against the breeze, I didn’t realize it was turned on – easily done when you’ve covered up the switch with a waterproof camo-cover) I’m pleased to say that it didn’t seem to make any difference to the image sharpness.
Post Processing
These days I’m using lightroom for initial adjustments, then adding a quick mid-tone contrast boost to the bird itself using Tonal Contrast in Color Efex Pro, followed by my 3 or 4-pass sharpening routines in photoshop. Though I must say that the Raw Pre-sharpener algorithms in Sharpener Pro 3 are just as good and much faster to implement.
Spoils of the Day…
Cheers,
R.

Jan
26
Alas No Cycling, But a Few Hours to Play…
Photoshop and the Art of Self Destruction
Last weekend I had a great ride on Saturday, 2,000 feet of climbing (and calorie burning), over 25 miles, including the famous Horseshoe Pass. The weather was cold and wet, with some wind, but a lovely lunch at Fouzi’s in Llangollen made up for the strain. I had been having some difficulty with my freewheel for several months, and there had been a few events where its slipping had caused problems starting off, especially at temperatures near zero. Last Sunday, I set off for another ride, but the freewheel failed completely. No forward motion, so alas no cycling. My friends walked back with me to the car, and we talked about what next. I had been hoping that I could manage through the winter and get a new bike in the summer months, but this plan has had to be trashed. Spares for the Marin have been hard to get, and a freewheel seems impossible to source at this juncture. So I have ordered a new bike from Halfords, and I’m waiting for it to arrive. I’m going for a Boardman Team CX this time. It should see me through the rest of the winter, once the frame size I require is shipped down from the Leeds store. But that is another story.
The weather has been awful today, so I guess it has been no hardship to stay at home, but I needed a diversion to make up for not having a regular hit of exercise on the Marin. So what was it to be today? I didn’t fancy a trip out to photograph landscapes or wildlife (the weather again), and my inside macro-brain was similarly uninspired. I caught sight of an old book on the shelf in my study, ‘How to Cheat in Photoshop CS3, The Art of Creating Photorealistic Montages’ by Steve Caplin. That’s it I thought, I’ll just play this morning, with Photoshop, just see what I can create. I didn’t have a plan, or any pre-conceptions, it was a spur of the moment thing. I thought about it for a while, and decided that I would edit a photograph of myself, and see what might be possible. That way, nobody would be offended.
Gold Finger…
First off, how about some fun with Curves?

First convert the image to black and white using your preferred method, then, to get a metal effect, you need a curve with wiggles. From here it is simple enough to color the image with a second curve that does 3 things. Lift the red and green mid-tones and then darken the overall image.
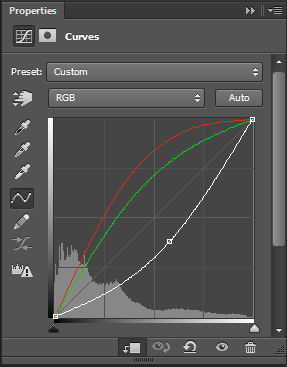
Layer mask your image to taste and away you go. For this image, I made a cut-out of myself, and jumped it up onto its own layer, in order to simplify the masking. There was already quite a lot of contrast in the image, so I was able to do this fairly straightforwardly using the Quick Selection tool, rather than resorting to a channel mask.

Goldfinger, He’s the Man!
The Next Level
That was fun. It only took a few minutes, but was not intrinsically satisfying. I would definitely like my own weight in gold, but would want to earn it by doing something that was a real test. So what next? Play some more, it’s the only way!!
Having thought of myself as a golden statue, what about being a robot? Perhaps with something removed? What about some missing face? What about an explosion of some sort? Hmm. An idea was taking shape. Smoke and flame, that’s the stuff. Now, I can definitely step you through what I did next, but for this blog it might be sufficient just to show you the finished piece. I’m not claiming that this is perfect, I didn’t spend too long working on it, I way just experimenting after all. I’m certainly not sure that an exploding head merits such an inane smile. But hey, it’s a start.

Until next time,
R.

Jan
05
New Year, New Profile Photo for LinkedIn
Photography / Photoshop / Portfolio / Portrait / Studio Flash / TDI News Posted by Robin
/
0 comments
The Making of a New Profile Photo for LinkedIn
The Reason Why…
I have been working on my social media profile for a few weeks now. I have a Google+ account, with a page for TDI, an Instagram account and most recently a LinkedIn account and now Twitter. I am in the process of getting to know the strengths and weaknesses of these, how they work, and how best to engage with them and will be linking. My LinkedIn account is really to support my other career as a psychiatrist but I have previously used the same (branding) image as for TDI and my other accounts. Thinking that I probably need something a little more formal, my wife agreed to help me take a fresh portrait for LinkedIn.
A New Fridge-Freezer, A New Problem
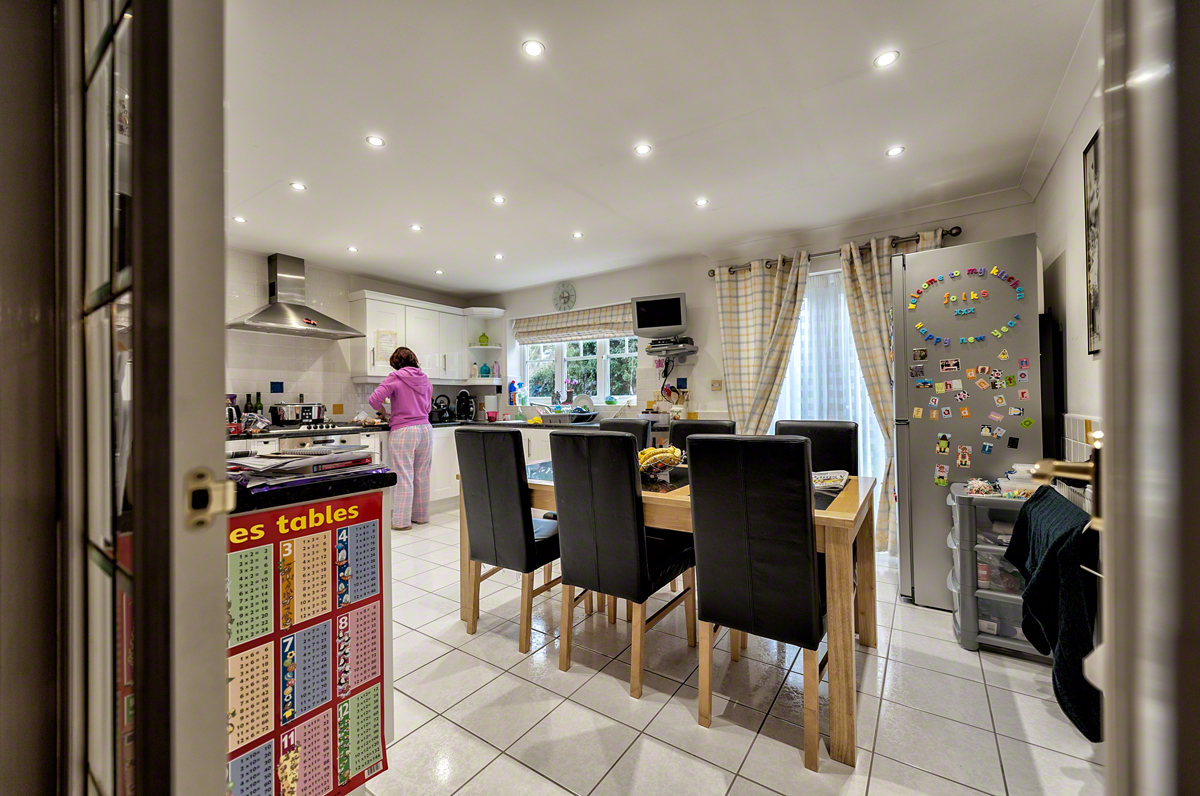
Towards the end of last year our built in Fridge-Freezer decided that it would start freezing everything in the fridge, as well as the freezer, and to make so much ice that the drawers in the freezer wouldn’t open at all. Fearing a fire, and not having enough time to source a reasonably priced built in unit, or re-fit it in the appropriate cupboard, we elected to have a free-standing unit instead. In fairness this has been a great success, my daughter has decorated it with magnets, and uses it as a noticeboard for maths puzzles for her poor old dad to write down and solve. But here’s the rub. I can’t easily move the kitchen table out to the side like I used to, because a third of that space is now Fridge-Freezer!! So using the kitchen as a studio to capture a new profile photo is a world more grief than it used to be. Still, I needed some exercise because the weather had trashed our planned cycle ride today (too much ice this morning, too much rain and gale force winds this afternoon). Plus my bike’s not well at the moment either. So moving a heavy table and running up and down stairs a lot seemed just the ticket.
The Area to Clear, Ho Hum..
So here’s the thing, that kitchen table had to go out in the hallway. Would it go out through the doors? Could we lift it? If it was out in the hallway, could we get back in the kitchen? Was I going to be able to carry my equipment from upstairs past the obstruction? Who knew, we had to give it a try. After, that is, Helen had cleaned the floor!!
Phew, That Looks Better!!
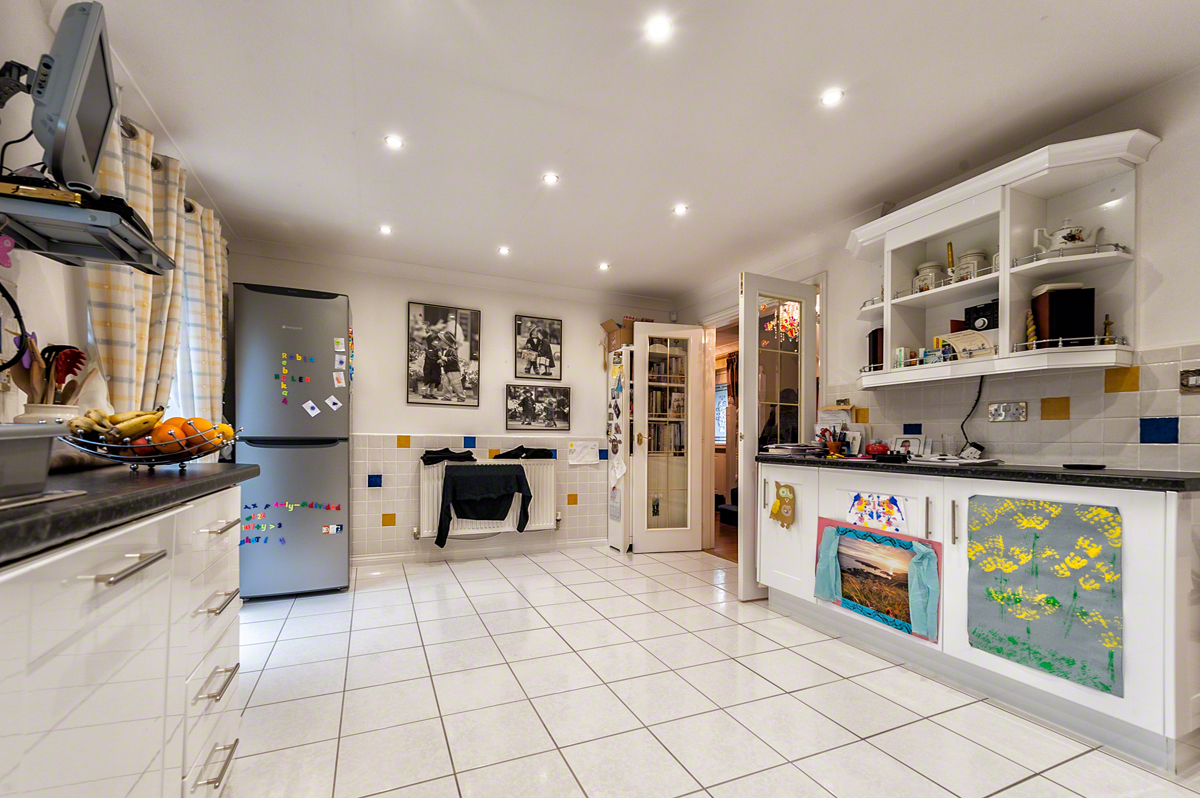
After much shoving and scraping, and even more hoovering and washing, a space was made available in the now pristine cooking and dining area. So, whilst Helen moved on to pastures new, for further housework opportunities, I set about bringing the necessary equipment downstairs, and stockpiling it into the hallway. Hmm.. That’s a bit of a mess you’ve got there thought I. I wonder how long Helen is going to stay patient with you?

Hallway Carnage…
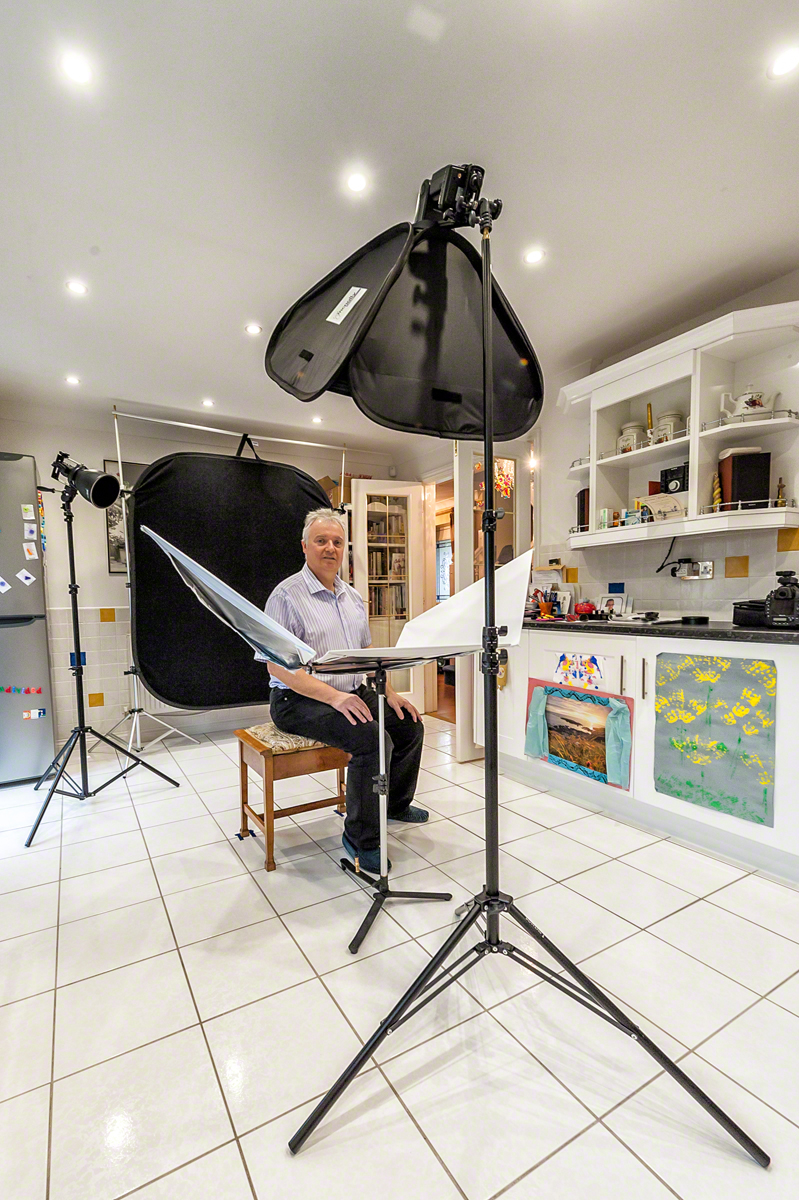
So onto the setup and test shots. I went with the D4 with 70-200 f2.8. This was going to be quite heavy for Helen, but she was confident that she could manage anything I threw at her. I decided not to shoot tethered. It was just one portrait and the image on the back of the D4, particularly with the 3 channel histogram, was more than sufficient to judge framing and exposure. I used my favorite portrait set-up of the Lastolite Triflector and Nikon Speedlight fired through a Joe McNally Ezybox with soft white interior and 2 layers of diffusion. For separation I used a second speedlight (an old SB800, in SU4 mode at 1/32 power) fired through a Bowens grid-spot attached via the rather superb Interfit Strobies XS Int326 gizmo. As usual, the camera was connected to the key light using a PocketWizard Flex Mini TT1 and Flex TT5 set up with the AC3 Zone Controller set to -2/3 exposure compensation, with ISO 200, 1/160th second and f8. Finally, my favoured Lastolite black velvet panel, suspended from a suitable stand, completed the picture.
So That’s how it’s Done!!
We have daylight balanced LED lighting in our kitchen, so I left those on during the shoot. The only slight problem was teaching Helen to use the back-focus button (I have all my cameras set up this way for my wildlife photography) instead of half pressing the shutter release, but she picked this up really quickly, and didn’t need reminding to focus on the forward eye.
Until next time,
R.
Jul
22
The NetMagic Shoot
Bill and Wendy from NetMagic are friends of mine. Bill has been helping me get started with cycling again, after a 20 year rest from regular exercise (I kid you not!!). In a way, that’s a whole blog piece for another time. I’m certainly not willing to share any images of me as a MAMIL until I’m quite a lot fitter, the shame would be much too alarming for my family (and me of course!).
The NetMagic team are working on their web presence at the moment, and Bill mentioned to me that they were looking out for suitable images. I offered to help out with the corporate portraits and an image that gave a sense of the purpose of the enterprise, which is essentially all about helping students (see below).
NetMagic Tuition and Training Services provides:
- Private tuition (GCSE and AS/A2 level) in a range of subjects
- Exam Preparation and Study Skills support
- University Application Advice (Personal Statement Review)
- Oxford and Cambridge Application support with preparing to apply, the application process and mock interviews.
- Specialist support for students with specific learning difficulties of all ages, such as those with dyslexia, dyspraxia and autistic spectrum disorder.
The Technical Stuff
I used 2 setups for the shoot. First-up was a black (velvet) background with two flash. The first as a keylight at 45 degrees above the subject, shot through my favorite double diffused, 54cm Lastolite Professional, Joe McNally EzyBox Hotshoe. The second strobe was a hair-light shot through a grid. Both flashes were on Pocket Wizard Flex TT-5 radio triggers, and so easily controllable from camera. Both lights were set camera-left. The set (on the kitchen table, as it happens) was built with books from my study and props from the kitchen. I have heard it stated that you should use the same quality of light on the hair as with the keylight, but I really like the sharpness of a grid spot on the hair and I think that a lot of photograhers shoot that way.
The second setup was a more traditional corporate portrait affair. Keylight courtesy of Joe McNally, a Lastolite Tri-Grip reflector and a low-tech grey background (a £7 grey bed sheet, courtesy of ASDA), in this case, simply thrown over the velvet background panel and clipped on with A-Clamps to keep it taut. A hair-light shot through a grid, and finally a background light shot through a Lastolite Micro-Apollo softbox. Again all the strobes were on Flex TT-5 radio triggers controlled from the camera.
Post-Processing
Given the nature of the lighting, not too much was required. A quick run through OnOne software’s Perfect Portrait 2, the addition of mid-tone contrast from Color Efex Pro 4 and my usual 3-pass sharpening regimen.
The Images
The best way to see them is to swing by NetMagic and check out their excellent facilities. You may well know someone that could benefit from their services and they would be delighted to take your call.
Cheers,
Robin.

Apr
08
Photographing Roses
Focus Stacking / Macro / Nature / Photography / Photoshop / Studio Flash Posted by Robin
/
0 comments
A Rose by Any Other Name
I hadn’t started out to do a studio flash session photographing roses, but on thinking about what background colour would suit a white and pink rose, I realized that it had to be bright white and not grey, so the available window light session that I had planned quickly turned into something else entirely.
Photographing Roses Against a White Background
 Photographing roses against a white background requires the same technique as for photographing a portrait, or anything else, against a white background. The background has to blown-out, but only just blown out, in order to avoid too much flare and contrast reduction from the resultant backlight. People sometimes talk about getting the background about 2-stops hotter than the foreground, which is another way to go, but I treat the background (which, by the way, needn’t itself be white!) like I would treat a snow scene. I will take a couple of shots with just the background lit, and increase the exposure, from metered, up a couple of stops or so, until it is just blown out. I will then turn the back-lights off and use the main light to get an exposure for the subject. For this shoot, I used 3 x SB900 strobes. 2 for the background, either side at 45 degrees, and one in a Lastolite Joe McNally Ezybox Hotshoe for the main light. I prefer to shoot manual as much as possible these days, so the Camera was set to 1/200 second at f11, ISO 200. The lens was a 105 mm Micro Nikkor on a D3, and I used 2 layers of diffusion in the softbox. All 3 flashes were set on manual, and the amount adjusted for correct exposure. I like this setup because nothing changes (except perhaps the ambient light), so all your shots are perfectly exposed and provided your strobes aren’t maxed out (1/1) you can take a small burst of shots if you need to, for instance with a moving subject.
Focus Stacking
 Photographing roses with a macro lens, close up, can lead you into problems with depth of field. This is often livable with, particularly if your shot includes quite a bit of stem and you are further back, but close-in you will have to make a decision about where to focus. I had just been reminded of the possibility of using focus-stacking in an article in Am Phog (Saturday 6th April 2013, Martin Evening’s Retouchers’ Guide), so thought I would give it a go here. By the way, Martin Evening’s books, ‘Adobe Photoshop for Photographers’, ‘The Ultimate Workshop’ and ‘Photoshop Lightroom’ are all very useful tomes if you get a chance to read them.
Focus stacking is often used in macro photography, especially for extreme close-ups of things like small insects. It is often not straightforward, however, and there are several gotcha’s to be aware of. It is best to use an uncluttered plain background because as the lens elements move, the relationship of the subject to the background can change, making the blend between layers harder to do manually (or trick the software and end up with a small areas of blur that really stand out). Having a lens that focusses internally helps (but doesn’t avoid the problem completely), and sometimes you get a better result by using something like a Manfrotto 454 Micro Positioning Plate. What this does is allows you to slide the camera and lens combination backwards and forwards by very small amounts using a thumb-screw. This can be much easier for small focus adjustments when you are very close in and the depth-of-field is only a millimeter or so, where the lens’s own focus ring gives too course an adjustment.

 For good focus stacking it is said to be best to use an aperture that represents the sharpest focus of the lens, which on my 105 is f8 or f11), in order to avoid diffraction effects. There are several good focus stacking software programs available, but I use Photoshop because I don’t do this very often and a bespoke software solution has not seemed warranted. The process is quite straightforward. Take a series of photographs (in this case of your roses) starting at the foremost focus point, working through to the rearmost focus point. Select the files in Bridge or Lightroom, then using the tools menu choose Photoshop –> Load Files into Photoshop Layers, or in Lightroom, right-click on the selected files and go to Edit In –> Open in Layers in Photoshop… Once the files are in a single Photoshop document. Select the layers and go to the Edit menu and choose ‘Auto Align Layers…’ using the Auto Projection method.
 The next step is to merge the layered images together. Go to the Edit menu and select ‘Auto-Blend layers’ making sure that the Stack Images button is set and the Seamless Tones and Colours also checked. From then on it’s just a matter of clicking Ok and waiting a while. As I have mentioned, you may not get perfect results and, for this reason, you may want to manually select appropriate images, stack them, and blend them manually yourself. This is not for the feint-hearted, but does give you a great-deal of control over the final result and this is what I did here. I suspect, but have not checked out myself, that it makes a difference to Photoshop that the images are in depth-of-focus stacking order, rather than in a random order. Sometimes you get a really excellent result, other times less so. At the point of capture it is not always clear which bits of an image are at which depth, so you can end up going backwards and forwards a bit.
Until next time,
R.
Mar
09
Shooting Garden Birds
Field Craft / Garden Birds / Nature / Photography / Photoshop / Slideshow Posted by Robin
/
0 comments
Frosty Mornings are so Cold

The Hide and Feeders
On a frosty Sunday morning in March (the 3rd 2013 to be precise) I had the urge to pop up my hide and go shooting garden birds. We do have feeders in our garden, to which we have a steady stream of Goldfinch visiting along with a variety of Tits (Blue, Great and this month Long-Tailed), but I had shot these before and was keen to try a different position in the garden. Our garden is L-shaped so there are a few different angles from which to shoot, and I have not yet tried them all. So the day before I visited one of our local garden centres and purchased some fresh feeders on sticks and placed them round the corner so as not to disturb the current visitors to our existing feeders. This turned out to be a very helpful strategy for reasons I did not yet fully appreciate. I did not particularly want to shoot Goldfinch, but rather a selection of other garden birds, but I expected them to make an appearance (ie the Goldfinch) round the corner if I put out more Niger seeds. You can probably see the three feeders on the right hand side, beyond the hide in the picture above. The feeders are stocked with, from left to right, high energy bird feed, peanuts and Niger seeds. You may also be able to see, by zooming in, that there are 3 perches attached to the poles underneath the feeders. Obviously the plan is to have the birds land on the organic looking perches for some of the shots. I can’t stand birds on feeder shots actually – but nevertheless everyone takes a few whilst your waiting for better shots on the perches – unless you are exceptionally disciplined.

A Gnarly Perch
Here is a close-up of one of the gnarly sticks used as a perch for shooting garden birds. Usually you need about 10m or so beyond the focus point in order to blur the background. For this reason, I positioned the perches so that, by shooting from the hide level, I would be taking in a background beyond the fence (mostly). It was a dull and overcast day, so the background was either distant tree foliage or dull sky. As it happened, towards midday the sun came out and I was treated to lovely blue skies as well. The day was bitter cold, so I set up with plenty of layers and my trusty flask of coffee in the hide and waited, and waited some more. The joy of shooting overcomes the feeling cold, but I was shivering for hours afterwards. Make sure you eat regularly to keep the cold out.
Happily there started to arrive a series to blue and great tits, mostly to the high energy feeder and the peanuts. Sadly, not one alighted on my special perches. Actually there is a bit to know about perch diameter. It is essential that the perches are not too wide as this hurts the bird’s foot musculature and they don’t stay on them very long. Moose Peterson says that being uncomfortable in this way also affects the bird’s eyes in an unhelpful way. So titrate the diameter of your perch to the size of your intended bird’s feet!! I wasn’t sure what to do. Was it just a matter of waiting (a very long time, as opposed to just a long one) or was there something that I could do to improve my odds?
Field Craft for Shooting Garden Birds
So here’s what I did. I took down the peanut feeder. It was getting a lot of traffic, but not so much the Niger seeds, and actually the peanut feeder had the least visually appealing perch. I also put an assortment of peanuts, meal worm and high energy feed on the top of the fence in the distance to see if I could encourage some birds onto that. Et Viola, a Great Tit landed on my gnarly perch. Boom he was gone. It was so unexpected I wasn’t ready and missed the shot. And then, something even more unexpected. Siskin. And at least 3 males. All loving the Niger seeds, greedily feeding on the built-in perches for minutes on end. Bright yellow and gorgeous. Visiting only from mid-March to mid-May, and completely unnoticed in the garden so far. Still no gnarly stick action though. But in-between plenty of birds on the fence in the distance, and still within reach of the 840mm combination of Nikkor 600mm plus 1.4x teleconvertor. These interventions did make a difference to my hit-rate on the organic perches, but even so these shots were few and far between. I could have put suet on the back of the thicker sticks, but I am loath to do this in case it shows up in the photograph.

Close-up of the Hide
So, what about the Hide? The hide is an F1 Fold Out Hide from Wildlife Watching Supplies. This is a cube shaped hunting style Hide with a built-in metal frame. It folds down to a small case that has two straps for easy carrying by hand, or on your shoulder, or back. It comes with pegs and guy ropes (although you usually don’t need to use the guy ropes). For shooting garden birds it really is very easy to put up, but if you are on your own it is necessary to peg the base out in order to pull up the roof frame. The hide is very well made and has viewing “windows” at the front and at the sides in addition to the rear. Each window has a cover attached by toggles (like an old duffel coat) and velcro’d on scrim netting. The inside is matt black coloured so provided you are wearing dull coloured clothes the animals don’t know that you are there. Clearly from this photograph you can see that the Hide cannot be said to be inconspicuous in my back garden, yet I am constantly amazed at how close birds, squirrels etc will approach. Sometimes too close for the 600mm to focus on!! I purchased my Hide with a handy portable chair (the C25 Fold-Out Chair). It has a handy shoulder strap, and a fabric pocket beneath the seat. The only down side is that there is no ground sheet, though I haven’t really found that one is essential.
The Photography
There was quite a range of lighting between the various places that the birds were landing so, at least until the sun came out, I was forced to select a pretty high ISO to keep the shutter speeds up to a reasonable level. I find that I can reliably shoot at a 160th with the 840mm set up on a tripod with gimbal head, and can get away with a 125th of a second on a good day. This meant sometimes rising to ISO 2500. When shooting garden birds that are fast-moving, I find it difficult to change the ISO at a moment’s notice, so this is something I tend to do in-between shots. I live in hope that practise will eventually make perfect for this issue. It’s certainly easier to change ISO with your eye to the viewfinder on the professional bodies like the D4. It’s strange, but I can adjust aperture and exposure compensation whilst juggling back focus and firing but really struggle with the left hand adjustment of ISO, which means I slightly lose control of the camera bracing and positioning is critical for rapid shooting within frame. But setting a high ISO in advance does let me increase depth of field for the brighter perches by stopping down, which I can do very quickly. Once the sun came out I was able to get down to ISO 200 for some of the shots again. Usually I shoot wide open at f4 or f5.6 with the 1.4x teleconvertor, but I have found it beneficial to stop down to f8 or f11 respectively to get slightly more feather and beak in focus, particularly when the bird is face-on.
The Photoshop
There isn’t a great deal to say about this. The images were prepared in Lightroom 4 and finished in CS6. All that was required was some mid-tone contrast adjustment via the ever amazing Color Efex Pro 4, and some sharpening using my usual sharpening actions in a 3-pass routine with additional local creative sharpening where required and sharpening for screen to finish. I must discuss sharpening as an issue in-depth some time.
Glad to be back in the warm,
Until next time,
Robin.
Feb
28
The Machinery for Drop Collision Photography

Splash Art Kit Mk II
First off, I was alerted to this new drop-image possibility by a review in Amateur Photographer (January 26th edition). The kit in question is the SplashArt Kit Mark II, manufactured by High Speed photography Ltd, 31 Roebuck Lane, Buckhurst Hill, Essex IG9 5QN. Their website is www.phototrigger.co.uk. Tel: 07905 836280. My pal Geoff was similarly taken and, without further ado, purchased said item and brought it round for a test shoot for which I supplied the set and the lighting.
There are 4 dials on the control box, with line markers but no scale markings or labeling, so it all seems like guesswork to start with. From left to right (and top to bottom) the dials control; the size of the first drop, the time delay between drops, the size of the second drop and the camera delay adjustment. There is a small micro-switch that controls the mode (1 drop, 2 drops or 3) and is responsible for firing off a round of drops and triggering your camera. As others before me have said, the apparatus is reminiscent of the retort stands we used to have in school chemistry lessons with an additional gizmo attachment at the end. The drop container looks like a small sandwich box of the type popular in supermarkets now, though this does not impede its functionality. Un-clipping the top to add colourants to the drop mixture will move the retort stand however, so you will need to refocus if you do.
For lighting the drop collision photography I used 2-3 SB900 strobes set to 1/128 power fired through a translucent (clear) plastic A4 ring binder cover (with the ring binder removed) to backlight the drops. I would have liked to use a translucent plastic sheet similar to those used on light-boxes or x-ray viewers, but I did not have time to source this for our shoot. I angled both strobes at 45 degrees, to begin with, both at the same height. I quickly realized that a diagonal spread of light would be better so moved one of the lights onto a light stand.
The Technique

Setting up the Focus Point
In order to start our drop collision photography, we set the SplashArt kit to 1 drop mode to find the focusing point. First time out I used the knife-edge method, but I have now found a better way. I used the dual threaded spigot that comes with my flash brackets. It has a thread each end and is shaped like a small metal reel. It is reversible so that it can be attached to two sizes of thread and then acts as the spigot that you clamp your bracket onto in the same way that you would use the top of a formal light-stand. I placed this in the drip tray and fired off a series of drops adjusting the position each time until the drops fell inside the small threaded end. This works much better because you don’t need a second person to hold it still whilst you focus and can get a more accurate result. When using a macro lens it is quite difficult to get the whole splash in focus, and this way you know where the front and back of the drip will fall, so you can focus on the front edge, back edge or in between according to what you prefer to be most sharp. As you can see, this drop was slightly to the right of the threaded hole at this point (greater splash to the right). It was also a 2 drop scenario because we hadn’t yet switched the SplashArt kit to single drop mode. You will notice that the drop is red colored. We didn’t start off this way, we began with clear water in the tray and the dropper, but this shot from later on in the shoot was necessary to reposition the camera focus following moving the drip container in the process of putting pink food colouring into the top and stirring it.
The next logical step was get a feel for where the drops fell in the two drop mode and how much camera delay would be required to get a pit, crown, or a pole.

Pit

Crown

Pole
Once this is done, the next step is to control the spacing between drops so that there is a collision. The size of the drops that collide seems important and I think that similar settings on the dials for the first and second drops (first and third dials) helped me get a satisfactory result with the SplashArt Kit. The sign that you are approaching the correct timing between the drops is when you start to see some action at the tip of the pole, for example:

Finding the Collision Point

Repeatability
Once this point is reached a smaller further closing of the gap between drops may be necessary, and thereafter just plenty of trials, until you get some attractive results. All the shots you see here in the slide show were made first time out with the SplashArt Kit Mark II. One session of 4 hours or so got us all these shots (minus a coffee and brief lunch break of course). There is a lot of variability between shots. I don’t know whether this is because the timer cannot perfectly control the drip valve, or whether there are timing issues with the flash. My SB900 strobes, as usual, were fired using my trusty Flex Mini TT1 with AC3 controller and TT5 trigger combination. This gives on-camera control of the distant flash which makes for less walking round the studio (kitchen) and speeds things up a little. I suspect that there is no particular issue with the flash timings (but can’t completely rule it out) as at no point do I see a double drop image which means that both flashes trigger at the same time. Not bad when the flash duration is 1/38500 of a second!!
More on the Lighting
As you can see from the slide show, and the production images, I have used a selection of coloured gels on the strobes along with changing up the position of the strobes relative to the translucent plastic background. I must admit that my selection of gels is a bit limited, but the combinations were:
- White on White
- CTO (orange) on White
- CTO on Blue
- CTO on Red
I have also got green gels (to colour match for flourescent lights) which might also have looked good but I didn’t think to try. Needless to say there are a couple of approaches to white balance settings in this situation. You can use tungsten or cloudy settings for, instance, to produce a uniform rich yellow or blue colour. Alternatively, as I did here, you can use the preset flash white balance to produce an overal neutral result but then gel the flashes to produce the colours. This is my preferred approach because, although it requires multiple strobes, you do get greater flexibility.
It would be possible to set up a single coloured, or patterned multicoloured (perhaps printed out on a home inkjet printer), background, and reverse light that to get similar results to the multi-strobe effect.
For water drop collision images you do really need to backlight. For milk images you can front light, and for the closeups you see in the slide show this was really necessary to counter some of the shadows produced by side lighting. In fact I ended up using three strobes. A single backlight and two front lights. The front lights were camera right at 45 degrees and camera left at 45 degrees but much higher up to light into the extensive crowns. We might have been ok with a single front strobe placed centrally and above the camera in order to throw the shadows behind the splash.
More on the Fluids
Since my first attempt at drop collision photography, I have been reading Corrie White’s Comprehensive Water Drop Photography Guide. You will find a lot more detail on what you might do to water to thicken it, and some further tips on lighting milk etc. What I have realized is that it is easier to get spectacular crowns, and some really interesting graphic shapes, using the thicker substrate of milk, than it is with water. In fact, as Corrie points out, there are some things that you just can’t do with water alone. Clearly thickening water with sugar or guar gum also has side-effects to the look of the resulting solutions, so sticking with plain water is probably best. Nevertheless the old school physics fact that water is densest at 4 degrees centigrade is worth knowing and using here. So next time I will definitely try using very cold water and placing some ice cubes in the drip dispenser and into the drip tray.
Colourings
We only had red food colouring at our disposal this time out. Clearly there are many others that you could purchase fairly cheaply. I have heard that some people use printer inks, but this may be quite expensive. Red looks great in contrast to the white milk. One tip for the milk shots using coloured drops, you need to stir the drip tray in between trials to whiten up the milk again. You could also put colouring into the drip tray and experiment with the two colours mixing together in the drip stem. I really do think that you are limited only by your creativity.
Things to Try
- I really fancy having a go at splashes inside bubbles. Wow. Can’t wait.
- Splashes where the drip container is a crystal glass, or similar, and can be seen in the shot.
- Odd looking colour combinations.
- Several splashes composited into the same shot.
Until next time,
Robin.
Feb
06

Relaxing at home…
Another Year Older..
Both the Doctor’s Images, and the Doctor himself, are another year older. It has bugged me for some time that my current photo has me with such long hair. Did I ever tell you that story? I really dislike having my hair cut. Just always have done. I only go to have it cut with my family, to places I’m used to. Once happy with a hairdresser I would always go there, even on my own. My spouse, on the other hand, is very fussy. Hairstyle is a business issue as well as a personal one. Picky doesn’t come into it. And she changes hairdresser quite often, which leaves me high and dry. Can’t go back. Too embarrassing to explain why my wife has changed. Nightmare. Several months will go by, and then another few, whilst the new stylist proves themselves and then I can join in. Meanwhile I turn into 60’s man. Work colleagues recognize this pattern. Anyway, we are back where we need to be with Sam again, and my hair is a reasonable length. So time for another picture.
Choosing a Setting
Actually, I quite like the relaxing at home in the library look (although, as you will see, the reality is somewhat different), so I will go with a repeat of that. I thought briefly about a plain black or grey or white background, but then thought something less clinical would be better. I thought about a 2 strobe setup, and whether to employ the same methodology as previously described in The Making of a Self Portrait, but decided against it. Instead, as can be seen from the production shot below, I used a softbox and a grid-spot this time.
 This was no ordinary softbox, but a Lastolite Ezybox 30 inch from their Jo McNally range. As you can see I’m using part of my lounge with a single bookcase, which through careful positioning, and by using a 70-200mm f2.8 zoom, has been made to look like a whole library. As you can also see from the production shot I am using my famous home-made grid spot, the ones made of black straws and cardboard, for the hair light rather than using window light.
Finding the Focus
This was not as easy as it might have been because I was doing this as a self-portrait. Our weekends are very busy and no helper was available. I had a remote release in play and used manual focus via trial and error to find my focus point. I started out using f2.8 to blur the bookcase as much as possible, but this just made critical focus impossible to find on my own, so I moved out to f5.6 which gave sufficient depth of field. My radio flash triggers worked well but I was having a problem with my remote release. If not pressed firmly and precisely downwards, the button caused only one flash to fire, and at first this seemed to weird to be true. This gave an interesting and very dramatic effect (because it was the grid spot) but this was not to be too arty. Common sense would indicate that it must be a flash trigger problem, though this didn’t seem to be the case and after a while I was able to choose one or both flash to fire at will based on how I pressed the button on my remote trigger. So what about the outcome? Well I have chosen 2 shots below as possible to use, and by the time you read this one will be posted in my About page.

 The images were relatively straight forward to edit, but I did use the opportunity to play with onOne Software’s Perfect Portrait 2 which is now much faster and easier to use than previously. There are many things to like, particularly the way in which it uses Bezier curves to select the mouth and eyes. This is so much faster than the previous method which used a mask. Skin smoothing is a real doddle and it is possible to get a really nice skin tone and texture even if the original is quite red for instance. Perfect Portrait 2 comes as part of Perfect Photo Suite 7 which again is worth a look. Comparing these images with last year’s picture, the background blur is much less at f5.6 than that achieved with my 85mm at f1.4, but this is to be expected given that I was much closer in on the previous image. Background blur varies with both the camera to subject distance (a shorter distance gives more background blur) and subject to background distance (a longer distance gives more background blur). So in essence self-portraits, with a lot of background blur, are better taken by someone else!! Well at least focussed by someone else. I have decided to use the more casual looking photo for my about page, and to blur the background a little more in Photoshop using CS6 field blur from the blur gallery.
Blurring the Background in Photoshop
 This is trickier than most people think by the way. If you blur the image substantially, for instance to remove most of the texture from the books, you will end up creating a large halo around the figure on the background layer. So when it comes to mask out the blur over the person, so that they remain sharp, what happens is there is still the halo blur of the figure in the blurred background. You can’t get rid of it, so what do you do? The trick is this:
Copy the layer that you are going to blur, prior to applying the blur, twice. Now, turn off the upper layer and apply the blur to the background layer beneath it, leaving the bottom most layer unblurred and untouched, until it appears satisfactory (in fact go a bit further than you think you need to, you can always fade it back later on). On the background layer (the middle of the 3), use the clone stamp tool to carefully clone appropriate background detail into the halo around the figure, effectively losing the outer rim of the blurred figure. Clone-in until the entire halo has been removed. Now turn off this layer and turn on the top layer. Mask out the figure using whatever technique you normally use. These days I use the quick selection brush to create the selection and then finesse in refine edge to create the mask. This creates a sharp-edged cut out that can then sit in the blurred background. Turn on both the blurred and the untouched background layers and select the blurred layer. Dial down the opacity to taste and you’re done.
In the interests of full disclosure, I have also darkened the background a little too.
Cheers,
R.
Recent Comments