
Apr
13
The World in a Droplet
Focus Stacking / Macro / Photography / Photoshop / Retouching / Water Droplets Posted by Robin
/
0 comments
The World in a Droplet
Macro Photography can be a Challenge
The Basic Premise
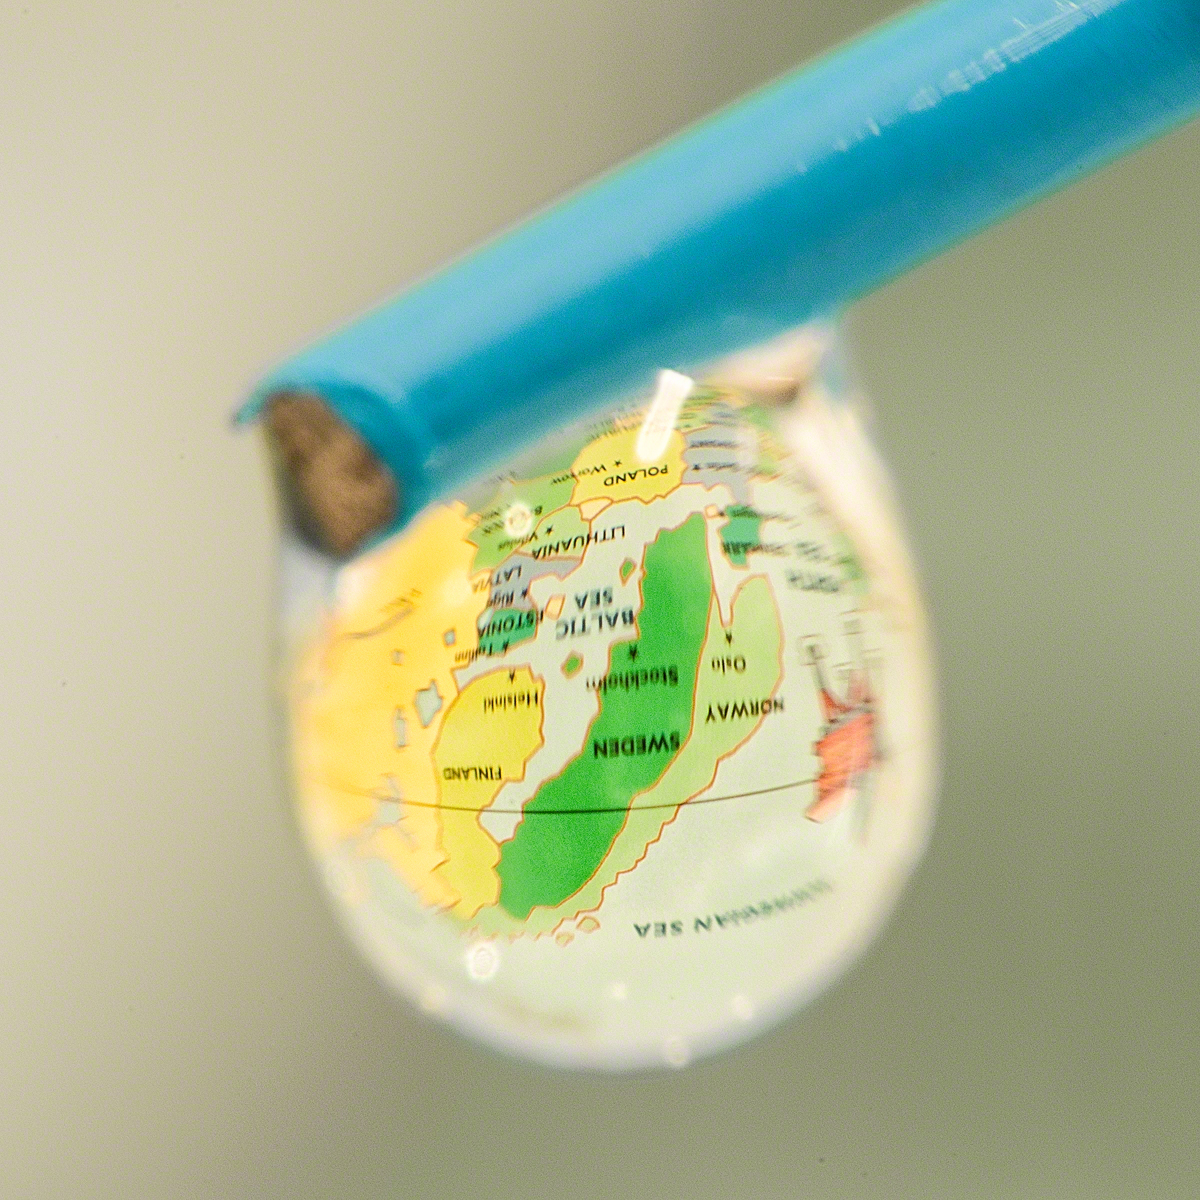
My inspiration for the world in a droplet idea came as a result of seeing an image of a drop of water on a hypodermic needle on the web. You could see a thin reflection on the base of the droplet, which was very small in the frame, but you couldn’t see what it was. I had the idea that I could have the reflection of a world atlas in the droplet and, of course, larger in the frame.
Testing the Theory
Although I was confident that I could pull this off, I knew it might be difficult. I thought I could get the magnification, but I wasn’t sure about the rest. How to get a drop on a wire (I don’t have a hypodermic needle), how to get the map reflected and what about the necessary depth of field. A pilot project seemed the thing to test the theory. I didn’t take any production shots of this, so you will have to use your imagination.
Daylight seemed perfect, so I set up on the surface by the kitchen window. I took my floor stand (a light stand) and, using electrician’s tape, fixed a cardboard tube from a roll of aluminium basting foil leftover from the Christmas turkey. To this I taped an empty Bic biro carcass with a blue paperclip wedged into the end, and bent it into a sort of hook shape. Using a second biro carcass, I poured water into the open end until I got a droplet on the end of the paperclip hook. Actually, I didn’t realize how lucky I was to get this to happen quickly because it proved a nightmare to reproduce when I did the final world in a droplet image.
Equipment wise, I used my old D300 Nikon as it would give more magnification than a full frame (the droplet was only 1.5-2 mm wide). I fitted an old 75-300 mm Nikkor lens, and using a set of reversing rings, fixed an old 50 mm f1.8 Nikkor to the end. I quickly found that I had more reach than I really needed so zoomed the 70-300 to a wider setting, and took my shot.
First Stab..
So what did I learn? Firstly, I’d have been better off setting up somewhere other than the backlit kitchen window, because I was getting a lot of flare and unwanted reflections in the droplet and had to shutter out the window. Secondly, focusing is really difficult because there is so little depth of field. If you move the tripod it can take an age to even locate the droplet again, never mind focus on it. You aren’t able to clearly see the text on the map when you focus on the droplet, so it is very hard to get it sharp (at least with my eyes). Partly because you can’t define the letters, partly because it’s hard to make fine enough adjustments to the focus (more on this below).
Secondly, the map image appears to be on the rear surface of the water droplet, so you have to focus there to get the map sharp. This means you can’t see sharp edges on the droplet itself, and the paper clip is not properly in focus. In fact the paperclip would have been better parallel to the plane of focus to avoid so many depth issues. When I do this for real, I will have to use focus stacking.
Thirdly, the map was upside down in the droplet (of course you idiot!!), so that needs turning upside down before you start.
Doing it for Real
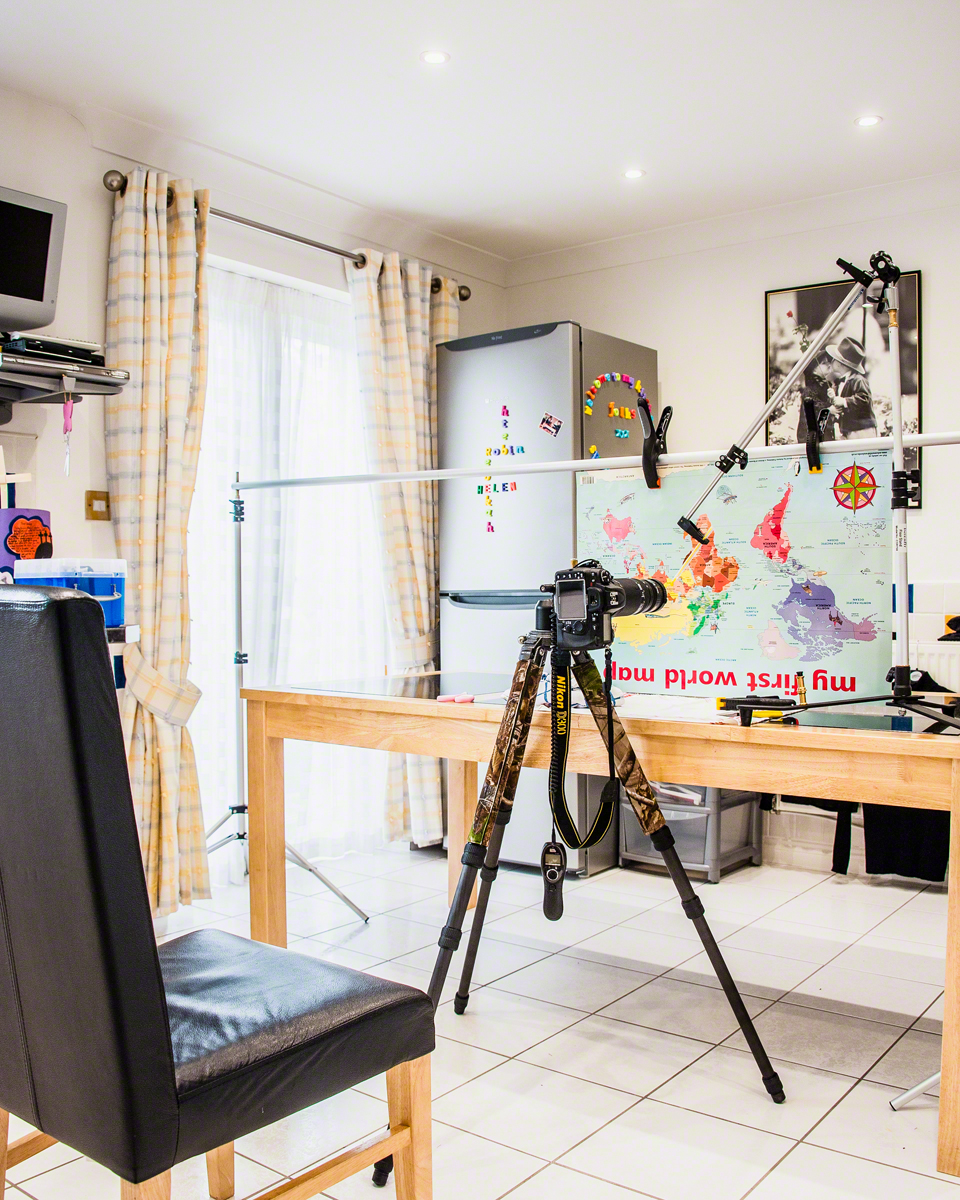
Household chores notwithstanding, it was a few days before I got to try this again. Time to approach things more professionally and turn the house upside down in the process! Clearly this is best when your wife is out for a few hours. I wanted a more adjustable setup as I’d had real problems changing the position of the map first time round. I wanted to be able to adjust the field of view in the droplet, so that meant adjusting the position for and aft, as well as from side to side. Secondly, I wanted to be able to position the wire with the drop on it a little more precisely (there was no adjustment on the cardboard tube setup) too. Finally I wanted the droplet to be side lit to avoid flare.
Getting the Droplet on the Paper Clip
This was the hardest part of the shoot bar none! After much trial and error I came up with the setup shown. I was able to use an old Lastolite reflector holder on my floor lighting stand as shown. This worked out fabulously because the spring grip made the perfect holder for the biro, which could then be slid backwards and forwards for perfect positioning in the frame. My only regret was it took a couple of hours, and a roll of electician’s tape, for me to realize I could do this!!

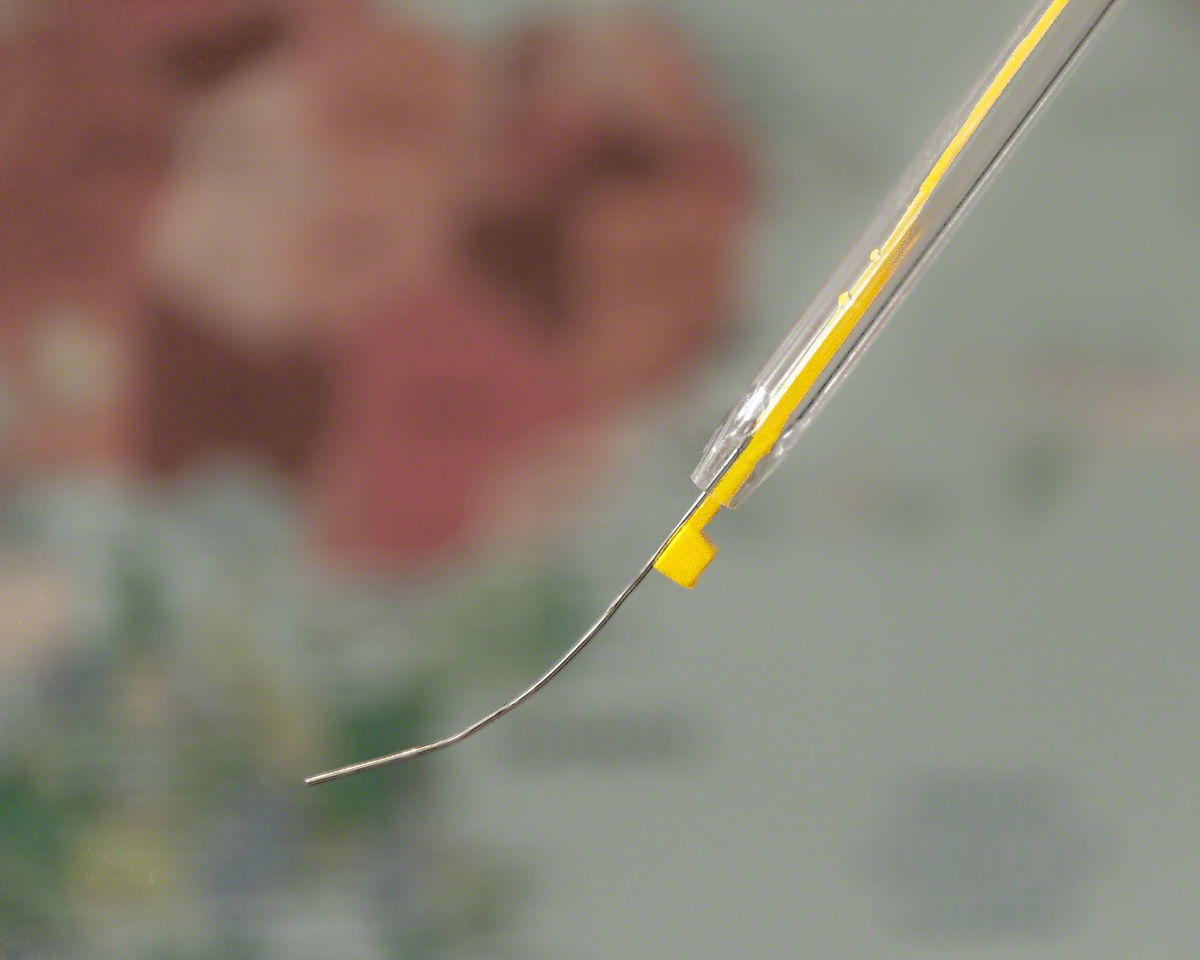
Getting the droplet on the paperclip proved difficult, but here are a few tips. The angle of the biro carcass needs to be quite steep so that water runs out of the end quite quickly. This makes it more likely to run around the curve of the paperclip, and consequently to leave droplets. Too slow and it just drops out of the end of the tube (counter-intuitive to be sure). Don’t forget to place a cloth underneath to catch the drops! The attachment system for the clip that worked best, and I tried many, was to have a cable tie underneath the clip as shown below. The cable tie slows the water down and ensures that it is running over the paperclip.
The Photography, Getting in Close
Firstly, don’t forget to turn the map upside down if you haven’t already. Given the size of the droplet (approximately 2 mm) you need considerable magnification to fill the frame. My solution was to use a reversed 50 mm lens on the end of a longer lens. The longer the second lens, the greater the magnification. I used an old 75-300 f4.5-5.6 Nikkor from my film camera days. You will need a reversing ring to join them together, and I purchased mine (52 mm to 62 mm) from a UK company, SRB Photographic (formerly SRB-Griturn) that make and sell a wide variety of these specialist items.
Both lenses were focused at infinity, and the 50 mm aperture was set to f1.8. I’m not certain that a wide open aperture leads to the best quality/depth of field, but that will be an experiment for another day. The 75-300 zoom was set to f32 and I used the zoom control to finesse the magnification.
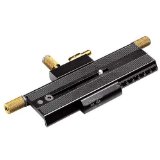
To focus, I moved the camera / lens setup back and forth on a Manfrotto 454 Micropositioning Sliding Plate. You can just see the lock screw poking out above the D300 on the tripod in the picture above. It can be surprisingly difficult to find an image at this magnification so be patient!
It goes without saying that to avoid camera shake you should use a remote release and mirror lock up.
Watch-Out!! Don’t Damage the Lens…
The rear element of the 50 mm Nikkor is flush with the back of the lens which is problematic. It is very easy to flick the paperclip onto it, and there is a risk of scratching the lens or getting water into the electronics. Even though this was a very old lens, I didn’t want to damage it, so after a few near misses I decided to use my smallest Kenko auto-extension tube as a lens hood for the back of the lens. I used the shortest one in order to minimize the risk of extra vignetting.
Focus Stacking
Depth of field at this magnification is very narrow and both the map, the paperclip and the edge of the droplet need to be sharp in the final image, so take separate images at each depth. The front of the droplet is unnecessary as it would obscure the view of the map. Using the 454 it was possible to get the 3 images required for the blend.
Post Processing
The images for the focus stack will be pin registered if you haven’t moved the tripod, so they can be loaded as layers into Photoshop without issue from Lightroom (or whichever way you choose). Any adjustments in Lightroom or Camera Raw should be made to each of the images before stacking them. In Photoshop, the sharp paperclip and map images can then be blended into the final image using layer masks. Here I took the opportunity to desaturate the background (i.e. the full sized map) a little to make the map inside the droplet all the more prominent. After that, some sharpening using your preferred method or plug-in finalizes the image.
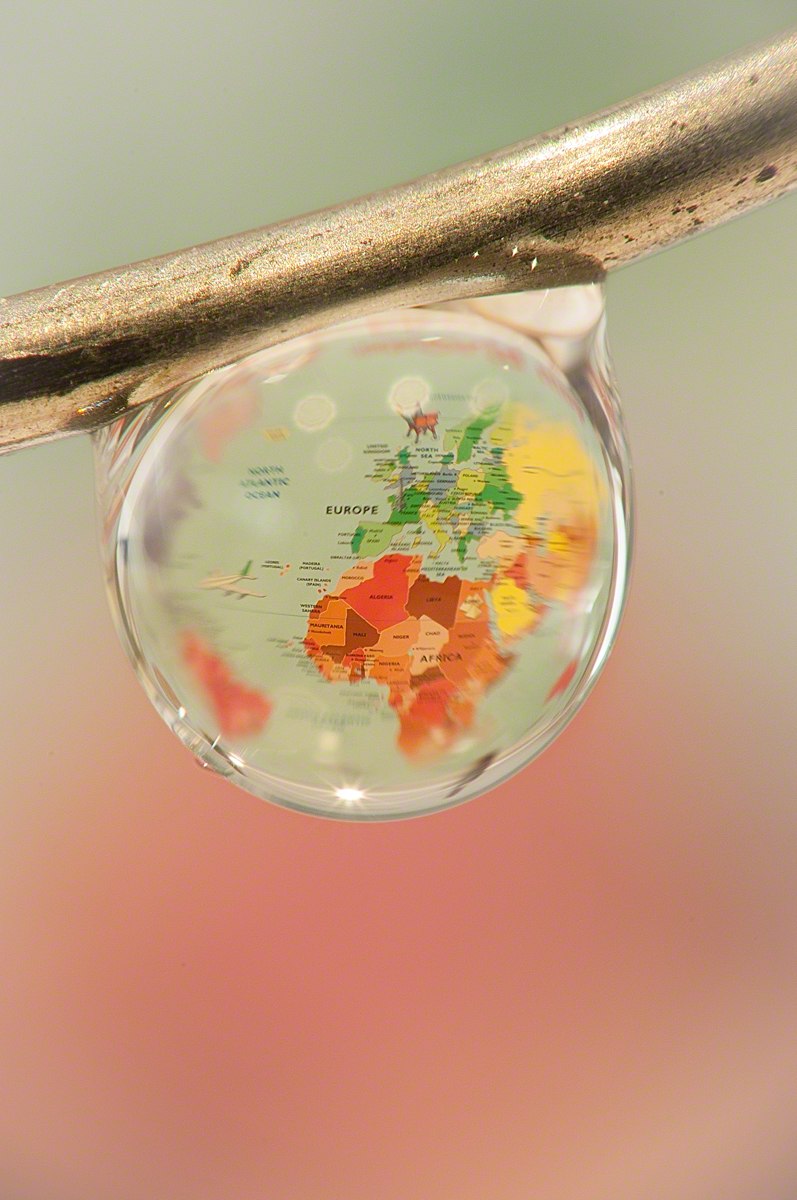
The World in a Droplet!
Cheers, R.

Apr
08
Photographing Roses
Focus Stacking / Macro / Nature / Photography / Photoshop / Studio Flash Posted by Robin
/
0 comments
A Rose by Any Other Name
I hadn’t started out to do a studio flash session photographing roses, but on thinking about what background colour would suit a white and pink rose, I realized that it had to be bright white and not grey, so the available window light session that I had planned quickly turned into something else entirely.
Photographing Roses Against a White Background
 Photographing roses against a white background requires the same technique as for photographing a portrait, or anything else, against a white background. The background has to blown-out, but only just blown out, in order to avoid too much flare and contrast reduction from the resultant backlight. People sometimes talk about getting the background about 2-stops hotter than the foreground, which is another way to go, but I treat the background (which, by the way, needn’t itself be white!) like I would treat a snow scene. I will take a couple of shots with just the background lit, and increase the exposure, from metered, up a couple of stops or so, until it is just blown out. I will then turn the back-lights off and use the main light to get an exposure for the subject. For this shoot, I used 3 x SB900 strobes. 2 for the background, either side at 45 degrees, and one in a Lastolite Joe McNally Ezybox Hotshoe for the main light. I prefer to shoot manual as much as possible these days, so the Camera was set to 1/200 second at f11, ISO 200. The lens was a 105 mm Micro Nikkor on a D3, and I used 2 layers of diffusion in the softbox. All 3 flashes were set on manual, and the amount adjusted for correct exposure. I like this setup because nothing changes (except perhaps the ambient light), so all your shots are perfectly exposed and provided your strobes aren’t maxed out (1/1) you can take a small burst of shots if you need to, for instance with a moving subject.
Focus Stacking
 Photographing roses with a macro lens, close up, can lead you into problems with depth of field. This is often livable with, particularly if your shot includes quite a bit of stem and you are further back, but close-in you will have to make a decision about where to focus. I had just been reminded of the possibility of using focus-stacking in an article in Am Phog (Saturday 6th April 2013, Martin Evening’s Retouchers’ Guide), so thought I would give it a go here. By the way, Martin Evening’s books, ‘Adobe Photoshop for Photographers’, ‘The Ultimate Workshop’ and ‘Photoshop Lightroom’ are all very useful tomes if you get a chance to read them.
Focus stacking is often used in macro photography, especially for extreme close-ups of things like small insects. It is often not straightforward, however, and there are several gotcha’s to be aware of. It is best to use an uncluttered plain background because as the lens elements move, the relationship of the subject to the background can change, making the blend between layers harder to do manually (or trick the software and end up with a small areas of blur that really stand out). Having a lens that focusses internally helps (but doesn’t avoid the problem completely), and sometimes you get a better result by using something like a Manfrotto 454 Micro Positioning Plate. What this does is allows you to slide the camera and lens combination backwards and forwards by very small amounts using a thumb-screw. This can be much easier for small focus adjustments when you are very close in and the depth-of-field is only a millimeter or so, where the lens’s own focus ring gives too course an adjustment.

 For good focus stacking it is said to be best to use an aperture that represents the sharpest focus of the lens, which on my 105 is f8 or f11), in order to avoid diffraction effects. There are several good focus stacking software programs available, but I use Photoshop because I don’t do this very often and a bespoke software solution has not seemed warranted. The process is quite straightforward. Take a series of photographs (in this case of your roses) starting at the foremost focus point, working through to the rearmost focus point. Select the files in Bridge or Lightroom, then using the tools menu choose Photoshop –> Load Files into Photoshop Layers, or in Lightroom, right-click on the selected files and go to Edit In –> Open in Layers in Photoshop… Once the files are in a single Photoshop document. Select the layers and go to the Edit menu and choose ‘Auto Align Layers…’ using the Auto Projection method.
 The next step is to merge the layered images together. Go to the Edit menu and select ‘Auto-Blend layers’ making sure that the Stack Images button is set and the Seamless Tones and Colours also checked. From then on it’s just a matter of clicking Ok and waiting a while. As I have mentioned, you may not get perfect results and, for this reason, you may want to manually select appropriate images, stack them, and blend them manually yourself. This is not for the feint-hearted, but does give you a great-deal of control over the final result and this is what I did here. I suspect, but have not checked out myself, that it makes a difference to Photoshop that the images are in depth-of-focus stacking order, rather than in a random order. Sometimes you get a really excellent result, other times less so. At the point of capture it is not always clear which bits of an image are at which depth, so you can end up going backwards and forwards a bit.
Until next time,
R.
Recent Comments