Feb
07
My Love of Photography
Have you ever thought much about why you like photography? Or indeed why you take the pictures you do? No? Well nor me, until earlier this week. A few events have made me reflect on what it is to take differing types of pictures, in different ways and at different times. I’m still thinking so bear with me, this is difficult.
Like many men, I suspect, I get a thrill from handling my camera and using it to photograph, but recently I’ve become aware that this is by no means a constant in my picture-taking. More on this aspect later. For me there are three main image making scenarios. Firstly, I’m setting out to take pictures, and I’ve got something specific in mind. Perhaps I’ve planned a trip or perhaps I’ve been thinking about a particular picture I can take at home, either way there is planning involved and the end point is to produce some images that I am pleased with. The better they can be, fresh out of the camera, the more satisfied I am. Secondly, I’m in a social situation, but I have taken my camera along to record the event. Here there is no planning involved and actually, depending on the precise circumstances, I may or may not take any photographs. I think that this depends on how sociable the act of engaging in the process of photography is likely to be for the people I’m with, because human contact, not image making, is the primary purpose. Mind you if it is a large gathering and I feel anxious, I do sometimes hide behind the camera to give a purpose to my social interactions. Thirdly there are situations where planning to go somewhere socially with others, where photographs may be expected to be taken, happen and these are somewhere in between the first two scenarios given above. So where is this preamble leading?
I like to Snap!!
It seems to me that there is a lot of pretentious nonsense spoken about photography. Some image makers espouse a notion that every image has to be carefully considered, of high technical quality whilst also having a competent and pleasing aesthetic. Photographs must tell a complicated story, requiring the viewer to have superior imagination and narrative understanding. Photographs must involve an ordeal to achieve, either through the hoops that must be got through just to be there, perhaps at sunrise or after dark, or perhaps involving a hike up a mountain or travel in dangerous settings, in order to have enduring value as an image. I hear things said like “If you snooze you lose” and “You don’t take a picture, you make a picture”. And yet, on the flip-side, many people are much more concerned with gathering mementos of their everyday lives, often using a mobile phone camera these days, to share with their friends of Facebook or other social networking sites. Many of these pictures have little aesthetic merit but huge sentimental value and there is nothing wrong with that. Well, what is best? Who is correct?
An old friend of mine, now pardon my rudeness, once said “Eat shit.., 10,000 flies can’t be wrong”. We were adolescent at the time, and I think the comment was more for its intrinsic shock value than about making an important point, but this phrase has stayed with me because there are many trends, fads and innovations out there that lead to huge numbers of people doing something a little unusual that is initially disparaged. The advent of colour television, mobile phones and Betamax video all spring to mind as technologies that initially led to criticism for the early adopters. For flies, eating excrement is a natural and purposeful enterprise. They are able to extract nutrients that sustain them, from the copious waste that humans cannot use. Not an obvious pastime, but not at all crazy once you are in possession of the full facts. I’m not seeking to draw a parallel with the many photographs that get taken on mobile phones, for these images do also sustain, at least the spirit if not the physical health and can be a vehicle to greater technical proficiency. Put another way, 10,000 people taking poor quality i_snaps can’t be wrong. And they are not, they are purposeful, and the images meaningful to them. Of course there is a severe limit to how much you can learn from photography with a camera phone, as they have few controls and little precision, though I expect that to change in years to come as manual controls sneak in to camera phones, or phones sneak in to better cameras. After all, the very best camera is the one that you have with you and several successful books have been published on the back of this (for instance the excellent “The Best Camera is the One That’s with You: iPhone Photography” by Chase Jarvis).
So what is a Snap to Me?
In my old Collins Gem English Dictionary from 1998, in a very different time, a snapshot is an informal photograph, whereas a photograph is a picture made by the chemical action of light on a film (my how that has changed!) and an image is something altogether more general and complex. It’s a mental picture of someone or something, an impression that people have of a person or organization, a representation of a person or thing in a work of art, an optical reproduction or even a metaphor. We can see right away that the pretentious crowd are using the correct word for their impression of the way photographs should be made, but what about the happy snappers? Looks like they are correct too, with an emphasis on informal. And this, at its crux, is why I like snapping. It’s the informality of it all. To be in situations where others are comfortable with your taking pictures. To not have to worry too much about the quality or purpose of a picture. To make it just because you can. To create and keep memories of events and people for when you are old (or gone). To be accepted for what and who you are, to be at peace with yourself, enjoying the moment. This is the time I take pleasure in my camera. This is what I enjoy. It is not that I don’t enjoy my more technical photography, it’s just that it is different. That is a much more professional endeavour. It is do-or-die. The stakes are immense. You have to get things right. The camera is a tool to be wielded with skill and accuracy. Like computer programming, there are no half measures, no in-between. It works or it doesn’t. You have a moment, if you are lucky a few moments, but you have to be on time and on task. The rewards are high but so are the costs, in that the perfectionists are correct at least.
Is it really this Black and White?
As with many things in life, however, there are situations in-between the extremes. Grey areas exist, betwixt these poles, in which people have options. A third way if you will. A more personal way or style if you like. Once you have the technical skills to take successful photographs, you don’t lose them, or fail to implement them, just because you are in an informal social situation. These skills do contribute to the less formal pictures you take, making them better timed, technically proficient, better framed, more interesting with better background narrative. The informality of the situation helps you concentrate on your technique and encourages you to play more. Try things you might otherwise not have done in a more formal setting, where failure is not an option. Your missed opportunities will be fewer if you have good technique, your personal memories will better reflect how you felt at the time (remember the camera looks both ways) and there is a chance that your pictures will hold the attention of others for more than a microsecond.
Conclusions
Realize that picture-making settings vary considerably, and be comfortable with that. Learn what you can, through rigorous image making opportunities, but use these skills to take personal pictures that have meaning for you. Be snap-happy, and proud.
Cheers, till next time,
R.
Feb
06

Relaxing at home…
Another Year Older..
Both the Doctor’s Images, and the Doctor himself, are another year older. It has bugged me for some time that my current photo has me with such long hair. Did I ever tell you that story? I really dislike having my hair cut. Just always have done. I only go to have it cut with my family, to places I’m used to. Once happy with a hairdresser I would always go there, even on my own. My spouse, on the other hand, is very fussy. Hairstyle is a business issue as well as a personal one. Picky doesn’t come into it. And she changes hairdresser quite often, which leaves me high and dry. Can’t go back. Too embarrassing to explain why my wife has changed. Nightmare. Several months will go by, and then another few, whilst the new stylist proves themselves and then I can join in. Meanwhile I turn into 60’s man. Work colleagues recognize this pattern. Anyway, we are back where we need to be with Sam again, and my hair is a reasonable length. So time for another picture.
Choosing a Setting
Actually, I quite like the relaxing at home in the library look (although, as you will see, the reality is somewhat different), so I will go with a repeat of that. I thought briefly about a plain black or grey or white background, but then thought something less clinical would be better. I thought about a 2 strobe setup, and whether to employ the same methodology as previously described in The Making of a Self Portrait, but decided against it. Instead, as can be seen from the production shot below, I used a softbox and a grid-spot this time.
 This was no ordinary softbox, but a Lastolite Ezybox 30 inch from their Jo McNally range. As you can see I’m using part of my lounge with a single bookcase, which through careful positioning, and by using a 70-200mm f2.8 zoom, has been made to look like a whole library. As you can also see from the production shot I am using my famous home-made grid spot, the ones made of black straws and cardboard, for the hair light rather than using window light.
Finding the Focus
This was not as easy as it might have been because I was doing this as a self-portrait. Our weekends are very busy and no helper was available. I had a remote release in play and used manual focus via trial and error to find my focus point. I started out using f2.8 to blur the bookcase as much as possible, but this just made critical focus impossible to find on my own, so I moved out to f5.6 which gave sufficient depth of field. My radio flash triggers worked well but I was having a problem with my remote release. If not pressed firmly and precisely downwards, the button caused only one flash to fire, and at first this seemed to weird to be true. This gave an interesting and very dramatic effect (because it was the grid spot) but this was not to be too arty. Common sense would indicate that it must be a flash trigger problem, though this didn’t seem to be the case and after a while I was able to choose one or both flash to fire at will based on how I pressed the button on my remote trigger. So what about the outcome? Well I have chosen 2 shots below as possible to use, and by the time you read this one will be posted in my About page.

 The images were relatively straight forward to edit, but I did use the opportunity to play with onOne Software’s Perfect Portrait 2 which is now much faster and easier to use than previously. There are many things to like, particularly the way in which it uses Bezier curves to select the mouth and eyes. This is so much faster than the previous method which used a mask. Skin smoothing is a real doddle and it is possible to get a really nice skin tone and texture even if the original is quite red for instance. Perfect Portrait 2 comes as part of Perfect Photo Suite 7 which again is worth a look. Comparing these images with last year’s picture, the background blur is much less at f5.6 than that achieved with my 85mm at f1.4, but this is to be expected given that I was much closer in on the previous image. Background blur varies with both the camera to subject distance (a shorter distance gives more background blur) and subject to background distance (a longer distance gives more background blur). So in essence self-portraits, with a lot of background blur, are better taken by someone else!! Well at least focussed by someone else. I have decided to use the more casual looking photo for my about page, and to blur the background a little more in Photoshop using CS6 field blur from the blur gallery.
Blurring the Background in Photoshop
 This is trickier than most people think by the way. If you blur the image substantially, for instance to remove most of the texture from the books, you will end up creating a large halo around the figure on the background layer. So when it comes to mask out the blur over the person, so that they remain sharp, what happens is there is still the halo blur of the figure in the blurred background. You can’t get rid of it, so what do you do? The trick is this:
Copy the layer that you are going to blur, prior to applying the blur, twice. Now, turn off the upper layer and apply the blur to the background layer beneath it, leaving the bottom most layer unblurred and untouched, until it appears satisfactory (in fact go a bit further than you think you need to, you can always fade it back later on). On the background layer (the middle of the 3), use the clone stamp tool to carefully clone appropriate background detail into the halo around the figure, effectively losing the outer rim of the blurred figure. Clone-in until the entire halo has been removed. Now turn off this layer and turn on the top layer. Mask out the figure using whatever technique you normally use. These days I use the quick selection brush to create the selection and then finesse in refine edge to create the mask. This creates a sharp-edged cut out that can then sit in the blurred background. Turn on both the blurred and the untouched background layers and select the blurred layer. Dial down the opacity to taste and you’re done.
In the interests of full disclosure, I have also darkened the background a little too.
Cheers,
R.
Jan
26
I Just Cannot Believe It..
I must be getting old and Meldrew-like! I love the cold weather, and especially the snow, as an unparalleled opportunity to get outside with the camera. What I don’t like is the way that our weather forecasters seem incapable of even remotely predicting the time, place or extent of weather with any accuracy. Worse still, the very mention of the possibility (never mind the actuality) of snow throws the media into a frenzy with dire predictions of death and mayhem. These days my wife and I often have to travel, usually a long way and in different directions but that’s incidental, and an accurate weather forecast is pretty essential if snow is forecast. Can we get decent information? Certainly not.
And what about consistency of approach to travel information in the media and on the roads themselves. Forget it, no-one cares. On the M5/6 yesterday I saw plenty of signs for ‘Salt Spreading’, but never saw a grit spreader once. Neither, more worryingly, did I see any obvious grit on the road. Nor any warnings of snow on the road, or an advisory speed limit, despite several inches of snowy slush, harsh wind and appalling driving conditions!! I saw plenty of signs asking ‘is your vehicle prepared for winter?’ but for what purpose? So there we all were, driving in columns, much too fast, terrified to attempt to slow down or change lane in case a truck rear-ended you or the manoeuvre started a skid and a major pile-up. Astonishing. So I ask again was there an advisory speed limit? Were there warnings of snow? Of course not, no-one cares it seems. On the news this morning I hear that people were stuck in their cars overnight. I felt lucky to get home alive last night, this country beggars belief sometimes.
Less Moaning and More Photography
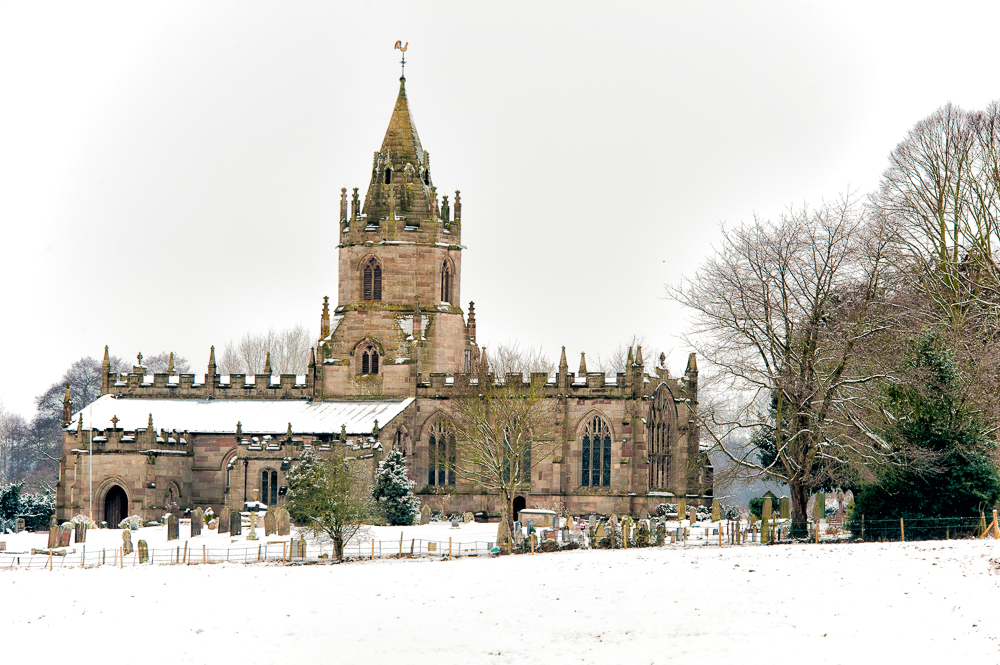 I did manage a couple of pictures however. I was quite attracted to the image of the Collegiate Church of St Bartholemew Tong pictured here. As you can see from the link it is a listed building with a very attractive facade. So who built Tong Church and when? It seems from their website that in 1409 Lady Isabel de Pembrugge obtained a Royal license from Henry IV to found Tong Church and build the present church so that masses could be said for Sir Fulke and her two other husbands, Thomas Peyteveyne and John Ludlow. Tong church is probably the third building on the site, and is a fine example of Perpendicular Gothic Architecture, with the exception of the Golden Chapel. It’s a real pity that it was so dull on the day I went past, this would look so much cleaner with a blue sky background. On well, you have to take what you can. If you would like to see it yourself it is off the Newport Road (A41) just off J3 of the M54.
Nighttime Snow HDR Stuff
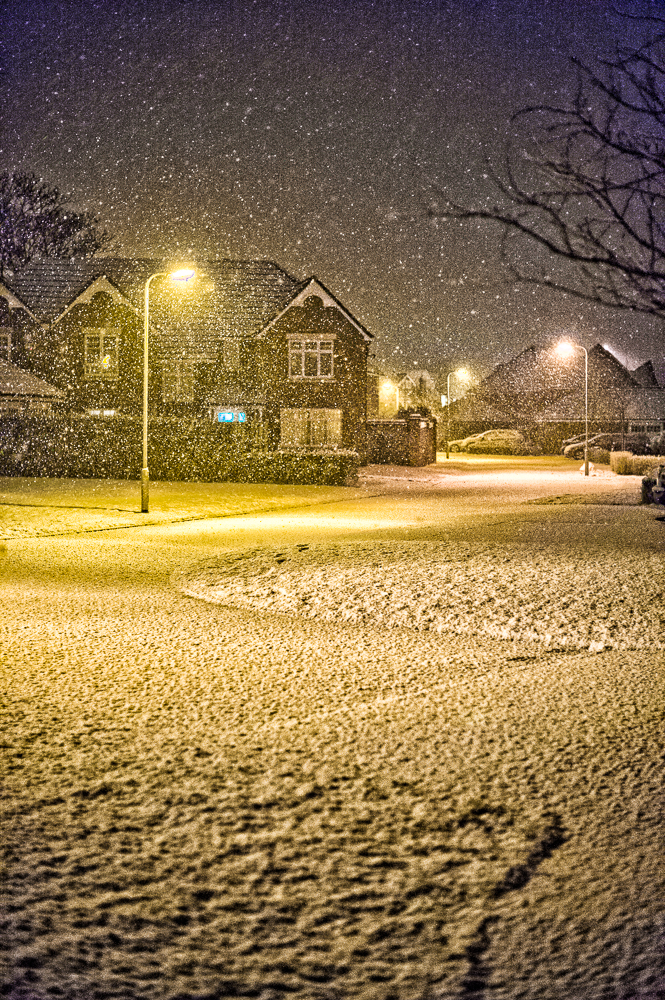 Many snow scenes are low contrast, and as such it is important to remember your positive exposure compensation to get clean bright whites, and to shoot to the right as far as possible. At night though, all that changes, particularly if you have things like streetlights in the scene. Here you may need HDR. One of the nice touches on the Nikon D4 is that you can select your bracket interval between 0.3 and 3.0 stops. Previously, on the D3 for example, you could only select 0.3-1.0 stops, so you would end up taking many more exposures just to get a good range. Now, many scenes can be captured automatically with a 3-image bracket of -2, 0, +2 stops. For this image, I pushed the boat out with a 5 image 2 stop bracket because of the deep blacks and the bright street lighting.
The shot was taken in full darkness using a 50mm f1.4 Nikor, hand-held at ISO bonkers (25,600), between 1/25 and 1/6400 of a second for the 5-image series. The shot was put together using lightroom 4 and CS6 Extended using the preset Scott 5 as a starting point in Merge to HDR Pro. It was then taken back to lightroom for further processing and then back to CS6 for extra tonal contrast thanks to Color Efex Pro 4. If you have never used Color Efex Pro 4 I can really recommend it to you, it is worth the asking price just for the tonal contrast feature, I use this on most of my images, even the wildlife pictures sometimes.
Jan
12
Twas Just Before Christmas
I had been working on my image collection to smarten up the galleries on this site. I even worked on separate thumbnails for maximum effect with each one individually centred. Took ages…
Having a little time over Christmas (a change to say the least) I thought I would go ahead and update TDI with the new galleries. Having not blogged since last March, I could barely remember how to enter admin mode (had even forgotten my password), so creating a new menu system was an even larger hurdle. Never mind, I was up for it… Unfortunately I realized that multi-level menus were out of the question with my previous theme as they were just as long as menus without sub-levels, and there were just t00 many galleries.
Repeat Performance..
So guess what. I had to re-organize my galleries to be larger and fewer. Took ages (and I was not amused once more!!). Worked hard, got it all done, felt very pleased, theme fell over. No slide show on the home page. Ahhhhh!!
No Help from Theme Authors..
I emailed the theme authors, but no reply. Emailed again, but still no reply. What a nightmare, looks like they have gone out of business – still economic times are hard and there might not be a very large market for something so specialized – but here’s the thing… I really liked that theme.
My choices were few. I could learn (actually re-learn) HTML and learn JScripting (for the first time), the WordPress architecture and something about theme writing and thus fix it myself. Or purchase another theme, re-do all my galleries, re-design my homepage and get to grips with unfamiliar settings. Neither seemed much fun, but I chose a new theme.
It took longer than I thought, but eventually themeforest came to the rescue with an excellent theme called Photolux from Pexeto Themes. It’s very popular, reasonably easy to use and very attractive with a simple style. I’ve been able to reuse my old galleries pro-tem so that’s a help, but not a permanent solution because the full-screen images that this theme can do look so much better.
But There’s More..
One of my plugin updates caused an internal server error taking me off-line. Nevertheless I’m delighted to say that everyone has been very helpful. The GoDaddy technical support was excellent (did you know that their European office is in London?), and the plugin author is being very helpful too.
Back to the Photography..
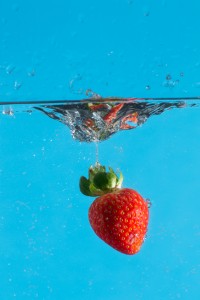
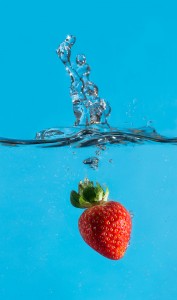 Well, things did take a turn for the better in the end, and I finally got the strawberry falling into water shot that I wanted. As much as I enjoy my wildlife photography, I do also enjoy the controlled circumstances of the studio, and I’ve had several goes at this shot previously. My daughter was keen to help out and took some of the shots herself with her D3100 and Sigma macro lens combination, so this is a combined effort. Unfortunately I didn’t quite have the correct kit to get the shot the first time round as I needed a longer container. This image is taken using a flat sided glass vase to hold the water, and they are available quite cheaply in many stores (see picture below). The strawberry is carefully chosen for size and shape, side lit with a small strobe and the background is lit with 2 other flash (it’s actually a piece of A3 blue card). It’s important that the vase is tall enough to get both the strawberry and the splash, and the position of the light is important because you don’t want any stray highlight reflections on the glass. The greenery on the top of the strawberry is best retained in my view. It may look untidy when the strawberry is out of the water, but usually looks fine when it is beneath the waterline, so you don’t have to be that fussy.
 It is not really possible to get this shot in one go because the splash occurs when the strawberry is much lower down in the vase, and therefore the angle of view of your macro (or telephoto) lens is too narrow to get it all in. So to get both the strawberry and the splash-back in this pleasing aesthetic you need to merge two shots in Photoshop. In order to make this possible shoot everything in manual in the same way you would with a panorama. Obviously you have to be quite patient to get both parts of this shot correct. Expect lots of missed strawberries mostly out of shot, lacklustre splashes and don’t forget to pre-focus on the strawberry in the centre of the vase before you drop it!! You will need to crop out the sides of the vase because this makes it very difficult to merge the two shots. The inside surface of the vase can get covered in distracting water-droplets as the number of trials increases so it is important to watch out for this and periodically wipe the inside surface with a piece of kitchen towel or similar. As with anything electrical and involving water, make sure your flash equipment is sufficiently distant not to get splashed. They can be covered by plastic bags if needs-be. I found that at the distance I was using no droplets landed near to the flash units.
Manual flash exposure tends to be more reliable than auto and don’t forget to use a manual white balance, plus any correction you might need post shot, for both images before attempting the merge. Given that it is the speed of the strobe flash that freezes the action it is important not to have too much ambient light for the ISO/Shutter Speed/Aperture combo that you are using in order to minimize the potential for speed blur. To judge this take a test shot with the flash turned off. the darker the frame the better. Here are the two shots I used and you can see clearly how the splash begins as the strawberry moves out of frame. As you can see I might have been better off shooting higher for the splash since the splash was almost cropped by the top of the frame. A good trick for centring the strawberries prior to focussing is to skewer them and hold them in place.

If you do this though, remember not to go right through the strawberry because this doubles the risk of being able to see the exit wound on the face of the strawberry, the top one is usually out of sight but one on the front of the strawberry may not be, as happened here. The clone tool came to the rescue easily enough, but it is best completely avoided if possible. Alternatively you can copy a patch of strawberry that is similarly lit up onto its own layer and then move it into place and mask the edges with a soft brush to obscure the repair. Don’t forget to match the spacing of the seeds though, otherwise the repair will look odd. Finally I painted out some of the more distracting water droplets on the inside face of the vase (this is an advantage of using a flat-lit plain coloured background), sharpened and saved the image.
For the sake of completeness, this image was taken with the following settings:
Focal Length = 220mm, Aperture = f11, Shutter Speed = 160th Second.
New Year’s Resolution
My new year’s resolution is to try to blog at least once a month and to always have a new image to show. I’m becoming curious about social networking (my wife says it’s a jolly good thing in business). I’d quite like one of those social media icons on my home page – but I’m not sure I can commit to the regular stream of content (however short or inane).
Best wishes,
R.
Mar
17
Work’s Been Hectic…
So not so much time for the photography this month. Nevertheless a fresh ordeal had been planned (more walking around the Sandstone Trail) and executed with somewhat less pain than previously. Small 20 minute walks several times a week seem to have helped my general levels of fitness, so there was definitely more energy to think about the pictures. Sadly, on Sunday 26th February 2012 the weather was not brilliant with featureless grey skies to accompany dull scenery. The sun did peak out once or twice, but this was not a tripod-wielding foray, and I had left out my gradient neutral density filters to save weight, so hand-held HDR seemed the order of the day.
Walk of the Week

- A Sign of things to come…

The walk this week was a circular trek around Beeston Castle which began in the car park opposite the castle entrance which walkers also use. You can find out more about the castle on the English Heritage site. You may remember the previous walk along the Sandstone Trail after Christmas.So off we set, Helen, Rebekah, Cyril, Suzie (complete with new hat) and myself.
The snowdrops looked lovely as they graciously carpeted several areas of the route, and contrary to initial expectations, the sun graced us with its presence on several occasions. This did not resolve the issue of high-contrast shooting conditions however, and the need for HDR (3-5 stop range) persisted through most of the day. Particularly for those shots of the castle where the foreground was in sunshine but the castle in shadow.
HDR shooting has become part of my routine these days, although I usually try to retain some subtlety in the final shots, but as with everything else this brings choices… There is necessarily a trade-off between speed and precision when it comes to HDR, attempted during a brisk walk with friends. Being generally slower than my fitter peers it would be bad-form to dally too long over multiple shots. Often in overcast situations with deep shadow areas it would be tricky to determine the exact range of exposure to capture everything anyway, so for these reasons quick and dirty frequently rules the day.
Dial in a 3-5 stop auto-bracket and then shoot and check the histograms to see whether that number caught the range or not. If not dial in another couple of shots and go again. Otherwise, if you are shooting in more relaxed company, use spot metering to check the difference in range between the highlights and shadows. It helps when auto-bracketing to use continuous high-speed shooting as this helps you to keep the camera still between shots and lets you know clearly when the bracketing sequence has finished – if you use single shots and lose track of your count, you’re sunk with your next photograph.
Dynamic Range Issues

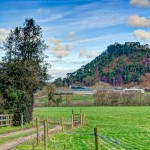
- High Contrast Scene…

My D3 has a dynamic range of 8.6 EV at ISO 200, though if I shoot at 14-bit in RAW (my default) then with ACR I have nearer 12 EV to work with. You need to shoot a range of exposures, in aperture priority, that will ensure that there is no clipping of the shadows in the longest exposure, or of the highlights in the shortest one.
Because of the way that the digital sensor works it is necessary to make sure there is a good margin between the end of the shadow peaks and the left-hand wall of the histogram to avoid posterization and excessive noise in the shadows in the final result. This is because digital sensors have a linear ratio of exposure to “negative” density. Clearly digital cameras don’t produce film negatives, but you know what I mean.
For the sake of example, let’s imagine that a photo sensor has a dynamic range of 6 stops. If you imagine these 6 stops as test tubes arranged in a row, then a 12-bit RAW image file contains 4,096 tonal levels. The first test tube is equivalent to the brightest stop of exposure. When it is filled to the top it will contain half of all the available levels i.e. 2,048. The next test tube along will represent the next stop of exposure which is half as bright and will therefore contain 1,024 levels, thus being only half full. Likewise the third stop will be half as bright again – 512 levels (a quarter full), the fourth 256, the fifth 128 and the darkest stop only 64 levels (just 1/32 of its capacity). The signal to noise ratio increases massively at these low light levels, making sure that the shadow detail is not only poorly represented by brightness levels but also very noisy. This theory has been incorporated into the notion of “shooting to the right”. This means adjusting the exposure value to keep the brightest values as close to the right-hand edge of the histogram as possible in order to maximize the number of levels in the shadow areas.
If you are interested in learning more about practical HDR, digital exposure issues and extreme lighting take a look at the references cited below.
White Balance
These days, when shooting my wildlife photographs outside, I generally use a White Balance preset of 5880K. This works well with landscape shots too, and keeps the white balance constant when shooting panoramas or HDR sequences. If you like technical accuracy there is no substitute for an ExpoDisc white balance filter.
HDR Software Choices
I use Photomatix Pro 4.1.4. Photoshop CS5 HDR Pro can also be useful, but seems to take more fiddling with to get a pleasing result. I generally aim for a very flat result, with well preserved highlights, as this gives more scope for the second and third pass processing in ACR and Photoshop. Everyone seems to prefer a different spin on HDR, from photo-realistic through to incredibly surreal. I’m not a fan of strong haloing, but other than that I don’t mind a strong visible HDR effect. I really like that hyper-saturated postcard look. See references below for more information on resources.
-
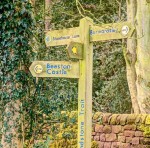
- A Sign of things to come…
-

- High Contrast Scene…
-

- See these Pine Cones Dad?
-

- Where’s my fill flash!!
-

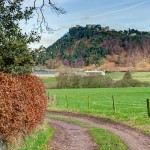
- Castle from Under a Tree…
-

- Alternate Castle View…
-

- More Castle…
-

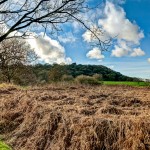
- Pleasant Spot for Lunch…
-
- The Right Path…
-
- Sweeping Left…
-
- Where’s the Castle?
So What was the Ordeal?
Nikon announced the D4 and then, shortly afterwards, the D800. I want both, they are very different animals and each is clearly useful for different purposes. Of course I can’t have both, so where should I spend my money? More on the issues, the dilemmas and the solution next time.
References
- Mastering Digital Exposure and HDR Imaging. Understanding the Next Generation of Digital Cameras. Chris Weston. RotoVision SA 2008.
- Practical HDR. A Complete Guide to Creating High Dynamic Range Images with your Digital SLR. David Nightingale. ILEX 2009.
- A Guide to Extreme Lighting Conditions in Digital Photography. Duncan Evans. AVA Publishing SA 2006.
- Extreme Exposure. Pushing the Limits of Aperture and Shutter Speed for High-Impact Photography. David Nightingale. ILEX Press Ltd 2010.
- The HDR Book. Rafael Concepcion. Peachpit Press 2011.
Feb
04
The Agony of Upgrading
Way back when Nikon upgraded the SB800 Speedlight to the SB900. I can’t remember what time of year this was, but I do remember that I only had one SB800 and had seen the merit of having a set of 3 or 4 (I had been reading Joe McNally’s Excellent “The Moment it Clicks”. I already had a set of Bowens studio strobes, but was attracted to the portability and possibilities of using mini-strobes on location. I couldn’t afford the purchase at that point, and within 6 weeks you couldn’t buy an SB800 anywhere. When I bought my D3 I also got an SB900 (with a plan to buy a few more along the way), but as with so many things, it never happened. I have achieved some interesting effects with one of each, so what the heck.
But then Nikon does it again. It’s Christmas and the SB910 comes out. £120 more per item than the SB900 and a gentle evolution rather than a barn-storming game-changer. So what to do. I certainly didn’t want to become an owner of 3 different types of flashgun so I made the decision to buy 2 more SB900s before stocks vanished again. A side issue is that I have also invested in the Flex-TT5 system and there is no guarantee that the SB910 would even work with the new Speedlight. Now I do use my Bowens light-shapers, including a grid-spot, with my speedlights via a cunning device made by Interfit – the Interfit INT326 Strobies XS Bracket, but did not want to spend any more money this close to Christmas, and the Bowens grid spots are not cheap!!

Interfit INT326 Strobies XS Bracket
So, What to Do?
I thought I’d make some. I thought how hard can it be? I was about to find out. I thought things through. How large do I want these grids. What would be a good base from which to manufacture? How would I attach the grid to the flashgun? After some reflection I decided to make them as small as practical, and a push fit. This is what I came up with.
Making the Grid-Spots…
Stage 1. Gather together the components which in this case consisted of:Black cardboard, black drinking straws, gaffer tape, sellotape and UPVA glue.
Stage 2. Make the shell. This was done by cutting a 3 inch strip of black card from an A4 piece and wrapping it around the head of the Speedlight. I pulled this tight and secured it with a small piece of gaffer tape. Next I creased the corners to help maintain the shape whilst it was still in-situ on the strobe.
Stage 3. I cut, what seemed like 100s, of 3cm lengths of black drinking straw. There are various ways to do this, but I cut a cylinder of cardboard to size and then used this as a template to cut several straws at once.
Stage 4. Lay the straws in a long level line. I used a piece of gaffer tape stuck to the side of the table (much to the distress of my wife who gave me a stern telling- once she realized so be careful). This held the straws in place whilst I placed a long piece of sellotape over the top of the straws. Once in place gently free the ends of the straws from the gaffer tape edge and flip over so that the sellotape is down on the table. Place a second strip of tape over the top and trim the ends.
Stage 5. Remove the cardboard shell from the Speedlight. Fold the strip of straws back and forth to form a shape that will fit into the shell and press it down inside to be flush with the outer edge. Finally glue the straws in place round the edge with UPVA glue and leave overnight to set.
Grid Spot for SB900

Grid Spot for SB900 - Outside View

Grid Spot for SB900 - Top View

Grid Spot for SB900 - Inside View
The Making of a Self-Portrait Revisited
So what has all this got to do with making a self-portrait? Well, you may have noticed that the picture in About looks heavily vignetted, and have assumed that this was done in Lightroom or Photoshop. Well not so. It was taken using the above Grid Spot on one of my SB900’s. The SB900 was on a stand to camera left at about 45 degrees and pointing downwards. Behind me was a window with daylight providing the rim light edging my hair and left cheek. The ambient was a stop and a third below the exposure on my face. Et Viola! Cheap and cheerful but none-the-less effective.
Relaxing at home...
Jan
21
 Christmas is Over…

So there we were. Christmas over, New Year too and everyone feeling bloated and slow. My better half decided that it was time to get healthy and that we should meet up with friends and go for a walk. Trouble is, I’m the more overweight and least energetic of our group, and the plan was to explore the Sandstone Trail in Cheshire. A 5-mile traipse over hill and dale. Oh well, at least an opportunity to get the D3 out and explore a fresh landscape. One problem though, I would need to take a selection of lenses and all of my current bags are shoulder bags. Not the best idea for a major 5-mile trek! Never mind, we were going into Chester for a hair cut so perhaps I could take a few moments to check out the Camera shops whilst Helen was having her hair coloured. I had planned to go into Jessops, but in the final event I happened across the London Camera Exchange in Bridge Street Chester. The staff were very helpful, and a couple buying Canon kit were keen to reassure that the Tamrac Expedition 6x Photo/Laptop Backpack would serve well enough. So the purchase was made.
 Starting Out…

So off we went, starting at the Candle Factory, Tattenhall, and made our way up hill on one of the circular walks. The Expedition 6 had everything I could possibly need, and was very comfortable in use, despite being quite heavy with everything in. The bag comfortably holds a Pro-DSLR with 3 Pro Lenses and there is still space for filters, a flash and sundry other accessories.
The Expedition 6x has a pocket for a laptop, and outside pockets for things like your mobile phone, spare batteries and cards with a nifty red card system to help you know which ones are spent and which ones are fresh. There is a third ‘pocket’ at the base of the sack which you can use to support your tripod legs if you have a tripod strapped to the back of the sack.
Finally there are the Strap Accessory System attachment slots in the sack chest straps, and the Modular Accessory System attachment slots on the sides of the sack. The modular accessories are purchased separately (for instance from Premier Ink and Photographic), and include things like a water-bottle with holder, various lens cases, flash cases, rain covers and belts. All in all the sack was comfortable in use, though as with anything like this, when fully loaded you have to be reasonably fit to avoid aches and pains the next day!! Helen says more walks for me, 10 miles next time – oh dear!!
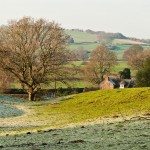
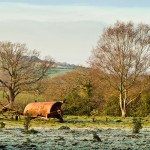
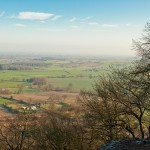
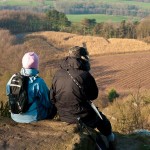
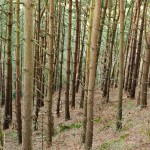
The circular route that we took presented a number of pleasing views, with various opportunities to include farm machinery, forest scenes and aerial views.


Recent Comments