15
Uni-White Balance on a D850
How Much Difference Does it Make to Assessing ETTR?
I’m very much in favour of using an ETTR (expose to the right) methodology with all my RAW shooting. Uni-white balance is a way of improving the exposure information from your on-camera histogram, which is based on the jpeg processing currently in force when you take your shot. This jpeg processing, in turn, is determined by the picture control that you have selected in-camera. Setting a neutral picture control, with flat contrast and zero sharpening, is itself a way to improve the accuracy of the in-camera histogram, because it limits extra white point and black point clipping. Unfortunately this only takes you so far. A larger difference can be made by using, so called, uni-white balance. But how much difference does this make in practise, and crucially, is it useable?
What is Uni-White Balance?
Background
Checking the histogram and the clipping information is part of everyday routine for many photographers. Sadly the histogram and clipping information (blinkies) do not closely relate to the information captured in a RAW file. This is because the histogram is taken from a version of the JPEG file that the camera produces (stored inside the RAW file). The correlation between the information in the JPEG file and the RAW file depends upon the modifications that occur during the processes of:
- White Balance
- Application of a Contrast Curve
- Colour Profile Conversion (sRGB, Adobe RGB)
- Gamma Correction
- User Chosen Picture Controls or Settings (Contrast, Saturation, Sharpening etc)
These changes frequently lead to a pessimistic assessment of what the RAW file actually contains, leading to apparently blown out highlights for channels that are not really fully saturated in the RAW data.
In Camera Histograms
It’s difficult to know, for certain, exactly how the in-camera histogram (prior to the shot being taken) is really calculated. What may be happening is that the histogram that you see is derived from only a part of the image processing chain that produces the JPEG file. In live view it is likely that the camera sub-samples (to make the calculation faster) and assigns the pixels to buckets. To make the JPEG, the camera performs the additional 8×8 discrete cosine transform, file compression and formats the data in the nominated pattern for a JPEG file format. The histogram that you look at when viewing the file, post capture, is probably calculated from the JPEG preview file embedded within the raw file itself.
Almost always, the in-camera histogram, after this extensive processing, will not help you perform ETTR as it will show clipping at the right side of the image well before the raw data is actually clipped. Choosing the widest gamut camera color space (Adobe RGB usually) available, setting uni-wb and using the lowest contrast setting available (including removing any sharpening) will all help to give a closer approximation.
The RAW Image
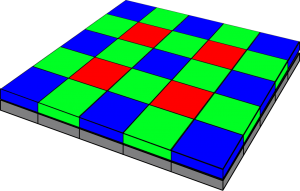
The sensor in a Nikon D850 is covered with a so called colour filter array using a Bayer Pattern. Sometimes referred to as an RGBG pattern, the Bayer filter mosaic was invented by Bryce Bayer whilst working for Eastman Kodak in 1976. Colour filters are needed because the typical photo sensors detect light intensity with little or no wavelength specificity, effectively only measuring luminosity rather than colour.
With a colour filter array in place, a calculation can be performed for each pixel to work out its precise colour based on its own colour and intensity, alongside those surrounding it. This is called demosaicing. The Bayer pattern has twice as many green filters as red and blue. The colour filter’s spectral transmission, and density, will vary between manufacturers and need to be taken into specific account during the demosaicing process and translation into an absolute colour space.
The extra green filters provide more luminance information, which mimics the way that the human eye fabricates the sharpest possible overall colour image. In other words the human eye sees luminance and grayscale better than it does colour, and luminance better in the greens.
Demosaicing
Demosaicing is the process of turning the raw sensor information into an RGB colour map of the image. Various algorithms exist for this process though, in general, slight blurring takes place as a result of the demosaicing process. Some algorithms try to take edge detail more into account in order to mitigate the overall colour averaging process that takes place over groups of pixels. In order to calculate the red, green and blue values of each pixel (i.e. the missing two thirds as only the red or green or blue value is measured for the index pixel according to it’s colour filter), the immediate neighbour non-index colours surrounding that pixel can be averaged. Thus, in some sense, the colour map is two thirds fabricated and only one third measured!
Conversion to a Standard Colour Space
The raw data is not in a standard colour space, but can be converted to one later. As such, it does not matter what you set your camera to (Adobe RGB or sRGB) because the raw data is preserved with the colour space setting representing merely a label. The details of conversion from raw data to a standard colour space contain many complications. For a start a camera sensor is not a colorimeter so it is not measuring absolute colours anyway. You may hear this stated as camera sensors ‘not satisfying the Luther-Ives or the ‘Luther-Maxwell condition’. Secondly, human eyes and colour filter arrays see different spectral frequencies which can lead to camera metamerism. Camera metamerism is a term that covers the situation in which there is a discrepancy between the way a camera and a human sees colour. Typically colours that the camera sees as the same, which a human sees as different, or vice versa. Metamerism also occurs in printed output, especially with pigment inks. Jim Kasson’s excellent article on how cameras and people see color is a useful read for more information, as is John Sadowsky’s article on RAW Files, Sensor Native Color Space and In-Camera Processing.
White Balancing and the Green Coefficient
The next step of in-camera image processing is to apply the white balance. There are lots of ways to do this involving matrices and RGB coefficients. In this scheme the Green coefficient is set at 1 and the Red and Blue coefficients define the neutral axis of the image.
Final Steps in Camera Raw Image Processing
Finally, there will be the addition of a gamma correction to each of the 3 colour channels. In essence this correction takes account of the non-linearity of the human perception of tones and can also increase the efficiency with which we store colour information.
Uni-White Balance
The ‘uni’ in Uni-White Balance really refers to 1. That’s 1 as in a white balance in which the red, green and blue coefficients are all set to the same value (i.e. 1).
When a camera or post-processing software (RAW convertors) apply a white balance to the RAW data, they generally leave the green data as is and apply a factor (the coefficient) to the red and the blue channels. So, for example, at sunrise and sunset when you have an abundance of warm (red) light, the red is lowered and the blue increased.
On a cold overcast day, or in shade, the reverse occurs so that the red is increased and the blue lessened. This factor, or coefficient, is thus a divider or a multiplier of the actual raw data from the sensor for the red and blue pixels. This may therefore lead to either an underestimate or overestimate of how much red or blue channel saturation is really present. In other words the red and blue channels can look either under or overexposed erroneously compared with the actual values recorded in the raw data from each red and blue photosite.
Uni-White balance uses coefficients of 1 for red, green and blue which thus leads to accurate histograms and highlights for your raw data provided that any picture control (for Nikon) in force does not artificially boost saturation or contrast in one or more channels.
More on White Balance
As mentioned above, the white balance is the linear scaling of the RGB channels of the RAW file. This means that the levels of red and blue are typically multiplied by a factor greater than 1 which scales them to compensate for the different sensitivities of the filtered photosites, and also the colour of the light in the scene (eg. daylight, tungsten or shade). These linear factors can be as high as 2 or even 2.5 leading to an apparent increase in exposure for the channel being scaled from 1 EV to 1.3 EV. Similarly, decreases in exposure may also occur leading to desaturation of the image in some colours.
Setting up a Nikon D850
There are techniques that approximate to Uni-White Balance and techniques that are specific to a particular camera. Both are comprehensively covered in Jim Kasson’s ‘the last word‘.
Approximations to Uni-White Balance
The shortcuts to Uni-White Balance do not work on all cameras.
Balance to Maximum or Minimum Saturated Pixels
Taking a dark frame image (for instance with the lens cap on), or a completely overexposed and blown out image, as a reference for White Balance is one way to get the same information in all the channels. This will sometimes work for some Canon cameras, but doesn’t work for Nikons. To check whether you have achieved the desired white balance check the red and blue white balance coefficients in the camera’s EXIF data. They should be within five or ten percent of one.
Manual White Balance Technique
In this method you set the white balance to 3800k (or as close as you can) and then set the colour bias (or tint) to as green as it will go. Take test exposures and check the EXIF white balance coefficients as above. Use the manual white balance to tweak the settings but beware that many cameras just don’t have enough adjustment range to get you to a full Uni-White Balance.
Use a Uni-White Balance File Prepared for your Camera by Someone Else
In this method you copy the white balance setting from a copy of an image taken by another camera, of the same make and model, with Uni-White Balance already set up. Copy the image to a memory card (with a suitable name and in a suitable folder so that the camera can find it) and tell the camera to use the white balance coefficients from the image as a white balance preset.
Avoid Uni-White Balance and ETTR Using Another Method
If you are confident that you know what the brightest part of your capture will be, you can meter for that, apply +3 stops of exposure compensation, and not use the histogram at all.
Setting up a Specific Camera for Uni-White Balance
I have personally used the method described by Jim Kasson on his blog. Since you are also free to use this resource I will not précis it here, suffice to provide the link and make a few comments on issues that I found particularly challenging. In essence, the task consists of taking defocussed, fully saturated, pictures of red, green and blue on a fully warmed and calibrated monitor using (for instance) photoshop. A second program (I used Rawdigger) gives you the average pixel values of the Red, Green and Blue in the raw images so that these values can be entered into a spreadsheet that Jim provides. The spreadsheet gives you values for a corrective (magenta) colour which you create and display on your monitor. This colour is then used to white balance your camera and store a preset for future use.
As I traversed Jim’s excellent protocol, the only real question that I had was about whether to use exactly the same exposure for the White Balance as for the RGB target images. It turns out that it doesn’t really matter. It doesn’t really matter what the exact exposure of the RGB targets is either, you really can let the camera decide. Secondly, when it comes to entering the desired camera values in the spreadsheet, it does make a difference to the magenta target brightness values calculated (but not the hue) so again they are not critical. Finally, I calibrated 5 cameras in one session and found that it is quite easy to forget to enter the desired camera values. So keep an eye on that detail.
Side Effects
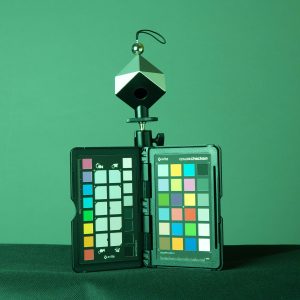
It goes without saying that success in this process leads to raw images with a heavy green cast (the background of this image was neutral gray). This is easily dispensed with by choosing an appropriate white balance preset in your image processor of choice, during post. After a while you stop noticing the cast and I tend to leave Uni-White Balance set most of the time.
Picture Control Settings
As mentioned previously I used the NL picture control preset but edited it to remove all sharpening. I left contrast at zero, though you could make it lower still. Just as an aside, Nikon makes the excellent Picture Control Utility 2 which comes free with other Nikon software or can be downloaded from the link included. This utility allows you to organise and manage your picture control presets so that they may be distributed between Nikon cameras. There are some features within the utility that are not available for adjustment in the camera picture control menus.
Testing the Effects
The Setup
My goal with this testing was simply to get a feel for how the histogram looks between shots taken with, in this case Auto White Balance, and Uni-White Balance across a range of exposures. To maximize accuracy I chose to use a manual flash exposure in order that there was no chance of the light levels changing between shots. I chose an exposure that meant the flash was the major lighting for the scene and no chance of the ambient lighting causing specular highlights. All shots were taken at 1/160th second at f11 and an ISO of 800. There is a debate to be had about which ISO to choose, but given that the D850 has an ISO invariant sensor, and that I’m often shooting wildlife in low light conditions, this seemed a reasonable compromise for this experiment.
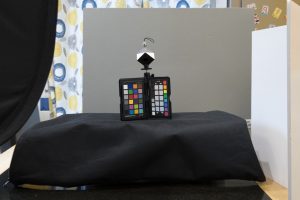
As can be seen from the image at left, the target was an X-Rite Color Checker Passport beneath a Datacolor SpyderCube White Balance target. The advantage of the SpyderCube is that the metal ball atop creates clear specular highlights, and the dark face has a light trap within it to give a definite black point.
The colour in the scene comes from the Color Checker only, with everything else being neutral. You can see a small colour cast across the grey background in the production shot, but this is removed by the ambient under-exposure and flash illumination. There did remain a small luminosity gradient across the background however as a result of using only one softbox. This is partly mitigated by the V-Flat reflector and, not a significant confounding variable in this test. The camera was tripod mounted and did not move during the test shoot.
Testing Procedure
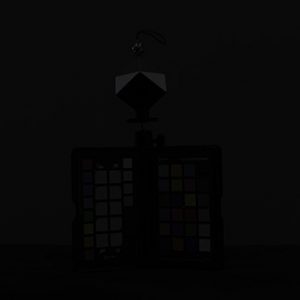
Below is an image of the ambient light at 1/160th second, f11 and ISO 800. The test itself consisted of making 10 exposures at 1/3rd stop intervals via a Nikon SB910 Speedlight set to manual exposure. The range was 1/8th power to 1/64th, chosen to be well within the normal range of the speedlight output (Full power to 1/128th). Shooting at a maximum of 1/8 power also provides insurance against the flash not being ready for the next shot. The flash was triggered using a Pocket Wizard Flex tt5 with a mini tt1 on camera alsongside the AC3 controller for easy and precise flash settings.
The Nikon D850 was set to Raw shooting and a set of 10 shots using Auto-WB 1 were made (Light to Dark exposures) followed by 10 shots using the Uni-White Balance Preset (as above). Again, bright to dark exposures.
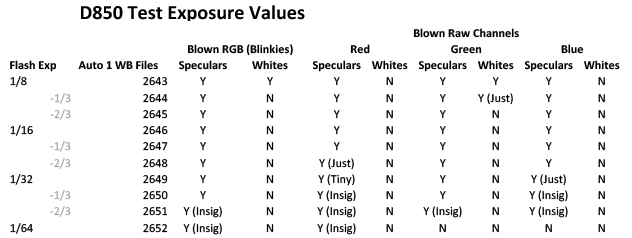
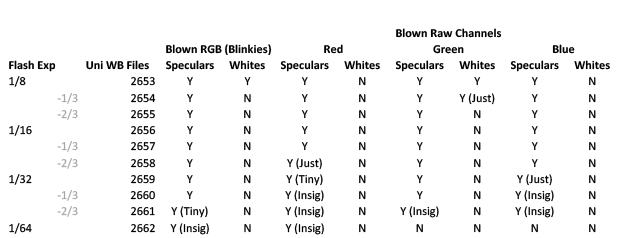
The 20 Raw Files were then inspected on the back of the camera and the histograms photographed. The Raw Files were brought into RawDigger and examined for highlight clipping in each exposure. These values were entered into a spreadsheet (see below).
Results
The first thing to notice is that these tables are, barring one small detail (a tribute to Nikon flash consistency) exactly the same. In other words (and reassuringly) the exposure captured was not materially altered by the application of Uni-White balance.
Does this mean that the back of camera histograms are the same? Not at all! My first examination was to look at whole stop increments.
Composite Histogram Analysis
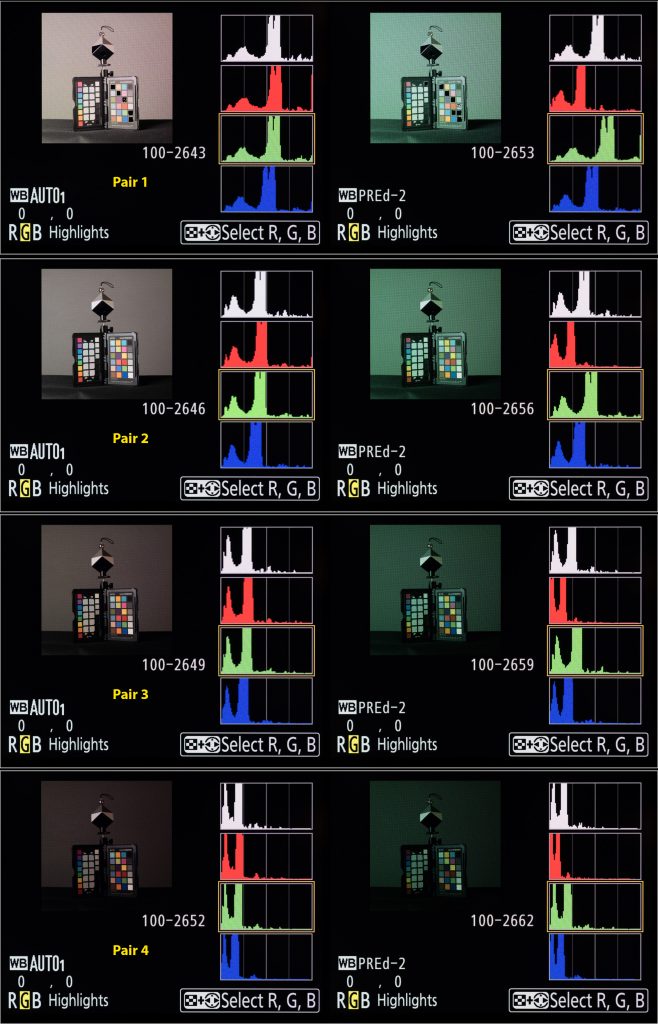
You can compare the histogram results to the RawDigger results by looking at the Hist No in the spreadsheet above (I.e. the number out of 208 in the images below).
The graphic shows four images, one stop apart in auto and uni WB pairs. As you can see the Uni-WB composite histogram is consistently left shifted (demonstrating more exposure headroom) in the Uni-White Balance partner. It’s reasonably easy to compare the peaks between histograms. The horizontal movement of peaks between successive Auto-1 White Balance Composite Histograms gives a measure for a one-stop difference in exposure. Bringing the images into Photoshop and applying the measurement tool, it looks as though a stop measures about 228 units, on average. This being the distance between the same histogram peak between images, on a full sized image. Comparing this between successive Auto-1 White Balance / Uni-White Balance pairs shows a distance of 88 units on average and this represents a 0.39 Stop improvement in accuracy on the composite histogram.
RGB Histogram Analysis
The image below shows 4 RGB histogram pairs with each pair representing 1 stop exposure difference, decreasing down the page as with the composite histograms above. At first the picture seems very confusing. The inflated green channel (or perhaps I should say, the more representative green channel) looks at first as though it may be a problem. Looking at the RawDigger white clipping values for the Green channel though, as with the images of the on camera histograms below, you can see that this reduces at the same rate in both sets of files and looks worse than it is. Also, because the red and blue channels are also shifted, you still end up with a better composite histogram. For this reason, ease of interpretation may improve by just using the composite histogram whilst Uni-White balance is in place.
Usability In Practise
I am still gaining experience with this technique, though my initial impressions are good. I was worried that the heavy green cast would put me off using Uni-White Balance, though in practice this is not the problem I first thought. You stop noticing it after a while. I was also concerned about moving back and forth between the white balance presets, but on the Nikon D850 at least, you can lock the Uni-White Balance preset so that there is no chance of overwriting it by mistake. I have set mine in the second custom white balance slot in all my cameras in order that setting a different custom white balance is not hindered when not using Uni-White Balance.
In Camera Settings
In camera I set a flat picture profile (NL or Neutral in the D850) with sharpening reduced to the minimum possible. Although preferable to use the Adobe RGB colour space in camera, I choose to use sRGB. This is to counter the problem of forgetting to change any camera generated jpegs back to sRGB prior to using them on the web or social media. In this regard I believe the Nikon default setting of sRGB to be the most pragmatic though I concede there may be further improvements in accuracy to be made by swapping.
Post-Processing Uni-White Balance Images
I am still gaining experience with post processing Uni-White Balance images. Nevertheless, after correcting the white balance via an appropriate white balance preset, or by correcting using a neutral tone within the image, smaller changes to exposure than usual are my major finding to date.
Conclusions
Using Uni-White Balance gives a 0.39 stop improvement in accuracy on a Nikon D850 over and above that obtained by using a flat Picture Control. Interpretation of the green channel information in the RGB histogram may be hindered by the more accurate representation of the green channel in some circumstances, but the more accurate rendition of the composite histogram reduces the risk of relying solely on the composite histogram.


Recent Comments