
Aug
02
Kingfishers Fishing for Fish
Nature Photography Hides Diving Workshop
Nature Photography Hides recently hosted a diving workshop for a group of 4 intrepid souls (myself included) at their new Hide and Diving Pool setup. This is so new that it’s not publicised on the website yet, but nonetheless available, and worth the trip down to Bromsgrove in the West Midlands to see Kingfishers fishing first hand, and photograph the process in detail. The set is sited down on the river bank. In the distance is a large buff coloured fence which blurs out as a background nicely. In front of the tank is a sheltered mount for the cameras, secured by four Arca Swiss style tripod heads. The sloped roof keeps the rain off, and the height of the mounts leaves the cameras in position to shoot parallel to the water surface.

Diving Pool
The tank itself has a relatively shallow surface and a deeper centre portion in which the fish swim. This cuts down the area in to which the Kingfishers will dive (the rest is too shallow), which is important because of the limited depth of field. The cameras are fired by remote control from the hide itself which is in front of the setup visible here.
Just above the diving tank there is a perch holder, which is again positioned in order that the Kingfisher will dive into the tank facing backwards from the Hide. This way they turn in the tank and fly out either sideways along the length of the river, or towards the hide, for better looking shots. No one wants to see the Kingfisher’s backside as it flies away from the camera. In order to get sharp shots the cameras have to be set up in a very particular way, at their highest frame-rates. See ‘Camera Settings’ below for more information.
Camera Settings
To catch the Kingfishers fishing we need the birds to be in the correct place at the right time. You can’t alter the camera settings once you are in the hide, and you must try not to disturb the birds by going in and out of the hide too frequently. So we were using manual focus, having pre-focussed on the most likely diving spot.
The Tricky Task of Focussing..
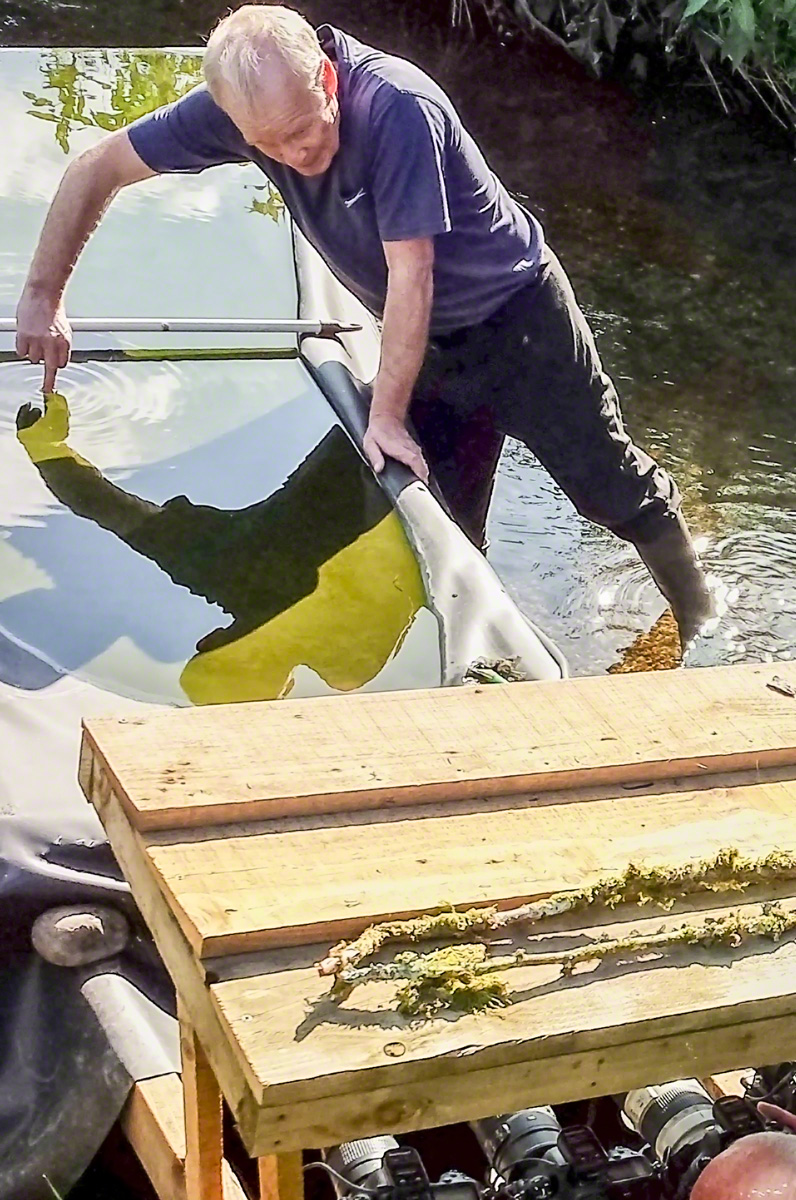
Our guide, Mick, was really helpful in making sure that we got everything right, and all came away with some excellent shots. Here Mick is holding a bar across the centre of the pool and using a handy finger knuckle placed mid tank for us to focus on (you can just see a head at a camera in the lower right hand corner). This is crucial because we were all using 70-200mm lenses at 200mm on full frame bodies. As you can see from the pictures, the Kingfishers were about 1.5m away, and this would mean a depth of field of about 2cm at f8 so there is no room for error and a certain amount of luck is still required.
F8 is about all you can afford in the dance between exposure value and ISO. To guarantee sharp shots you need a shutter speed of about 1/2500 of a second. We set auto ISO and aperture priority (i.e. to keep the camera set at f8) and a minimum shutter speed of 1/2500 s in the auto-ISO settings. We had great light and, with a 1 stop negative exposure compensation set to avoid blown highlights, the ISO ranged between a minimum of 720 and a maximum of 11,400 during the day. This said my keepers were evenly spread between ISO 800 and 7,200. No problem at all for the D4. You still need to take lots of shots however, because only some of them will be critically sharp and in frame. This depends partly on your timing, but mostly on where the Kingfisher dives and where he comes out again.
Participants were mostly shooting Nikon (1 D4s, 2x D4s and a Canon 5d MkIII). We were all using the Hahnel Giga T Pro II Wireless Timer Remote (by complete coincidence) and were able to set separate channels in order not to fire each other’s cameras. We were also able to help each other out because 3 of us hadn’t got much experience with the remote trigger, presumably purchasing them for this workshop! They worked flawlessly throughout the day though so they can be recommended as a reliable radio trigger.
Two Camera Setup
Having a perch, as well as a diving tank, gave the opportunity to shoot two cameras simultaneously (slightly tricky the first few times). This is made easier by the remote control, but you do have to watch that the handset doesn’t time out because it defaults to single shot when you first turn it on. This can be deceptive because you do get 3 shots if you hold the button down and, with other cameras firing at the same time, it’s easy to think that you are shooting continuously when you are not. So this is me in the hide with my D810 feeling very lucky indeed (though looking like I’ve just seen an alien)!

Selfie..
Not the best picture of myself I’ve ever taken, but I suppose given the conditions, my old Galaxy S4 did a decent enough job with it’s microscopic sensor, lens and 8 bit jpeg files. I’d probably just realised that my shutter speed was too high!
For the perch shots, given the very short distance to the perch, from the hide, it suited me to use my 300mm f2.8 with 2x teleconverter rather than my usual 600mm f4. I have been caught out once or twice recently by the 5m minimum focus distance on the 600. The 300mm Nikkor can focus down to 2.2m, which was crucial here. I must say that even with the 2x teleconverter the results are still very sharp, but you do lose 1 stop of light (f5.6) compared to f4 with the 600. This isn’t really a problem provided you keep your brain engaged!
One of the worries, with a shoot like this, is that you will miss a crucial setting on the camera. Prior to arriving at the hotel the night before, I had set both camera bodies up for the diving shots (i.e. auto-ISO and a minimum shutter speed of 1/2,500). You don’t need that kind of speed on the perch shots, unless you want to capture an in-flight arrival or departure from the perch. It’s not that there is really a problem with auto-ISO per se, but you do need to remember to tone down the minimum shutter speed, or better still (for me anyway) move to aperture priority with a fixed ISO. I prefer to use VR on the D810 with a shutter speed close to 1/500th second for the Perch Shots. This is plenty stopping power for subject movement and camera shake, providing me the sharpest results on the high-res sensor. On the D4 my VR threshold on the 600mm is 1/160th second (I prefer 1/250th second if I’m shooting with the 1.4 teleconverter) but this doesn’t give a tack sharp result on the D810 so I like to go higher. Obviously above 1/500th second you can introduce shake with the VR so you need a shutter speed to match the reciprocal focal length (1/600th s or above in this case).
The End Result
The setup above may appear Heath-Robinson, but it is just perfect for the task. Take a look!
Until next time..
Cheers,
R.

Nov
02
Rediscovering My Photography
B&W / Birds of Prey / Cameras / Landscapes / Macro / Motorcycling / Nature / Nikon Cameras / Nikon D3 / Nikon D300 / Nikon D4 / Nikon D810 / Photography Posted by Robin
/
0 comments
Rediscovering My Photography
My Journey Back, This Year in Pictures..
Background
I’m sure that I am the same as every other working individual. Work-life, home-life and chores expand to fill all available time — that’s Robin’s Law, one of many! The balance of these three may change from time to time, but essentially, hobbies are squeezed into any free time that you are not too tired to use. Over the past 12 months I’ve been focused on my cycling, as this has been making me feel better emotionally, and physically, but whilst doing so I’ve had a nagging feeling that something else is missing. I’ve known that it is my photography well enough. I’ve been thinking that I may as well dispose of my cameras, and other studio equipment, because they represent a large investment and I’m not using them. Fortunately I have managed to resist the urge, and in an effort to re-balance things, have started making time to take a few images again.
Recession and the Cost of Living
In reality my retreat from picture taking has been multi-factorial. I have read a lot of recommendations along the following lines: “Take loads of pictures, it doesn’t cost you anything to experiment with digital photography”. In one way this is true, well almost, it doesn’t cost very much to press the shutter button. The only real costs, once you have purchased the machinery, are for electricity to charge the batteries. Beyond this though, if you want to keep your photos safely, you need storage space in the form of multiple hard drives (or DVD’s if you have the patience to record them), and these do cost money. If you want people to enjoy your work you may also choose to purchase a website with it’s own attendant charges etc. There may be other expenses too, after all, there are only so many photographs you can find in your garden or front room. There comes a time when you have to invest in some form of subject-seeking. This can take many forms from the full-octane photography holiday, through to purchasing multi-colored knickknacks from a stationers for your macro photography. For some of us, the true joy of photography lies in the execution of a fabulous print. These also cost money, especially the A3 and A2 ones, and if times are hard, and you can’t afford the ink and paper for your printer, some of the joy of photography is leached away. The improvement in the UK economy has therefore also been one factor in my rediscovering my photography again.
With all this in mind, I took a day out to replenish my soul with one of my favorite subjects, a variety of birds of prey on an organized shoot at a falconry center. Some out-doors in natural settings, and others in the studio. Easy-peasy..
Gauntlet Birds of Prey, Eagle and Vulture Park
If you would like to visit the Gauntlet birds of prey, eagle and vulture park I can strongly recommend it. The vulture collection is a particular treat. In addition to photography workshops they have flying displays at 12.30 pm and 3.00 pm, Vulture feeding at 12.00 pm and a meet and greet at 2.00 pm as well as other attractions.
A Photo-Walk Around Chester
Invigorated by shooting wildlife again, albeit in captivity, I next tackled a photo-walk around Chester. Not a brilliant day, in fact quite dull, so I had to keep my wits about me. Black and white to the rescue..
A Visit to Oxford
In our only city-break this year, we went down to Oxford to see Ceri, the daughter of some friends of ours, as she started her final exams. The weather was not kind to us, unfortunately, so we had plenty of time to look around the shops, and drink the occasional cup of tea and coffee.
A Visit Thurstaston
The next step in my rehabilitation occurred during a drive out to Thurstaston with my daughter. The plan was to find some coastline, and take a few pictures along the way. As good fortune was to have it, the North Wales Hang Gliding and Paragliding Club were flying, and we got a few shots of them, plus the visitor center had a photography exhibition and a public hide with views out onto some well stocked bird feeders. Heaven!
The Journey Continues
Sadly, these trips were still not quite enough, on their own, to get me taking pictures regularly again. Have you had the experience of wanting something all the more, when you knew you couldn’t have it? Well, my D300 broke! I hadn’t been abusing it, I’d just been updating the firmware to include compatibility with the 800mm f5.6 Nikkor extreme telephoto (it’s not like I will ever own one, but I like to be up to date), when to my astonishment, it just stopped working. In all honesty I hardly ever use the D300. It’s old technology now, but it is my backup camera and I do like to use it for macro shooting extreme close-ups with an old 300mm zoom and a 50mm reversed onto the end. And now, suddenly, I couldn’t. Should I buy a new camera? Probably not worth it if I’m not using my cameras much, but should I get the D300 repaired? Well probably, yes, was the conclusion I came to, if a camera that old can even be repaired? Well it turns out that it could. Nikon UK have a fabulous online system for repairs. You can say how much you would be prepared to pay without seeking permission to proceed, and even get the free postage label printed out from the website. They prepare an estimate and you say whether you want to go ahead or not and that is pretty much that.
Needless to say, once the D300 was returned to me in good working order, I couldn’t resist using it for some macro shots, and generally loving it and reminding myself of all its settings. Sad I know.. In fact, the challenge was as much to produce some good looking and clean shots with it as I could. I’d forgotten how noisy and textured D300 images could look. Sensor technology, and the supporting electronics behind them, are so much better now than even 5 years ago! Here’s how I got on:
Oulton Park Track Day
By this point I’m fully engaged with the drama and creativity, seeking new photographic experiences and subjects again. I’ve said before on this blog that, for me, it is more about the photography than the subject. Novelty and complexity are always the way for me. I’ve never shot cars or bikes on a track before, so this would be a great entrée. Is it difficult? Depends. If you want a straightforward shot, tack sharp, just set a monster shutter speed and shoot away. If you want a sharp bike and rider with spin-blur on the wheels done in camera, on a bend, yes that’s tricky first time out. Impossible? You be the judge!!
Hooked Again!!
The Inevitible Consequences..
And so it was, hooked again. Desperately fighting the urge to buy a new camera, but eventually succumbing to the temptation. A couple of years ago I blogged about wanting a Nikon D4 and a D800, but having to choose just one. That time it was the D4, this time the siren call of 36mp detail was too much for my battered psyche, and so to the D810..
More later,
Robin.
Recent Comments