
Jul
02
Shooting Macro
I love shooting macro, though inspiration can be a little tough to find at times. I already have a 105 mm Micro Nikkor, but had been thinking about a longer focal length for some time. After some research, it seemed to me that, rather than buying the 200mm f4 Micro Nikkor which has a 20 year old design, I’d be better off going with the Sigma 180 mm F2.8 APO Macro ED DG OS. My thinking was thus. Firstly it is a faster lens, very sharp and has a good reputation. The 200 mm Nikkor, is also stunningly sharp, and built like a tank, but it is very much a one trick pony. The autofocus is very slow (though satisfactory for things a long way off apparently) and it has a maximum aperture of f4.
Making a Purchase, Checking It Out..
So, at the last but one photography show in Birmingham, I visited the Sigma stand and spoke to a representative. After looking at the lens, and hearing about it’s performance, a purchase was made from London Camera Exchange. It duly arrived, at our local store, about a week later. Had it not been a bank-holiday weekend it would have been even sooner. It’s been superb! Out of the box, the Sigma appeared well made and robust. I fitted a Wimberley Arca Swiss lens plate and set about shooting tethered using Helicon Focus. This revealed an unexpected, yet key, difference with the 105 mm Nikkor.
Bearing in mind that I had always considered the 105mm Nikkor to be an excellent lens, I was not prepared for the stunning absence of chromatic aberration. It’s not that the Nikkor is particularly bad, it’s just that the Sigma has no chromatic aberration. None at all. At least, I haven’t come across it yet. There must be some somewhere mustn’t there? But the visible difference was remarkable. With the same subject you could see the artifacting on the Nikkor but not on the Sigma. Amazing!
Choosing Between Macro Lenses
Back Garden Birds, Hide, Backlit
Choosing a lens for shooting macro requires a little thought. Firstly, what do you tend to shoot? If it’s wildlife, there is something to be said for a longer focal length to keep you more distant from your subject. This is not the only relevant factor however. Most of my outdoor shooting uses available light, sometimes with a reflector or torch to provide fill or dimension. The physical length of the macro lens I use makes little difference in this scenario, but if I’m to use flash then I need to consider two other issues.
Flash and Macro Lens Choice
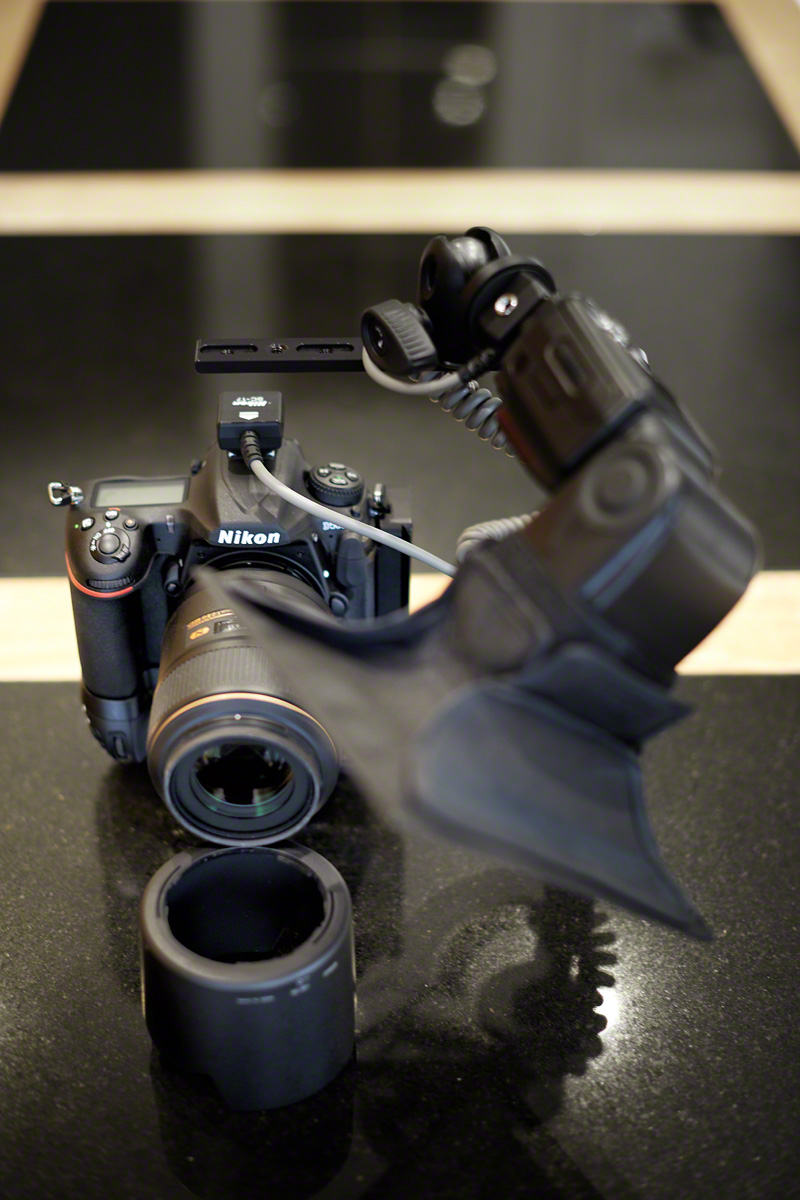
Clearly, for macro shooting with flash, the length of the lens itself makes a big difference to the type of flash you might use on camera. Will the flash be a Speedlight on a flash bracket? If so, a 105mm or 150mm lens will be more useful as you can get the flash nearer to the subject. The flash bracket can reach over the lens (as opposed to be in the lens’ shadow). Here I’m using a Custom Brackets CB Folding-T folding flash rotating bracket to hold an SB900, with a Neewer SB1520 small softbox attached, to light a subject from above and to the side.
Were I to attempt this with the Sigma 180 mm F2.8 APO Macro ED DG OS I’d be out of luck. On a D500, with the APSC lens hood extension, it is approximately 330 mm in length compared to the 190 mm of the Nikkor (or aprox 115 mm without the lens hood).
R1C1 macro flash kit on a Nikkor 105mm f2.8
Using a Nikon Speedlight Commander R1C1 Macro Flash
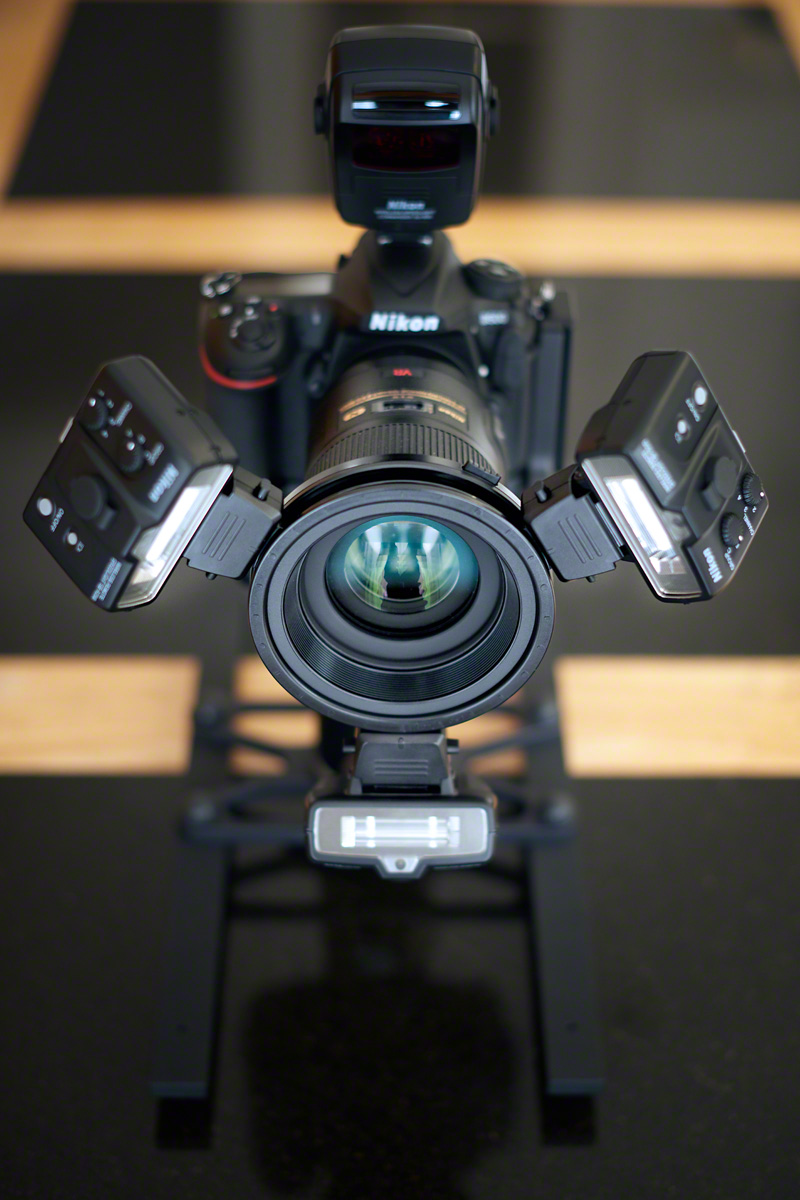
If you are going to use the Nikon Speedlight Commander R1C1 Macro flash, for instance, you also need to bear in mind that there is no adaptor ring available in the 86 mm filter size of the Sigma 180 mm. You have to use the SB200s off lens in this case. Personally, I felt this was an inconvenience rather than a deal breaker, because when I work with flash it is usually in the studio and I can easily use stands for the flash.
Multi-Purposing a Macro Lens
It occurred to me that I have used my 105 mm Nikkor as a portrait lens in the past, ideal on a full frame camera. Would a longer prime be useful for some of my larger birds in flight work, for instance Osprey at Rothiemurchus? With a working focal length of 27o mm on a crop sensor camera (my D500), it might be a useful alternative to using my D810 with my 300 mm f2.8 (which is a much larger lens). This could be ideal for the lower light situations pre-dawn when the D810’s ISO performance is less suitable.
Lower-weight, and shorter minimum focal distance, make it a good choice for ad-hoc wildlife appearances closer to the hide.
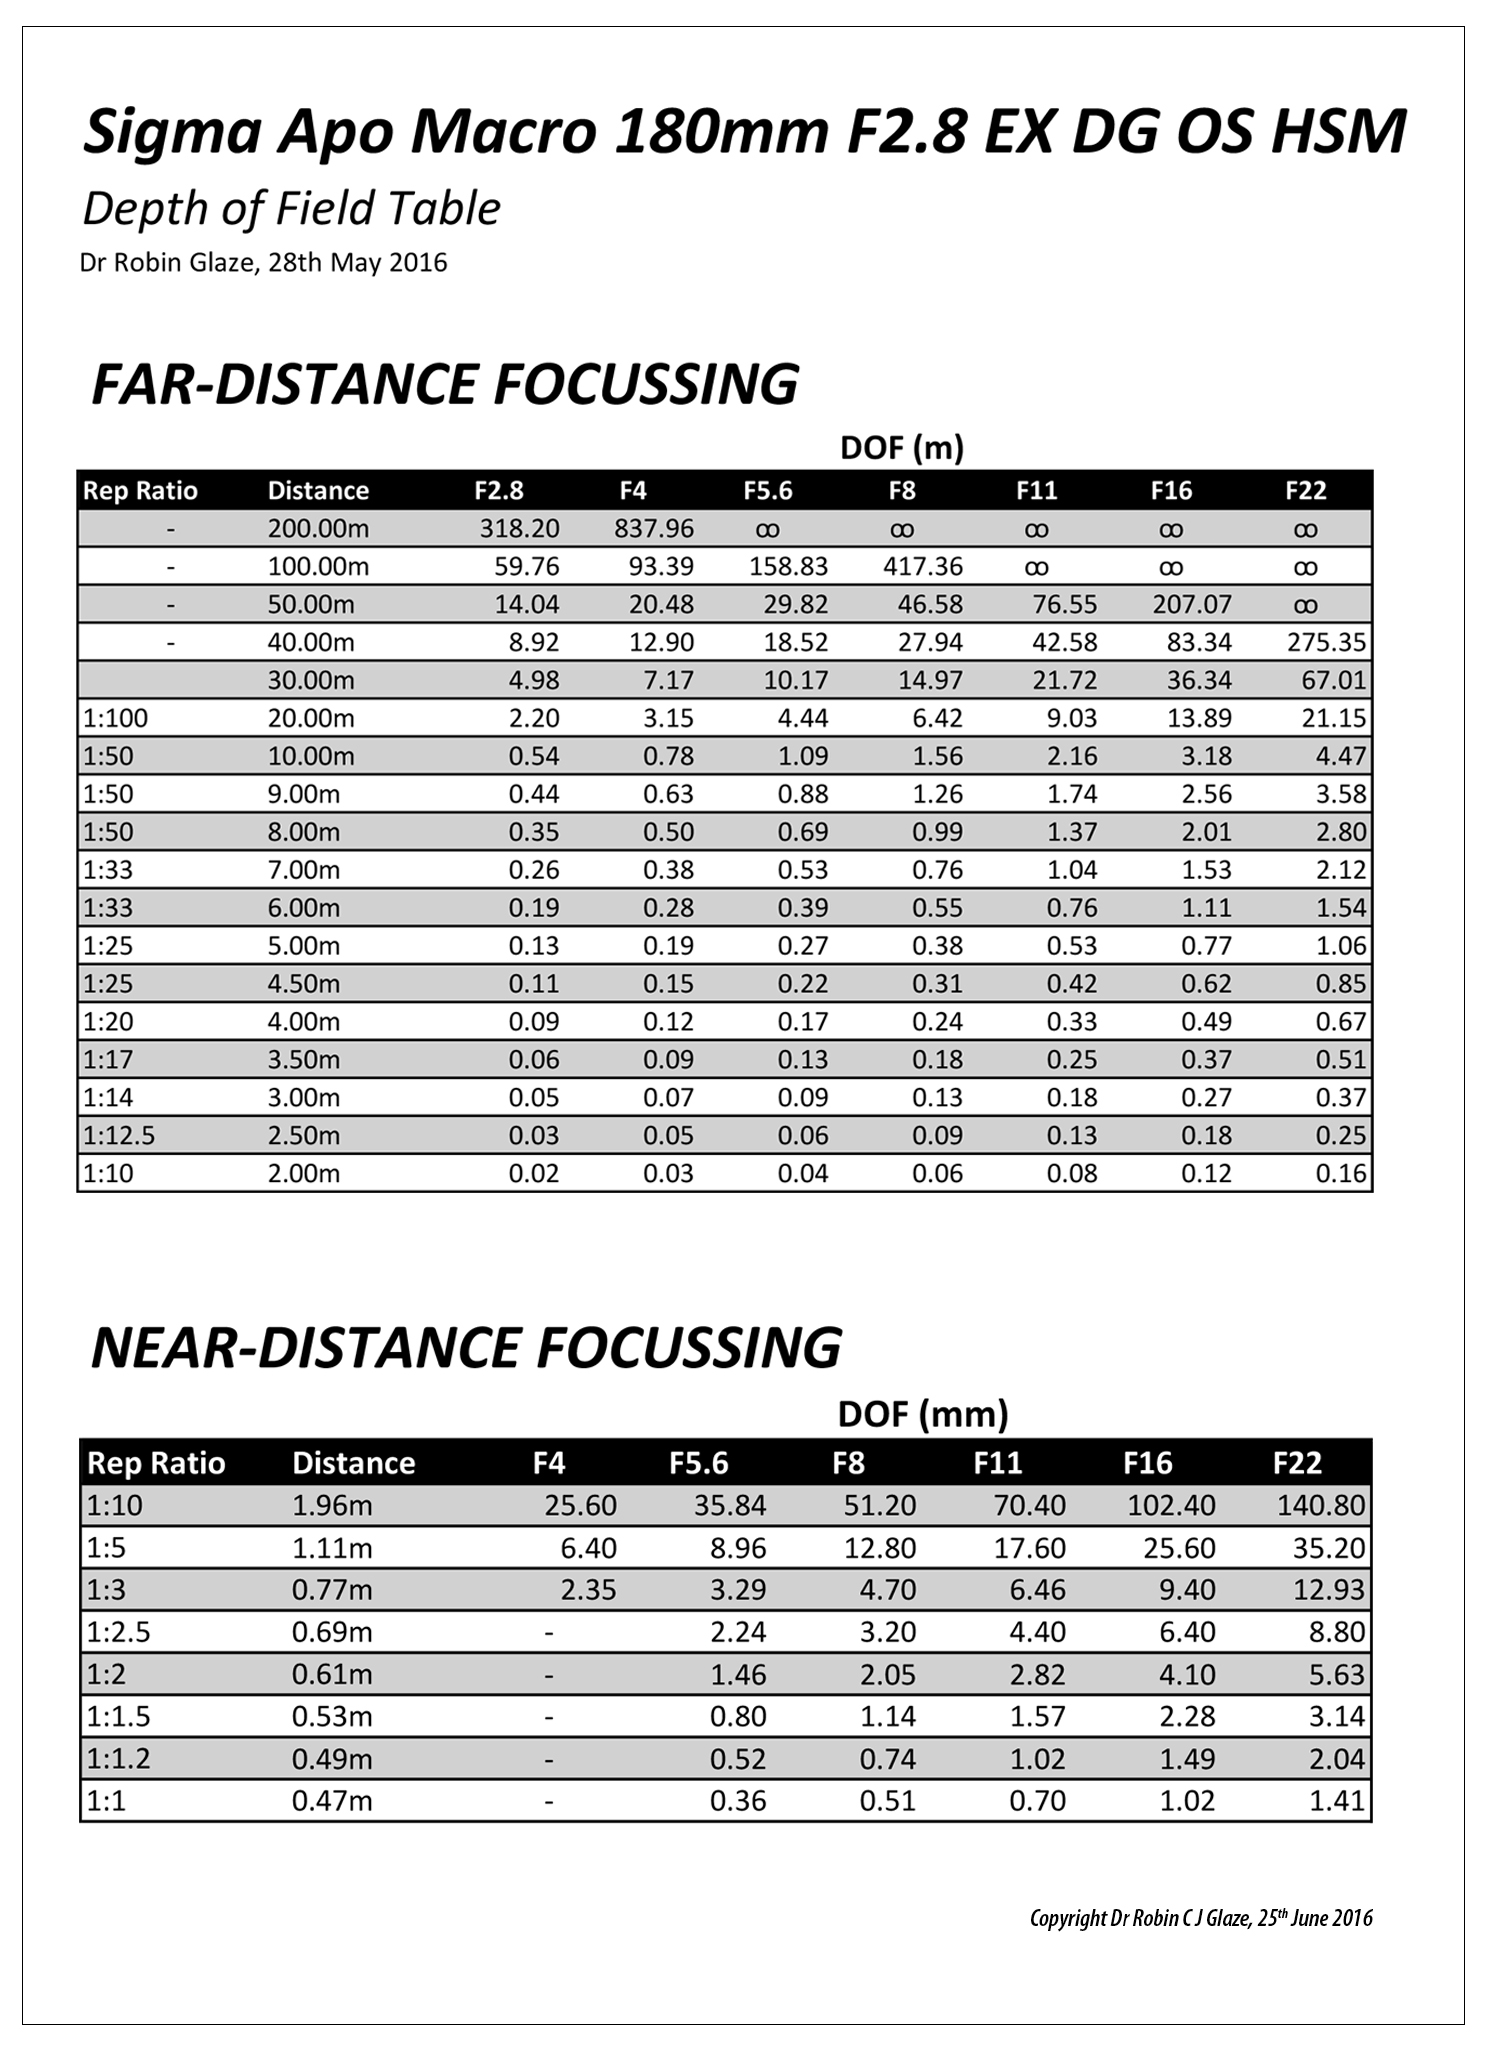
Depth of Field Calculations
Sigma do not supply depth of field tables for shooting macro with their lenses, so ascertaining depth of field for close up work is not straightforward.
Doing the Math..
Some research was required to find out how to do the DOF maths, but with an Excel Spreadsheet I was able to produce a depth of field table. This has helped me appreciate how some of my shots might work – pre shutter release.
I guess, ultimately, if you take enough shots, you learn from experience, but knowing whether to make a virtue out of a wide aperture shot’s limited depth of field can be a little thought provoking if not enough image is sharp. I never mind taking many different shots whilst I’m out in the field, on the basis that one of them might be spot on. When I can get them onto the computer, It’s easy to see how I did, but I’d really rather know how to take the image work with a single click.
Lateral vs Longitudinal Chromatic Aberration (CA)
Types of Chromatic Aberration
Chromatic aberration occurs because shorter wavelengths of light (blue) are refracted (bent) more than longer (green and red) wavelengths of light which are refracted less. There are two types of chromatic aberration. Lateral (or transverse) and Longitudinal (or Axial).
Lateral CA occurs when all the colours are focussed at the same plane, just not aligned. R, G and B light are focussed sharply, but side by side. In Longitudinal CA, the colours are not focussed at the same plane, they are superimposed with blue in front of green in front of red. To observe this, Lateral CA causes coloured fringes around objects of high contrast, whereas Longitudinal CA causes patches of colour (ie. the most in-focus colour predominates).
The 180 mm Sigma Macro lens is particularly good with Longitudinal CA, you do not see colours change as you move up to, and then through, the focal point for high contrast details. Longitudinal chromatic aberration is very noticeable in the Nikkor 105 mm in comparison.
Recent Images
Jan
12
Twas Just Before Christmas
I had been working on my image collection to smarten up the galleries on this site. I even worked on separate thumbnails for maximum effect with each one individually centred. Took ages…
Having a little time over Christmas (a change to say the least) I thought I would go ahead and update TDI with the new galleries. Having not blogged since last March, I could barely remember how to enter admin mode (had even forgotten my password), so creating a new menu system was an even larger hurdle. Never mind, I was up for it… Unfortunately I realized that multi-level menus were out of the question with my previous theme as they were just as long as menus without sub-levels, and there were just t00 many galleries.
Repeat Performance..
So guess what. I had to re-organize my galleries to be larger and fewer. Took ages (and I was not amused once more!!). Worked hard, got it all done, felt very pleased, theme fell over. No slide show on the home page. Ahhhhh!!
No Help from Theme Authors..
I emailed the theme authors, but no reply. Emailed again, but still no reply. What a nightmare, looks like they have gone out of business – still economic times are hard and there might not be a very large market for something so specialized – but here’s the thing… I really liked that theme.
My choices were few. I could learn (actually re-learn) HTML and learn JScripting (for the first time), the WordPress architecture and something about theme writing and thus fix it myself. Or purchase another theme, re-do all my galleries, re-design my homepage and get to grips with unfamiliar settings. Neither seemed much fun, but I chose a new theme.
It took longer than I thought, but eventually themeforest came to the rescue with an excellent theme called Photolux from Pexeto Themes. It’s very popular, reasonably easy to use and very attractive with a simple style. I’ve been able to reuse my old galleries pro-tem so that’s a help, but not a permanent solution because the full-screen images that this theme can do look so much better.
But There’s More..
One of my plugin updates caused an internal server error taking me off-line. Nevertheless I’m delighted to say that everyone has been very helpful. The GoDaddy technical support was excellent (did you know that their European office is in London?), and the plugin author is being very helpful too.
Back to the Photography..
 Well, things did take a turn for the better in the end, and I finally got the strawberry falling into water shot that I wanted. As much as I enjoy my wildlife photography, I do also enjoy the controlled circumstances of the studio, and I’ve had several goes at this shot previously. My daughter was keen to help out and took some of the shots herself with her D3100 and Sigma macro lens combination, so this is a combined effort. Unfortunately I didn’t quite have the correct kit to get the shot the first time round as I needed a longer container. This image is taken using a flat sided glass vase to hold the water, and they are available quite cheaply in many stores (see picture below). The strawberry is carefully chosen for size and shape, side lit with a small strobe and the background is lit with 2 other flash (it’s actually a piece of A3 blue card). It’s important that the vase is tall enough to get both the strawberry and the splash, and the position of the light is important because you don’t want any stray highlight reflections on the glass. The greenery on the top of the strawberry is best retained in my view. It may look untidy when the strawberry is out of the water, but usually looks fine when it is beneath the waterline, so you don’t have to be that fussy.
 It is not really possible to get this shot in one go because the splash occurs when the strawberry is much lower down in the vase, and therefore the angle of view of your macro (or telephoto) lens is too narrow to get it all in. So to get both the strawberry and the splash-back in this pleasing aesthetic you need to merge two shots in Photoshop. In order to make this possible shoot everything in manual in the same way you would with a panorama. Obviously you have to be quite patient to get both parts of this shot correct. Expect lots of missed strawberries mostly out of shot, lacklustre splashes and don’t forget to pre-focus on the strawberry in the centre of the vase before you drop it!! You will need to crop out the sides of the vase because this makes it very difficult to merge the two shots. The inside surface of the vase can get covered in distracting water-droplets as the number of trials increases so it is important to watch out for this and periodically wipe the inside surface with a piece of kitchen towel or similar. As with anything electrical and involving water, make sure your flash equipment is sufficiently distant not to get splashed. They can be covered by plastic bags if needs-be. I found that at the distance I was using no droplets landed near to the flash units.
Manual flash exposure tends to be more reliable than auto and don’t forget to use a manual white balance, plus any correction you might need post shot, for both images before attempting the merge. Given that it is the speed of the strobe flash that freezes the action it is important not to have too much ambient light for the ISO/Shutter Speed/Aperture combo that you are using in order to minimize the potential for speed blur. To judge this take a test shot with the flash turned off. the darker the frame the better. Here are the two shots I used and you can see clearly how the splash begins as the strawberry moves out of frame. As you can see I might have been better off shooting higher for the splash since the splash was almost cropped by the top of the frame. A good trick for centring the strawberries prior to focussing is to skewer them and hold them in place.

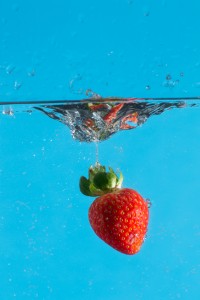
If you do this though, remember not to go right through the strawberry because this doubles the risk of being able to see the exit wound on the face of the strawberry, the top one is usually out of sight but one on the front of the strawberry may not be, as happened here. The clone tool came to the rescue easily enough, but it is best completely avoided if possible. Alternatively you can copy a patch of strawberry that is similarly lit up onto its own layer and then move it into place and mask the edges with a soft brush to obscure the repair. Don’t forget to match the spacing of the seeds though, otherwise the repair will look odd. Finally I painted out some of the more distracting water droplets on the inside face of the vase (this is an advantage of using a flat-lit plain coloured background), sharpened and saved the image.
For the sake of completeness, this image was taken with the following settings:
Focal Length = 220mm, Aperture = f11, Shutter Speed = 160th Second.
New Year’s Resolution
My new year’s resolution is to try to blog at least once a month and to always have a new image to show. I’m becoming curious about social networking (my wife says it’s a jolly good thing in business). I’d quite like one of those social media icons on my home page – but I’m not sure I can commit to the regular stream of content (however short or inane).
Best wishes,
R.
Recent Comments