Where Have I Been, What Have I Done?
Hi there, it’s good to be back. What have I been up to you may ask. Well this morning I’ve been trying to restore my Android phone back to decent health, but that’s another story entirely.
Some time back, the parents of one of my daughter’s dance peers invited us round for a meal. Bill is a big cycling fan, and does tens of thousands of miles a year on his road bike. Feeling somewhat impressed, and fueled by good company and more than a little vino, I mentioned that I had been a keen cyclist for a few of my adolescent years. This, of course, was far too many years ago to mention, and had been replaced by an incredibly sedentary lifestyle thereafter. I am, after all, paid to sit still and talk to people on a daily basis. Bill said that he, and a group of like-minded souls, went off for a ride most Sundays and that I should come along. Of course, I didn’t expect to hear anymore about this (indeed was probably hoping that I didn’t hear anymore about it…), but a couple of weekends later the posse called round at the house, and, in the rain and wind, off we went.
That First Ride
I have an old Marin mountain bike. It’s about 20 years old, and, hasn’t really seen much action at all over the time I have had it. It has mostly sat in the garage gathering dust and rust. The one time it did have a bit of excitement was when we were driving back to Ipswich from our honeymoon in the Lake District. The bikes were on the top of the car (at least for a while) until I knocked them off driving under a low car park barrier. What a mess. Still the bikes were largely unharmed, which is more than I can say for the car and my self-esteem. Back in 1992, the Bear Valley was a reasonable bike, priced at about £600. I had always found it uncomfortable, and riding it gave me numbness in the fingers. My longest ride, in East Anglia, had been 35 miles along the flat and this had taken all day. This day, I was to manage 6 miles. 3 miles there and the same again back. Nearly killed me! How could these guys go so fast without any apparent effort? I’m so short of breath!!
Further Progress
Well, not to be put off, that was the start of my regular exercise plan over the summer. We’ve had some cracking weather, and I’ve lost a stone and a half in weight, which can’t be bad. My blood pressure seems to have dropped a bit as well. The Marin now has slicks, instead of off road tyres, SPD pedals, and I have mountain bike shoes that clip on to them, and upgraded brake pads. The worn front and rear cones have been replaced with units from Australia and Spain respectively (there aren’t many of these old parts left in the world), and I am now familiar with “the chain whip”, “cassette removal tools” and “dry lube” to name but a few. I’ve even had to fix a puncture whilst being out on the road. Oh, and the other thing I realized was that large backsides need a decent saddle. I got one of those as well.
The Cat and Fiddle Challenge 2013
The Route…
We were out on a ride one evening over the summer when Bill mentioned that there was going to be a “minor” 55 mile sportive coming up on the 6th October 2013, and I might be ready for something a little bit harder by then. Perhaps this goal would help me stay motivated to keep going with my training? So I signed up. It was only £25 and all I had to do was to increase my mileage by 10 percent a week, and the job, as they say, would be a good-un. This proved harder than I thought it would be however, with most rides on a Sunday being in the 20-30 mile range, and my mid week evening rides being in the 10-20 mile range. I was feeling stronger, but I had to know, could I even get close to 55 miles? One Sunday morning I got up early and did a 40 miler on my own, less embarrassment that way. It was mostly flat though, and I really struggled with the last five miles. Not to be beaten, a bit nearer the time, I attempted the Horseshoe Pass to test out my climbing abilities. I managed it with a couple of stops, but I was very unprepared for the challenge that lay ahead. The problem was, that I just didn’t know it yet, which, as it turned out, was probably just as well.
The Challenge
“Rourkie’s Cat & Fiddle 55 mile Cycle Challenge” has been running since 2002 in order to raise money for Cystic Fibrosis. It is organized by Brian Rourke Cycles, and starts near to the showroom in Cobridge, Stoke-On-Trent. One of the big pulls for the event is the opportunity to ride with Tour de France legend Sean Kelly.
The Week Before
I purchased some Gels (sugary drinks in a packet to give you energy when you are flagging), some new water bottles, a bar bag and a Saris Bones RS carrier for the car. For the first time, I also ordered some lycra. Having lost a stone in weight, this was going to be marginally less embarrassing than when I started. Having the correct clothing is vital for this sort of ordeal, sorry, I mean event. And hey, I would never see these people again. I could avoid Stoke-On-Trent for the rest of my life if needed!
The Day Before
I thought it would be a good idea to wash the Marin, and check the tyres. Oh NOoooo!!! Two broken spokes on the back wheel. What to do? Quick check on the internet, then dash out to try and buy replacement spokes. I was in luck, I had the spokes but no tools to remove the Cassette from the back wheel. Hadn’t known that this would be a problem. Another dash over to Bill’s place for assistance with the repair, then back home again to put it all back together. Then off to a party (was this really sensible?). Thanks to Nikki and Dave, it was indeed. Just don’t ask Bill and Ieuan about the Karaoke!
The Ride Itself
Fortunately there is no specific start time, you can register and leave any time between 8.00 am and 9.30 am. We had to set off early anyway, because our road was going to be closed that morning for a marathon, though, as it happened we had a little difficulty locating Brian Rourke Cycles so we were nearer the 9.30 to start. The weather was beautiful with sunshine for much of the day. Whilst we were registering, a couple of guys had their, very expensive, road bikes stolen, one of them virtually in front of his eyes. I guess this can happen at any venue with so many high-end products on show, but it was terrible to see the distress and disappointment. And so we set off.
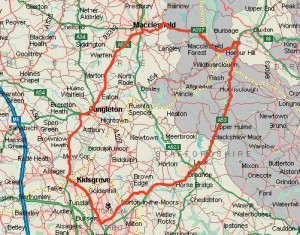
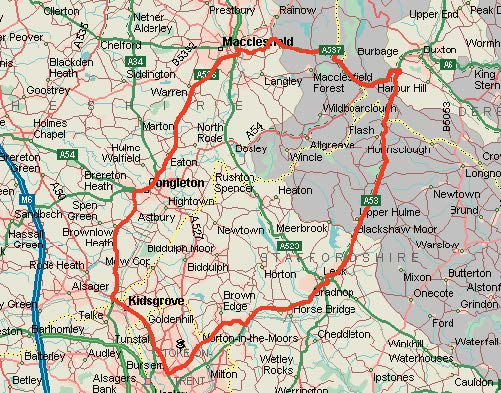
Three of us, myself, Bill and his son Ieuan set off together and the first few miles out of Stoke-On-Trent had several short climbs, but we soon settled into rolling countryside. The support crew were soon setting off round the course and would pass us from time to time shouting encouragement and holding a plaque with “Go Dad!” on it out of the window. I was feeling pretty pleased with myself at this point and had somehow managed to completely forget about the 7 mile climb ahead. About 20 miles in to the ride we dropped down an incline to some traffic lights, before turning right onto the Cat & Fiddle climb itself. It’s not as steep as the Horseshoe Pass, but it is so so long, seeming to go on for ever. About a mile and a half into the climb we came across some time trialists starting their race against the clock, setting off at 2 minute intervals. It was after this that it dawned on me that at my present speed (pretty slow) it was going to take me the best part of two hours to master this hill! Ieuan had set off on his own, just to see just how fast he could complete the climb and I didn’t see him again until much much later.
This slideshow requires JavaScript.
We stopped at the Peak View Tea Rooms for a coffee, cake and a sandwich or two. The support team had seen Sean Kelley who had been there much earlier. After another mile or so we passed the Cat & Fiddle Inn and then dropped down, via the A54 descent, onto the A53 for the Axe Edge Moor Climb (5 miles). To my horror, at this point I developed a migraine, probably as a result of the gels I’d been using having too much caffeine in them which I’m a bit sensitive to. In the event this probably worked in my favour because, with the visual disturbance and headache, I had to climb very steadily taking one pedal turn at a time, which took my mind off things. Fortunately, the brufen kicked in and I could continue apace. After Axe Edge Moor, there was another short climb into Leek and all seemed fine with the world. Only 10 miles or so to go. How hard could it be? Buoyed with enthusiasm, and more gels (Isotonic and sans-caffeine this time), we set off again after a short stop. But then came Ladderedge. Ouch. Three quarters of a mile at 6.3%. I’d always wondered what that would be like on a bicycle, back in the days when I worked in Cheddleton, and now I knew. Horrible.
This slideshow requires JavaScript.
On to Brown Edge. Bill and Ieuan shot off like scalded cats leaving me to plod my way up another monster climb at 5.6%, and finally Norton le Moors climb and Smallthorne Bank. Bill said I looked like a man who had used up every nano-joule of energy as I rolled up to where they waited for me at a set of lights. I felt like I had used up a few extra joules of energy that I had borrowed, and now had to pay back. And then, as if by magic, we were back where we started.
The Finish
This slideshow requires JavaScript.
The finish came unexpectedly for me as I don’t think we came back quite the same way we went out, but I’m easily lost. I was surprised and vaguely disappointed that we were home. Whether it was the gels, the migraine, the exhaustion or the endorphins, I felt euphoric. Beaming, I couldn’t get the smile from my face. According to Strava, I was the slowest round the course, but who cares. I had completed 4,000 kc worth of exercise. 1,226 m of climbing and 55 miles along the road. Awesome. Bring on the next challenge!!
What Next?
I suppose that my main goal, over the winter, is not to lose all of the fitness I’ve gained over the summer, and most of all, not to gain too much weight again. I definitely find that when I’m riding regularly that my appetite is reduced, but when I’m not it is huge. It’s much harder to find good quality cycling time in the winter months when the days are short and the weather terrible, but I’ve got the bug now – that’s for sure.
Until later,
Robin.


Recent Comments