
Dec
02
Christmas Bargains…
Just a quick note to let you know about TDI’s Christmas Bargains. Here at TDI we have reviewed our pricing policy and reduced out tariffs across the board.
Check out our wide selection of wildlife and macro images, and see if there is anything you would like to hang on your own wall, or give as a gift, at this special time of year. We have a range of stretched canvas, semi-gloss and premium matte prints available in sizes from A5 through to size A0 on selected images.
Prices range from £5 for an A5 Premium Matte print, through to £166 for a 40×60 inch Stretched Canvas.
Canvas prints can be purchased for as little as £20, with A3 Premium Matte prints available for as little as £10.
Our prints are professionally produced by The Printers Inc.
Here are some examples of the prints for sale in the gallery below:
Gallery of Christmas Bargains
Best wishes,
Robin.
Dec
01
Where Have I Been, What Have I Done?
Hi there, it’s good to be back. What have I been up to you may ask. Well this morning I’ve been trying to restore my Android phone back to decent health, but that’s another story entirely.
Some time back, the parents of one of my daughter’s dance peers invited us round for a meal. Bill is a big cycling fan, and does tens of thousands of miles a year on his road bike. Feeling somewhat impressed, and fueled by good company and more than a little vino, I mentioned that I had been a keen cyclist for a few of my adolescent years. This, of course, was far too many years ago to mention, and had been replaced by an incredibly sedentary lifestyle thereafter. I am, after all, paid to sit still and talk to people on a daily basis. Bill said that he, and a group of like-minded souls, went off for a ride most Sundays and that I should come along. Of course, I didn’t expect to hear anymore about this (indeed was probably hoping that I didn’t hear anymore about it…), but a couple of weekends later the posse called round at the house, and, in the rain and wind, off we went.
That First Ride
I have an old Marin mountain bike. It’s about 20 years old, and, hasn’t really seen much action at all over the time I have had it. It has mostly sat in the garage gathering dust and rust. The one time it did have a bit of excitement was when we were driving back to Ipswich from our honeymoon in the Lake District. The bikes were on the top of the car (at least for a while) until I knocked them off driving under a low car park barrier. What a mess. Still the bikes were largely unharmed, which is more than I can say for the car and my self-esteem. Back in 1992, the Bear Valley was a reasonable bike, priced at about £600. I had always found it uncomfortable, and riding it gave me numbness in the fingers. My longest ride, in East Anglia, had been 35 miles along the flat and this had taken all day. This day, I was to manage 6 miles. 3 miles there and the same again back. Nearly killed me! How could these guys go so fast without any apparent effort? I’m so short of breath!!
Further Progress
Well, not to be put off, that was the start of my regular exercise plan over the summer. We’ve had some cracking weather, and I’ve lost a stone and a half in weight, which can’t be bad. My blood pressure seems to have dropped a bit as well. The Marin now has slicks, instead of off road tyres, SPD pedals, and I have mountain bike shoes that clip on to them, and upgraded brake pads. The worn front and rear cones have been replaced with units from Australia and Spain respectively (there aren’t many of these old parts left in the world), and I am now familiar with “the chain whip”, “cassette removal tools” and “dry lube” to name but a few. I’ve even had to fix a puncture whilst being out on the road. Oh, and the other thing I realized was that large backsides need a decent saddle. I got one of those as well.
The Cat and Fiddle Challenge 2013
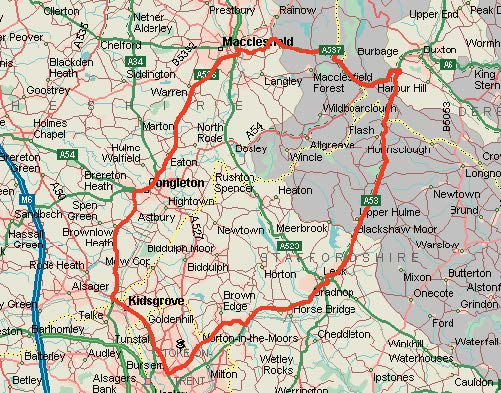
The Route…
We were out on a ride one evening over the summer when Bill mentioned that there was going to be a “minor” 55 mile sportive coming up on the 6th October 2013, and I might be ready for something a little bit harder by then. Perhaps this goal would help me stay motivated to keep going with my training? So I signed up. It was only £25 and all I had to do was to increase my mileage by 10 percent a week, and the job, as they say, would be a good-un. This proved harder than I thought it would be however, with most rides on a Sunday being in the 20-30 mile range, and my mid week evening rides being in the 10-20 mile range. I was feeling stronger, but I had to know, could I even get close to 55 miles? One Sunday morning I got up early and did a 40 miler on my own, less embarrassment that way. It was mostly flat though, and I really struggled with the last five miles. Not to be beaten, a bit nearer the time, I attempted the Horseshoe Pass to test out my climbing abilities. I managed it with a couple of stops, but I was very unprepared for the challenge that lay ahead. The problem was, that I just didn’t know it yet, which, as it turned out, was probably just as well.
The Challenge
“Rourkie’s Cat & Fiddle 55 mile Cycle Challenge” has been running since 2002 in order to raise money for Cystic Fibrosis. It is organized by Brian Rourke Cycles, and starts near to the showroom in Cobridge, Stoke-On-Trent. One of the big pulls for the event is the opportunity to ride with Tour de France legend Sean Kelly.
The Week Before
I purchased some Gels (sugary drinks in a packet to give you energy when you are flagging), some new water bottles, a bar bag and a Saris Bones RS carrier for the car. For the first time, I also ordered some lycra. Having lost a stone in weight, this was going to be marginally less embarrassing than when I started. Having the correct clothing is vital for this sort of ordeal, sorry, I mean event. And hey, I would never see these people again. I could avoid Stoke-On-Trent for the rest of my life if needed!
The Day Before
I thought it would be a good idea to wash the Marin, and check the tyres. Oh NOoooo!!! Two broken spokes on the back wheel. What to do? Quick check on the internet, then dash out to try and buy replacement spokes. I was in luck, I had the spokes but no tools to remove the Cassette from the back wheel. Hadn’t known that this would be a problem. Another dash over to Bill’s place for assistance with the repair, then back home again to put it all back together. Then off to a party (was this really sensible?). Thanks to Nikki and Dave, it was indeed. Just don’t ask Bill and Ieuan about the Karaoke!
The Ride Itself
Fortunately there is no specific start time, you can register and leave any time between 8.00 am and 9.30 am. We had to set off early anyway, because our road was going to be closed that morning for a marathon, though, as it happened we had a little difficulty locating Brian Rourke Cycles so we were nearer the 9.30 to start. The weather was beautiful with sunshine for much of the day. Whilst we were registering, a couple of guys had their, very expensive, road bikes stolen, one of them virtually in front of his eyes. I guess this can happen at any venue with so many high-end products on show, but it was terrible to see the distress and disappointment. And so we set off.
Three of us, myself, Bill and his son Ieuan set off together and the first few miles out of Stoke-On-Trent had several short climbs, but we soon settled into rolling countryside. The support crew were soon setting off round the course and would pass us from time to time shouting encouragement and holding a plaque with “Go Dad!” on it out of the window. I was feeling pretty pleased with myself at this point and had somehow managed to completely forget about the 7 mile climb ahead. About 20 miles in to the ride we dropped down an incline to some traffic lights, before turning right onto the Cat & Fiddle climb itself. It’s not as steep as the Horseshoe Pass, but it is so so long, seeming to go on for ever. About a mile and a half into the climb we came across some time trialists starting their race against the clock, setting off at 2 minute intervals. It was after this that it dawned on me that at my present speed (pretty slow) it was going to take me the best part of two hours to master this hill! Ieuan had set off on his own, just to see just how fast he could complete the climb and I didn’t see him again until much much later.
We stopped at the Peak View Tea Rooms for a coffee, cake and a sandwich or two. The support team had seen Sean Kelley who had been there much earlier. After another mile or so we passed the Cat & Fiddle Inn and then dropped down, via the A54 descent, onto the A53 for the Axe Edge Moor Climb (5 miles). To my horror, at this point I developed a migraine, probably as a result of the gels I’d been using having too much caffeine in them which I’m a bit sensitive to. In the event this probably worked in my favour because, with the visual disturbance and headache, I had to climb very steadily taking one pedal turn at a time, which took my mind off things. Fortunately, the brufen kicked in and I could continue apace. After Axe Edge Moor, there was another short climb into Leek and all seemed fine with the world. Only 10 miles or so to go. How hard could it be? Buoyed with enthusiasm, and more gels (Isotonic and sans-caffeine this time), we set off again after a short stop. But then came Ladderedge. Ouch. Three quarters of a mile at 6.3%. I’d always wondered what that would be like on a bicycle, back in the days when I worked in Cheddleton, and now I knew. Horrible.
On to Brown Edge. Bill and Ieuan shot off like scalded cats leaving me to plod my way up another monster climb at 5.6%, and finally Norton le Moors climb and Smallthorne Bank. Bill said I looked like a man who had used up every nano-joule of energy as I rolled up to where they waited for me at a set of lights. I felt like I had used up a few extra joules of energy that I had borrowed, and now had to pay back. And then, as if by magic, we were back where we started.
The Finish
The finish came unexpectedly for me as I don’t think we came back quite the same way we went out, but I’m easily lost. I was surprised and vaguely disappointed that we were home. Whether it was the gels, the migraine, the exhaustion or the endorphins, I felt euphoric. Beaming, I couldn’t get the smile from my face. According to Strava, I was the slowest round the course, but who cares. I had completed 4,000 kc worth of exercise. 1,226 m of climbing and 55 miles along the road. Awesome. Bring on the next challenge!!
What Next?
I suppose that my main goal, over the winter, is not to lose all of the fitness I’ve gained over the summer, and most of all, not to gain too much weight again. I definitely find that when I’m riding regularly that my appetite is reduced, but when I’m not it is huge. It’s much harder to find good quality cycling time in the winter months when the days are short and the weather terrible, but I’ve got the bug now – that’s for sure.
Until later,
Robin.

Aug
03
Preserving Highlights whilst Shooting in the Midday Sun
Sandwich Terns and Gulls at Cemlyn Bay
I was recently out shooting at Cemlyn Bay and Lagoon on Isle of Anglesey. This area is famous for its Sandwich Terns and I’d popped along with a view to taking a few Tern and Gull images. The day we picked to go was bright and sunny, and we were there late morning, all of which was less than ideal. When I’m shooting wild birds in flight, I always spend a few moments working out the correct exposure, because I cannot stand reviewing my images to find blown-out highlights. Getting a good general exposure that encompasses preserving highlights, without unnecessarily under-exposing the rest of the shot (in other words shooting to the right) can be crucial to ensure a reasonable result when the birds are flying in and out of various lighting conditions.
The Aperture Priority versus Manual Exposure Shooting
Many, perhaps most, wildlife photographers shoot aperture priority and use exposure compensation. I have found that, although I have a fair idea what my D4 might think is a correct exposure, and therefore what exposure compensation I might need to dial in, in a range of circumstances, this method is completely impractical for judging exposure when photographing birds in flight. The reasons for this include:
- The relative size of the bird in the frame changes as you track it.
- The colour and brightness of the background may change.
- The lighting on the bird may change as it flies under cloud, landscape or building shadows.
- The position and brightness of the highlights on the bird may change.
All of these factors make preserving highlights particularly tricky as you need to make very complex judgements, at high speed, whilst also trying to keep the bird in the frame. You are effectively fighting the camera in this situation and there is just, for me anyway, too much to do at the same time.
Setting up for Manual Exposure Shooting
This is my process for preserving highlights. Firstly I find an area of mid-tone, usually a patch of grassy field, then with my camera set to manual exposure I zero the meter in the viewfinder and take a test shot. Clearly if the subject will be in the sunshine, your base exposure should be set using a grassy field that is also lit by sunshine. If there is no mid-tone available you could also just take test shots of your subject instead, but this will take you longer.
The chances are that, if shooting a white gull for instance, even having taken a good base reading, there will still be some blown highlights if the bird is in the bright sunshine. This being the case, I adjust my shutter speed (upwards) or ISO (downwards) until they are gone. Usually, with my bird photography, I will be using my 600mm at f4 and looking for at least 1000th, preferably 1600th-2000th, second to freeze the wing tips.
In and Out of Sunshine
In the situation where there is a major shadow in the overall scene, and the birds are moving in and out of that shadow, you can take additional test shots to establish the exposure for that too. Again, according to circumstances, you might use a decrease in shutter speed or, more likely, an increase in ISO. Once you have established the settings for the shaded area it is easier, using the in-viewfinder information, to alter the exposure by the exact amount needed during actual shooting. Equally, if you were shooting at f8 in the sunshine for example, you could open up the aperture instead using the same method, though this will change your depth of field.
Shooting in Overcast Weather
Preserving highlights in overcast weather may be more straightforward in the softer light. Nevertheless when shooting in overcast weather, it is still sometimes the case that you take a base exposure and still get a small amount of apparent highlight clipping. If you have been shooting raw files this is easily retrieved in post production. It is up to you whether you take this chance or not, but my advice would be that, in this situation, you don’t delete any shots because of the blinkies as they may well be salvageable. For myself, I would still try and find an exposure to preserve the highlights if possible.
Cemlyn Bay Shoot
Jul
22
The NetMagic Shoot
Bill and Wendy from NetMagic are friends of mine. Bill has been helping me get started with cycling again, after a 20 year rest from regular exercise (I kid you not!!). In a way, that’s a whole blog piece for another time. I’m certainly not willing to share any images of me as a MAMIL until I’m quite a lot fitter, the shame would be much too alarming for my family (and me of course!).
The NetMagic team are working on their web presence at the moment, and Bill mentioned to me that they were looking out for suitable images. I offered to help out with the corporate portraits and an image that gave a sense of the purpose of the enterprise, which is essentially all about helping students (see below).
NetMagic Tuition and Training Services provides:
- Private tuition (GCSE and AS/A2 level) in a range of subjects
- Exam Preparation and Study Skills support
- University Application Advice (Personal Statement Review)
- Oxford and Cambridge Application support with preparing to apply, the application process and mock interviews.
- Specialist support for students with specific learning difficulties of all ages, such as those with dyslexia, dyspraxia and autistic spectrum disorder.
The Technical Stuff
I used 2 setups for the shoot. First-up was a black (velvet) background with two flash. The first as a keylight at 45 degrees above the subject, shot through my favorite double diffused, 54cm Lastolite Professional, Joe McNally EzyBox Hotshoe. The second strobe was a hair-light shot through a grid. Both flashes were on Pocket Wizard Flex TT-5 radio triggers, and so easily controllable from camera. Both lights were set camera-left. The set (on the kitchen table, as it happens) was built with books from my study and props from the kitchen. I have heard it stated that you should use the same quality of light on the hair as with the keylight, but I really like the sharpness of a grid spot on the hair and I think that a lot of photograhers shoot that way.
The second setup was a more traditional corporate portrait affair. Keylight courtesy of Joe McNally, a Lastolite Tri-Grip reflector and a low-tech grey background (a £7 grey bed sheet, courtesy of ASDA), in this case, simply thrown over the velvet background panel and clipped on with A-Clamps to keep it taut. A hair-light shot through a grid, and finally a background light shot through a Lastolite Micro-Apollo softbox. Again all the strobes were on Flex TT-5 radio triggers controlled from the camera.
Post-Processing
Given the nature of the lighting, not too much was required. A quick run through OnOne software’s Perfect Portrait 2, the addition of mid-tone contrast from Color Efex Pro 4 and my usual 3-pass sharpening regimen.
The Images
The best way to see them is to swing by NetMagic and check out their excellent facilities. You may well know someone that could benefit from their services and they would be delighted to take your call.
Cheers,
Robin.

Jul
21
Print Sales Update
Barn, Little and Great Grey Owl Prints now for Sale
Just a brief note to let you know that I have extended the availability of owl prints from TDI to include a selection of Barn Owls, Little Owls and Great Grey Owls. Images of the owls were taken in a range of settings including some at night and in the snow, static and in flight. The Great Grey Owls in flight are particularly attractive. This print sales update is in addition to the previously available Long-Eared and Eurasian Eagle Owl photographs.
Prints of a wide range of other birds of prey (including Falcons, Buzzard, Golden Eagle and Merlin), the Deer rut, Seals and a collection of Macro images are also available for purchase under Print Orders from the TDI homepage or other page menu header. Over the coming weeks I will be adding a selection of Red Kite images and extending the Macro collection with some of my favourite lifestyle images.
Selection of Images from the Owl Collection
If you live in Cheshire and would like to experience a diverse range of birds of prey at first hand, check out the Gauntlet Birds of Prey Eagle and Vulture Park. They have daily flying displays and knowledgeable staff. They offer a range of bird of prey experiences, for individuals, families, for half days and full days. They also offer photography workshops.
Best wishes,
Robin.
Jun
01
Print Sales Reach TDI
Friends and colleagues have been encouraging me to sell my images for some time now. I have had to wait for the necessary technology to do this to reach the UK, but now it’s here! Canvas and poster prints are now available for selected images. Simply go to the Sales menu and click on the “Buy this Print” button, or click on the image itself, and from there you will be guided through the process of making a purchase. Various sizes of poster and canvas print are available, at very reasonable prices, depending upon the original image size.
Starting Small
To begin with, print sales will start with images from the TDI home page. Initially I have selected images from my Peregrine Falcon, Common Buzzard and (Premium) Kingfisher Collections. Over time I will add other images from the TDI home page, and will be open to special orders from elsewhere on the TDI site by request. If you are particularly attracted to an image that you see in the Blog, Finest or Archive sections, simply drop me a line and I will let you know if it is available for sale.
Special Editions
From time to time there will be Special Limited Edition prints. These will be slightly more expensive, but will be certificated from a strictly limited run.
I hope you see something you like!
Best wishes,
Robin.

May
26
Time Flies When You’re Having Fun
Time flies when you’re having fun (or very busy at work), and perhaps especially when you have a day out at Martin Mere Wetland Centre. It’s huge, but well laid out, with a number of handy, and very well specified, public hides from which to mix with twitchers and shoot long lens wetland birds. I can hardly believe that it was the 9th of April 2013 that I was last there, it’s now nearly 7 weeks and I haven’t published any of my images yet.
Routes Round the Martin Mere Wetland Centre
The handbook, or walkabout guide, contains a route map, several suggested routes and some very handy information on a variety of species. There is a nature trail map, some photographic plates and a Wildlife check-list to tick off your sightings. The Marsh harrier, Whooper swan, Bewick’s swan, Pink-footed goose and Tree sparrow are filled in at the head of the list to get you started. We did in fact see a Pair of Marsh Harrier’s last time out, but not this visit. I think that my favorite part of the handbook is the fold-out back cover that contains 121 colored drawings of ducks, geese and other birds to help you with identification. WWT Martin Mere is one of nine unique wetland visitor centres in the UK run by the Wildfowl & Wetlands Trust. All the paths have a tarmac surface so they are an easy walk and reasonably clean to lie on to get a good low angle for birds in ponds. Martin Mere Wetland Centre opens at 9.30 am and closes at 5.30 pm in the summer and 5.00 pm in the winter. The grounds are open for one hour after the building closes but visitors must then leave through the exit gates.
Images from the Hides and Ponds
Post Processing…
Some time is inevitably spent trying to work out what I have photographed, not always with any success. I get swept along by the photography, so tend not to remember to take a note of the species names where those are noted at the pools. So for this reason I am indebted to Belinda Barker, office manager at WWT Martin Mere Wetland Centre, for putting names to quite a few of the images you see above.
Otherwise, getting the correct exposure is most of the battle with images of water birds. The brightness of the water or the sky tends to lead to underexposure which can mean blocked up blacks. Post processing involved the usual passage through Photoshop Lightroom 4 for tonal range, contrast and vibrance, with a brief foray into Photoshop to further improve the mid-tone contrast and some very careful multi-pass sharpening.
Best wishes,
Robin.

May
05
The Mach Loop in Wales
The Mach Loop is a set of valleys between Dolgellau in the north and Machynlleth in the south of Wales. The Mach coming from Machynlleth of course. The loop is used for low level flight training (as low as 76 metres from the nearest terrain) by the RAF. Geoff and I had heard that it was a simple matter to climb up a bit of bank and take some (nice) pictures of the Jets. Given that there had been heavy snowfalls, we wanted to scope out the terrain to see what might be involved in getting to a reasonable spot above the planes. So off we went to Bwlch to have a look.
The Weather was Against us!!
We checked out a few possible vantage points to visit from information on the internet, and off we went. We arrived at Bwlch at around 10:00am on the first of April 2013 (and it was no joke, even if we felt a little foolish). The temperature was just above zero, but felt about minus 30, due to the sharp wind. It was so cold that within no more than 3 minutes I couldn’t feel the ends of my fingertips. I scampered back to the car to re-group with a cup of coffee, before giving it another try.
After the second chilling, and a closer look at the steepness of the mountainside, I realized that I would need a helicopter winch to get me anywhere near the summit even if I was travelling without heavy camera gear. So we left to look down the road, but quickly gave up as the snow seemed deeper there. No stamina I suppose, perhaps after a year or two working out?
Decamp to Bala Lake
So a wholesale change of plan was required, and onward we forged to Bala Lake for a few photos. Hopefully it would be warmer lower down? Sadly, in the end, it was still pretty cold so I went with an HDR approach rather than breaking out my Lee Filter Holder and Neutral Density Grads. I did use my tripod though, for a change, rather than hand-holding a high speed burst.
I did think, afterwards, that I missed out an opportunity to try out my new Big Stopper. But hey-ho it was very cold, and I wanted to keep warm. I can hardly believe that a month has gone by since Bala and I’ve still to tell you about Ludlow and Martin Mere Wetland Centre!

Apr
08
Photographing Roses
Focus Stacking / Macro / Nature / Photography / Photoshop / Studio Flash Posted by Robin
/
0 comments
A Rose by Any Other Name
I hadn’t started out to do a studio flash session photographing roses, but on thinking about what background colour would suit a white and pink rose, I realized that it had to be bright white and not grey, so the available window light session that I had planned quickly turned into something else entirely.
Photographing Roses Against a White Background
 Photographing roses against a white background requires the same technique as for photographing a portrait, or anything else, against a white background. The background has to blown-out, but only just blown out, in order to avoid too much flare and contrast reduction from the resultant backlight. People sometimes talk about getting the background about 2-stops hotter than the foreground, which is another way to go, but I treat the background (which, by the way, needn’t itself be white!) like I would treat a snow scene. I will take a couple of shots with just the background lit, and increase the exposure, from metered, up a couple of stops or so, until it is just blown out. I will then turn the back-lights off and use the main light to get an exposure for the subject. For this shoot, I used 3 x SB900 strobes. 2 for the background, either side at 45 degrees, and one in a Lastolite Joe McNally Ezybox Hotshoe for the main light. I prefer to shoot manual as much as possible these days, so the Camera was set to 1/200 second at f11, ISO 200. The lens was a 105 mm Micro Nikkor on a D3, and I used 2 layers of diffusion in the softbox. All 3 flashes were set on manual, and the amount adjusted for correct exposure. I like this setup because nothing changes (except perhaps the ambient light), so all your shots are perfectly exposed and provided your strobes aren’t maxed out (1/1) you can take a small burst of shots if you need to, for instance with a moving subject.
Focus Stacking
 Photographing roses with a macro lens, close up, can lead you into problems with depth of field. This is often livable with, particularly if your shot includes quite a bit of stem and you are further back, but close-in you will have to make a decision about where to focus. I had just been reminded of the possibility of using focus-stacking in an article in Am Phog (Saturday 6th April 2013, Martin Evening’s Retouchers’ Guide), so thought I would give it a go here. By the way, Martin Evening’s books, ‘Adobe Photoshop for Photographers’, ‘The Ultimate Workshop’ and ‘Photoshop Lightroom’ are all very useful tomes if you get a chance to read them.
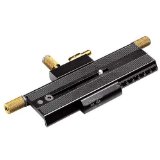
Focus stacking is often used in macro photography, especially for extreme close-ups of things like small insects. It is often not straightforward, however, and there are several gotcha’s to be aware of. It is best to use an uncluttered plain background because as the lens elements move, the relationship of the subject to the background can change, making the blend between layers harder to do manually (or trick the software and end up with a small areas of blur that really stand out). Having a lens that focusses internally helps (but doesn’t avoid the problem completely), and sometimes you get a better result by using something like a Manfrotto 454 Micro Positioning Plate. What this does is allows you to slide the camera and lens combination backwards and forwards by very small amounts using a thumb-screw. This can be much easier for small focus adjustments when you are very close in and the depth-of-field is only a millimeter or so, where the lens’s own focus ring gives too course an adjustment.

 For good focus stacking it is said to be best to use an aperture that represents the sharpest focus of the lens, which on my 105 is f8 or f11), in order to avoid diffraction effects. There are several good focus stacking software programs available, but I use Photoshop because I don’t do this very often and a bespoke software solution has not seemed warranted. The process is quite straightforward. Take a series of photographs (in this case of your roses) starting at the foremost focus point, working through to the rearmost focus point. Select the files in Bridge or Lightroom, then using the tools menu choose Photoshop –> Load Files into Photoshop Layers, or in Lightroom, right-click on the selected files and go to Edit In –> Open in Layers in Photoshop… Once the files are in a single Photoshop document. Select the layers and go to the Edit menu and choose ‘Auto Align Layers…’ using the Auto Projection method.
 The next step is to merge the layered images together. Go to the Edit menu and select ‘Auto-Blend layers’ making sure that the Stack Images button is set and the Seamless Tones and Colours also checked. From then on it’s just a matter of clicking Ok and waiting a while. As I have mentioned, you may not get perfect results and, for this reason, you may want to manually select appropriate images, stack them, and blend them manually yourself. This is not for the feint-hearted, but does give you a great-deal of control over the final result and this is what I did here. I suspect, but have not checked out myself, that it makes a difference to Photoshop that the images are in depth-of-focus stacking order, rather than in a random order. Sometimes you get a really excellent result, other times less so. At the point of capture it is not always clear which bits of an image are at which depth, so you can end up going backwards and forwards a bit.
Until next time,
R.
Recent Comments