
06
2017Turn a White Background Black
Turn a White Background Black
Really, Are You Having a Laugh??
I’ve watched several YouTube videos on taking pictures in adverse circumstances, including how to turn a white background black. Have you ever tried this yourself? It may not be as easy as you are made to think.
The Basic Principles
Underexposing for Black..
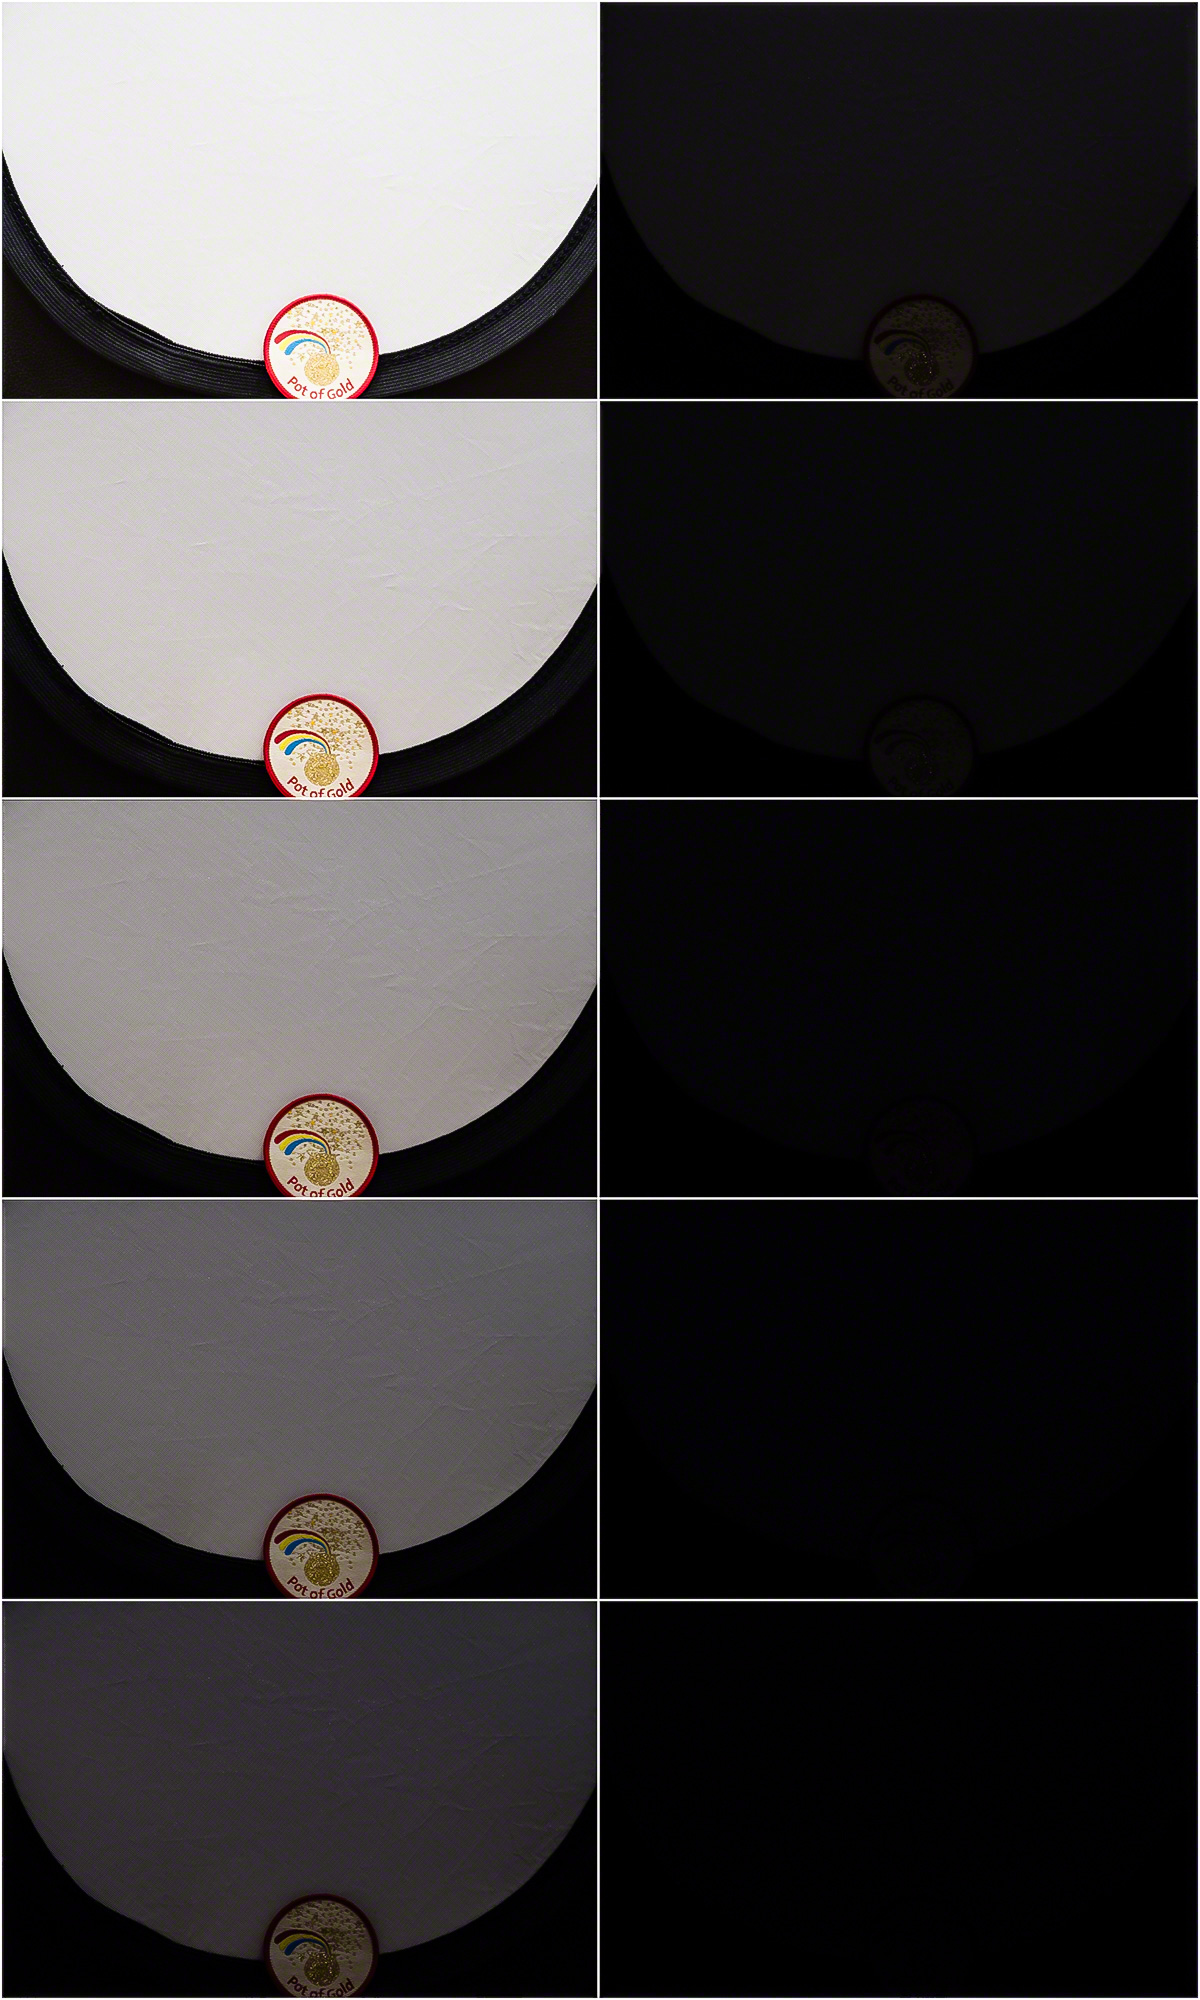
In order to turn a properly exposed, non-clipping, bright white background to black it will need to be under-exposed. How much may depend on the contrast of the light used and the reflectivity of the surface, but is likely to be between 6-8 stops. In the example at left, the bright white, non-clipping exposure was 1/4s at f5.6 and ISO 400 whereas the dark exposure was 1/500s at f5.6 and ISO 400, some 7-stops less.
The chart at left shows the incremental reduction in exposure, one stop at a time, of a small white Lastolite reflector. Although, at a distance, a 5 stop reduction looks adequate, you can clearly see the reflector in the image on the computer.
The ambient exposure needs to be reduced substantially in camera, and the subject re-illuminated, to compensate for the reduction, usually with flash. Shooting in manual, most flashes have a range of 1 to 1/64 or 1/128 power (6 or 7 stops respectively). This may sound a little close for comfort (which it may be), especially when using light modifiers that reduce the flash by 2+ stops. You can also place the flash nearer to the subject if needs be however.
What Can Go Wrong?
When trying to turn a white background black, the re-illumination of the subject has to be specific to the subject. In other words, the 7 stops of flash that you add back in must not travel to the background and re-illuminate it as well! This is awkward in smaller studios (or a mostly white painted kitchen as in this case) where flash bounces round the room increasing the ambient again.
Mitigating The Re-Illumination Light Spill
There are two main ways of managing light spill, firstly to manage the direction of the subject re-illumination light (so that it misses the background) and secondly using the inverse square law in setting the flash to subject and subject to background distances. In the smaller studio it may also be necessary to mitigate bounced spill by using flags or black reflectors or covers.
Managing Light Direction and Spread
Two main strategies will help here. Firstly, avoid front lighting if you can because the spill will necessarily hit the background. Try and use side lighting or lighting from high up and to the side so that the spill-light travels past the side of the background or down to the ground. Secondly, use light modifiers to narrow the direction of light rather than having light going off in all directions. Choose your modifier based on the following priority list (worse to better) for best directionality.
- Shoot through umbrella
- Bare flash with wide spread
- Shoot back umbrella
- Bare flash with narrow spread
- Softbox
- Deep Softbox
- Softbox with grid
- Grid Spot
- Snoot
Finally, you may need to control spill by reducing reflections from large reflective surfaces. This can be achieved by using large black panel reflectors (or non-reflectors) or covering with black sheets or a roll of black paper. Obviously, if you have these to hand, I have to question why you are trying to turn a white background black in the first place!
Inverse Square Law
What is it?
What is the inverse square law, and how does it help? Basically the inverse square law states that the intensity of light from a source falls off with the square of the distance from the light source. So if the intensity of light is X at 1m from a light source, at 2m it will be X/4 and at 3m it will be X/9 and at 4m X/16. This has some interesting implications for the photographer. Firstly it means that every doubling of distance from the light source delivers a 2-stop fall in light. So, for an example, if you had a subject lit by flash at 0.5m then at a background set at 4m there would be a reduction of 6 stops of light, and at a background set at 8m an 8-stop reduction. A small increase of flash to subject distance from 0.5m to 1.0m doubles the necessary flash to background distance to get the same reduction in light (namely 8 and 16m respectively – better order your new kitchen extension now!!).
How is it Used?
Secondly, and perhaps rather confusingly, the proportional light fall off with distance is greater close-in than it is far out. This is because the light intensity is the reciprocal of the distance squared so that, for larger distances, the difference between the fractions is necessarily less than for shorter distances. So light intensity at 2m is a quarter that at 1m, ie a 3/4 (0.75) reduction between 1m and 2m. At 4m the light intensity is 1/16 reducing to 1/25 at 5m. So the difference in intensity between 4m and 5m is 9/400 (0.0225). This is useful where subjects are at different distances from the flash. Moving the flash back to say 5m from the subjects would mean that there was virtually no difference in illumination between subjects at 4m or 5m (for instance in a wedding group shot).
Other Confounders
Managing light spill can be harder where you have, for instance, a white tiled floor, or a low white ceiling. The floor can be covered in extremis (beware the trip hazard though) but there is very little you can do to mitigate a low white ceiling.
Production Images and Results
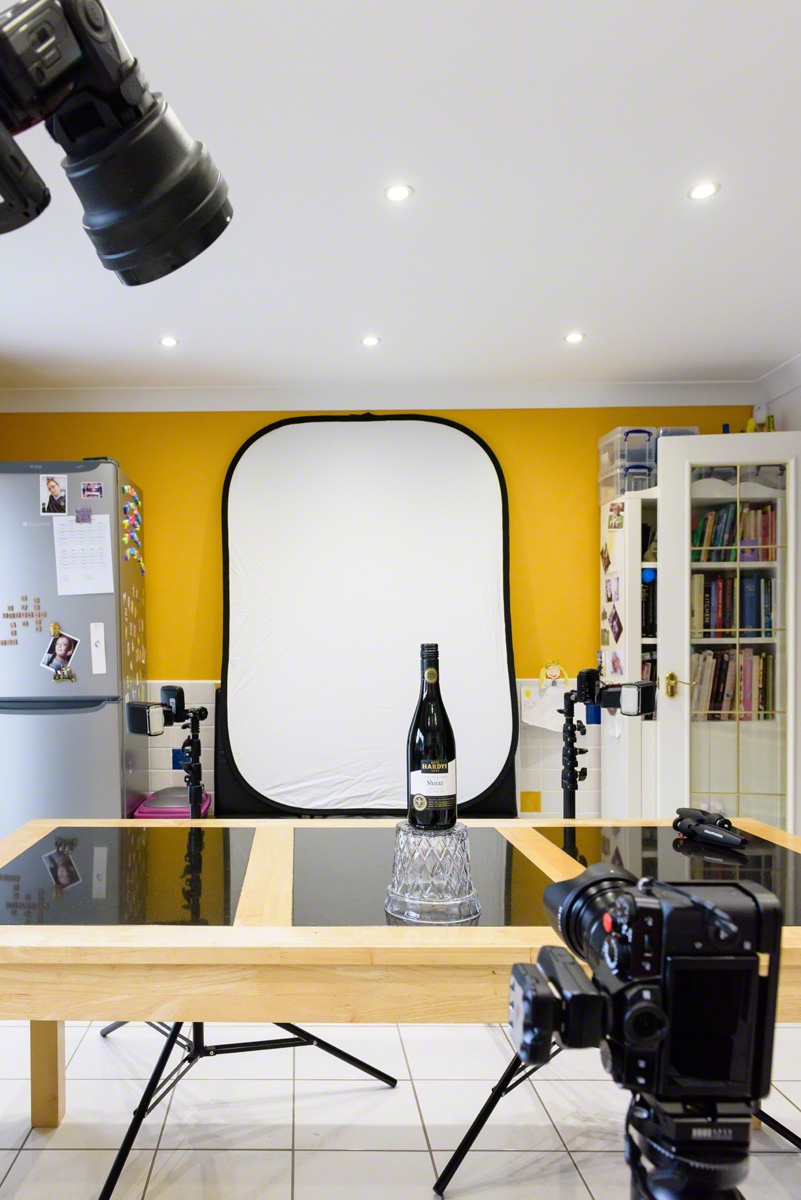
Here is the setup for this shoot. You get some sense of the restricted space and can see the camera, subject and strobe positions clearly.
Kitchen Studio..
Post Processing
The three wine bottles shown below were all straight off the camera card and, apart from a small crop, completely unedited! So I’d have to say that the morning spent trying to turn a white background black was a complete success. I’m bound to also say, though, that I’ve no intentions of abandoning my beloved black velvet Lastolite panel background anytime soon.
Equipment Used
Equipment used was a Lastolite large panel Black/White reversible background, a Lastolite black velvet background to control spill (out of shot), 3 x Nikon SB900 Speedlights, 3 x Bowens Light Stands, assorted cold shoe clamps to attach the Speedlights to the light stands and a Gary Fong Collapsible Snoot with Power Grid for the key light. For convenience I was using 3 x Pocket Wizard Flex-tt5 radio triggers, with the mini-tt1 and AC3 controller on the camera. As you can see there is much white and silver in this room to bounce spill light around. The main kitchen lighting is daylight balanced and camera left sits a large kitchen window and patio door.
Camera and Flash Settings
The eventual camera settings were ISO 200, f11, 1/125s. The key light was set to full power and the rim lights adjusted to give a pleasing result at a much lower power (around 1/32).
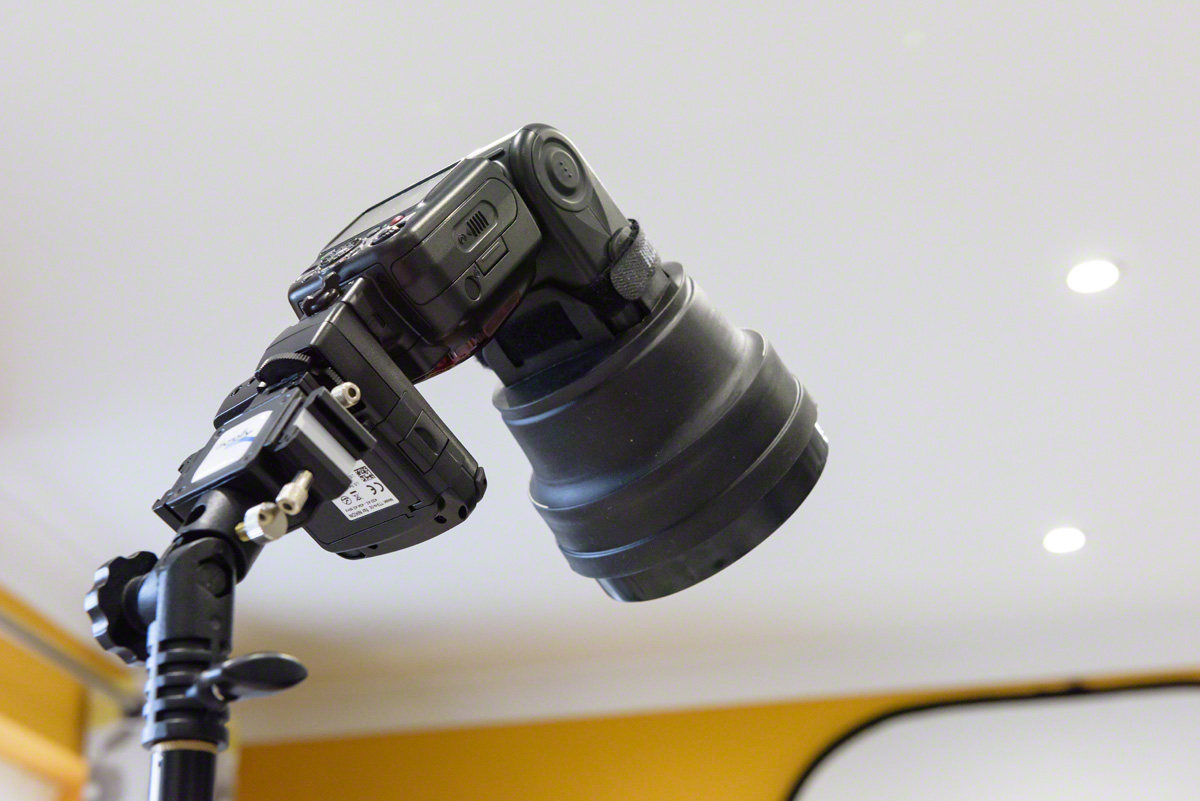
Key Light with Grid Fitted..
Use of the kitchen studio was only possible in the absence of other family members, so thanks also to them for leaving me with the house for the morning too. I think that it must be so lovely to have a permanent and dedicated studio where you are not hunting round the house for your equipment because it is all in one place. Or having to move chairs and furniture to create sufficient space. Perhaps when I retire.. You can only dream I suppose..
I feel a large man-shed coming on..
Final Thoughts
Small Kitchen Woes..
To pull this off in my kitchen studio I had to use all available space and had to keep the subject size down as I was rammed against the range cooker. You can’t see it in the production shot, but I had to manage some light spill with a large black panel reflector out at camera right. For me this was a technical exercise, just to see if I could do it. I have tried without success previously as I could not manage the light spill effectively enough. The subject to background distance, for me, was only about 3m so control of light spill was essential as I couldn’t afford to only rely on the inverse square reduction.
Controlling the Spill..
If I had needed more control of light spill, I would have thought about reducing the light from the white floor tiles and used flags on the rim light flashes to stop light getting onto the ceiling. Finally it might have been necessary to use another black panel reflector on the wall behind the camera to further reduce spill.
Could do Better..
As a technical exercise, I have added to my own difficulties by using my Fujifilm XT-20 travel camera instead of my Nikon kit. I don’t have a full flash setup dedicated to this camera system so I was working with manually. I was, however, very pleased to find that my flex-tt5s and SB900s could be used on my Fujifilm XT-20, controlled by the flex-mini tt1 and AC3 controller combo on camera in the usual way. The only concession was that I had to drop the shutter speed on my XT-20 to 1/125s in order to get reliable syncing. The XT-20 maximum sync speed is 1/180s which I am confident would have worked ok with optical syncing, but didn’t with the radio kit. Since my Flex kit is for the Nikon, I’m pleased that I was able to use it on the Fuji at all, so this was a small sacrifice to make.
Cheers,
R.
Recent Comments