
Dec
14
Free Postage in UK until February 2014
Birds of Prey / Christmas Bargains / Nature / Photography / Sales / TDI News Posted by Robin
/
0 comments
Free Postage on UK Deliveries
TDI are pleased to announce that there will be free postage on images delivered within the UK until February 2014.
Here at TDI we have also recently reviewed our pricing policy and reduced out tariffs across the board. Check out our wide selection of wildlife and macro images, and see if there is anything you would like to hang on your own wall, or give as a gift, this Christmas. We have a range of stretched canvas, semi-gloss and premium matte prints available in sizes from A5 through to size A0 on selected images.
Prices range from £5 for an A5 Premium Matte print, through to £166 for a 40×60 inch Stretched Canvas. Canvas prints can be purchased for as little as £20, with A3 Premium Matte prints available for as little as £10.
Our prints are professionally produced by The Printers Inc.
Coming Soon…
A selection of garden bird images, including birds in snowy settings, will shortly be available to order from TDI.
Best wishes,
Robin.

Aug
03
Preserving Highlights whilst Shooting in the Midday Sun
Sandwich Terns and Gulls at Cemlyn Bay
I was recently out shooting at Cemlyn Bay and Lagoon on Isle of Anglesey. This area is famous for its Sandwich Terns and I’d popped along with a view to taking a few Tern and Gull images. The day we picked to go was bright and sunny, and we were there late morning, all of which was less than ideal. When I’m shooting wild birds in flight, I always spend a few moments working out the correct exposure, because I cannot stand reviewing my images to find blown-out highlights. Getting a good general exposure that encompasses preserving highlights, without unnecessarily under-exposing the rest of the shot (in other words shooting to the right) can be crucial to ensure a reasonable result when the birds are flying in and out of various lighting conditions.
The Aperture Priority versus Manual Exposure Shooting
Many, perhaps most, wildlife photographers shoot aperture priority and use exposure compensation. I have found that, although I have a fair idea what my D4 might think is a correct exposure, and therefore what exposure compensation I might need to dial in, in a range of circumstances, this method is completely impractical for judging exposure when photographing birds in flight. The reasons for this include:
- The relative size of the bird in the frame changes as you track it.
- The colour and brightness of the background may change.
- The lighting on the bird may change as it flies under cloud, landscape or building shadows.
- The position and brightness of the highlights on the bird may change.
All of these factors make preserving highlights particularly tricky as you need to make very complex judgements, at high speed, whilst also trying to keep the bird in the frame. You are effectively fighting the camera in this situation and there is just, for me anyway, too much to do at the same time.
Setting up for Manual Exposure Shooting
This is my process for preserving highlights. Firstly I find an area of mid-tone, usually a patch of grassy field, then with my camera set to manual exposure I zero the meter in the viewfinder and take a test shot. Clearly if the subject will be in the sunshine, your base exposure should be set using a grassy field that is also lit by sunshine. If there is no mid-tone available you could also just take test shots of your subject instead, but this will take you longer.
The chances are that, if shooting a white gull for instance, even having taken a good base reading, there will still be some blown highlights if the bird is in the bright sunshine. This being the case, I adjust my shutter speed (upwards) or ISO (downwards) until they are gone. Usually, with my bird photography, I will be using my 600mm at f4 and looking for at least 1000th, preferably 1600th-2000th, second to freeze the wing tips.
In and Out of Sunshine
In the situation where there is a major shadow in the overall scene, and the birds are moving in and out of that shadow, you can take additional test shots to establish the exposure for that too. Again, according to circumstances, you might use a decrease in shutter speed or, more likely, an increase in ISO. Once you have established the settings for the shaded area it is easier, using the in-viewfinder information, to alter the exposure by the exact amount needed during actual shooting. Equally, if you were shooting at f8 in the sunshine for example, you could open up the aperture instead using the same method, though this will change your depth of field.
Shooting in Overcast Weather
Preserving highlights in overcast weather may be more straightforward in the softer light. Nevertheless when shooting in overcast weather, it is still sometimes the case that you take a base exposure and still get a small amount of apparent highlight clipping. If you have been shooting raw files this is easily retrieved in post production. It is up to you whether you take this chance or not, but my advice would be that, in this situation, you don’t delete any shots because of the blinkies as they may well be salvageable. For myself, I would still try and find an exposure to preserve the highlights if possible.
Cemlyn Bay Shoot

Jul
21
Print Sales Update
Barn, Little and Great Grey Owl Prints now for Sale
Just a brief note to let you know that I have extended the availability of owl prints from TDI to include a selection of Barn Owls, Little Owls and Great Grey Owls. Images of the owls were taken in a range of settings including some at night and in the snow, static and in flight. The Great Grey Owls in flight are particularly attractive. This print sales update is in addition to the previously available Long-Eared and Eurasian Eagle Owl photographs.
Prints of a wide range of other birds of prey (including Falcons, Buzzard, Golden Eagle and Merlin), the Deer rut, Seals and a collection of Macro images are also available for purchase under Print Orders from the TDI homepage or other page menu header. Over the coming weeks I will be adding a selection of Red Kite images and extending the Macro collection with some of my favourite lifestyle images.
Selection of Images from the Owl Collection
If you live in Cheshire and would like to experience a diverse range of birds of prey at first hand, check out the Gauntlet Birds of Prey Eagle and Vulture Park. They have daily flying displays and knowledgeable staff. They offer a range of bird of prey experiences, for individuals, families, for half days and full days. They also offer photography workshops.
Best wishes,
Robin.

May
26
Time Flies When You’re Having Fun
Time flies when you’re having fun (or very busy at work), and perhaps especially when you have a day out at Martin Mere Wetland Centre. It’s huge, but well laid out, with a number of handy, and very well specified, public hides from which to mix with twitchers and shoot long lens wetland birds. I can hardly believe that it was the 9th of April 2013 that I was last there, it’s now nearly 7 weeks and I haven’t published any of my images yet.
Routes Round the Martin Mere Wetland Centre
The handbook, or walkabout guide, contains a route map, several suggested routes and some very handy information on a variety of species. There is a nature trail map, some photographic plates and a Wildlife check-list to tick off your sightings. The Marsh harrier, Whooper swan, Bewick’s swan, Pink-footed goose and Tree sparrow are filled in at the head of the list to get you started. We did in fact see a Pair of Marsh Harrier’s last time out, but not this visit. I think that my favorite part of the handbook is the fold-out back cover that contains 121 colored drawings of ducks, geese and other birds to help you with identification. WWT Martin Mere is one of nine unique wetland visitor centres in the UK run by the Wildfowl & Wetlands Trust. All the paths have a tarmac surface so they are an easy walk and reasonably clean to lie on to get a good low angle for birds in ponds. Martin Mere Wetland Centre opens at 9.30 am and closes at 5.30 pm in the summer and 5.00 pm in the winter. The grounds are open for one hour after the building closes but visitors must then leave through the exit gates.
Images from the Hides and Ponds
Post Processing…
Some time is inevitably spent trying to work out what I have photographed, not always with any success. I get swept along by the photography, so tend not to remember to take a note of the species names where those are noted at the pools. So for this reason I am indebted to Belinda Barker, office manager at WWT Martin Mere Wetland Centre, for putting names to quite a few of the images you see above.
Otherwise, getting the correct exposure is most of the battle with images of water birds. The brightness of the water or the sky tends to lead to underexposure which can mean blocked up blacks. Post processing involved the usual passage through Photoshop Lightroom 4 for tonal range, contrast and vibrance, with a brief foray into Photoshop to further improve the mid-tone contrast and some very careful multi-pass sharpening.
Best wishes,
Robin.

Apr
08
Photographing Roses
Focus Stacking / Macro / Nature / Photography / Photoshop / Studio Flash Posted by Robin
/
0 comments
A Rose by Any Other Name
I hadn’t started out to do a studio flash session photographing roses, but on thinking about what background colour would suit a white and pink rose, I realized that it had to be bright white and not grey, so the available window light session that I had planned quickly turned into something else entirely.
Photographing Roses Against a White Background
 Photographing roses against a white background requires the same technique as for photographing a portrait, or anything else, against a white background. The background has to blown-out, but only just blown out, in order to avoid too much flare and contrast reduction from the resultant backlight. People sometimes talk about getting the background about 2-stops hotter than the foreground, which is another way to go, but I treat the background (which, by the way, needn’t itself be white!) like I would treat a snow scene. I will take a couple of shots with just the background lit, and increase the exposure, from metered, up a couple of stops or so, until it is just blown out. I will then turn the back-lights off and use the main light to get an exposure for the subject. For this shoot, I used 3 x SB900 strobes. 2 for the background, either side at 45 degrees, and one in a Lastolite Joe McNally Ezybox Hotshoe for the main light. I prefer to shoot manual as much as possible these days, so the Camera was set to 1/200 second at f11, ISO 200. The lens was a 105 mm Micro Nikkor on a D3, and I used 2 layers of diffusion in the softbox. All 3 flashes were set on manual, and the amount adjusted for correct exposure. I like this setup because nothing changes (except perhaps the ambient light), so all your shots are perfectly exposed and provided your strobes aren’t maxed out (1/1) you can take a small burst of shots if you need to, for instance with a moving subject.
Focus Stacking
 Photographing roses with a macro lens, close up, can lead you into problems with depth of field. This is often livable with, particularly if your shot includes quite a bit of stem and you are further back, but close-in you will have to make a decision about where to focus. I had just been reminded of the possibility of using focus-stacking in an article in Am Phog (Saturday 6th April 2013, Martin Evening’s Retouchers’ Guide), so thought I would give it a go here. By the way, Martin Evening’s books, ‘Adobe Photoshop for Photographers’, ‘The Ultimate Workshop’ and ‘Photoshop Lightroom’ are all very useful tomes if you get a chance to read them.
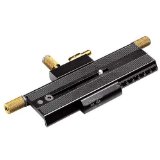
Focus stacking is often used in macro photography, especially for extreme close-ups of things like small insects. It is often not straightforward, however, and there are several gotcha’s to be aware of. It is best to use an uncluttered plain background because as the lens elements move, the relationship of the subject to the background can change, making the blend between layers harder to do manually (or trick the software and end up with a small areas of blur that really stand out). Having a lens that focusses internally helps (but doesn’t avoid the problem completely), and sometimes you get a better result by using something like a Manfrotto 454 Micro Positioning Plate. What this does is allows you to slide the camera and lens combination backwards and forwards by very small amounts using a thumb-screw. This can be much easier for small focus adjustments when you are very close in and the depth-of-field is only a millimeter or so, where the lens’s own focus ring gives too course an adjustment.

 For good focus stacking it is said to be best to use an aperture that represents the sharpest focus of the lens, which on my 105 is f8 or f11), in order to avoid diffraction effects. There are several good focus stacking software programs available, but I use Photoshop because I don’t do this very often and a bespoke software solution has not seemed warranted. The process is quite straightforward. Take a series of photographs (in this case of your roses) starting at the foremost focus point, working through to the rearmost focus point. Select the files in Bridge or Lightroom, then using the tools menu choose Photoshop –> Load Files into Photoshop Layers, or in Lightroom, right-click on the selected files and go to Edit In –> Open in Layers in Photoshop… Once the files are in a single Photoshop document. Select the layers and go to the Edit menu and choose ‘Auto Align Layers…’ using the Auto Projection method.
 The next step is to merge the layered images together. Go to the Edit menu and select ‘Auto-Blend layers’ making sure that the Stack Images button is set and the Seamless Tones and Colours also checked. From then on it’s just a matter of clicking Ok and waiting a while. As I have mentioned, you may not get perfect results and, for this reason, you may want to manually select appropriate images, stack them, and blend them manually yourself. This is not for the feint-hearted, but does give you a great-deal of control over the final result and this is what I did here. I suspect, but have not checked out myself, that it makes a difference to Photoshop that the images are in depth-of-focus stacking order, rather than in a random order. Sometimes you get a really excellent result, other times less so. At the point of capture it is not always clear which bits of an image are at which depth, so you can end up going backwards and forwards a bit.
Until next time,
R.

Mar
26
Photographing Garden Birds in the Snow
This weekend was a busy weekend with several major commitments. I have to edit our local Parish News magazine and my daughter has a choir performance. Then there is the snow! What a fantastic opportunity to get some interesting new shots of the garden birds in a snowy setting. But here’s the rub, I’ve got so little time and the weather will probably be gone in time for my return to work. Photographing garden birds in the snow is tough but here is a tip. Shooting from the house can pay dividends and may impact on quality less than you think. It certainly allows you to keep dry and warm.
Does Shooting Through Double Glazing Have to Ruin your Images?
Shooting through your double glazed domestic window does present certain problems. It helps if they are reasonably clean, and you will have to accept a small loss of contrast and sharpness as a result of adding an extra barrier between yourself and your subject, but these effects may be less than you think if you take steps to make sure that contrast is not further reduced by shooting through reflections in the window before you. I have also found that, I suppose intuitively this would be true, that the sharper the lens I am using the better the result through the window.
Reducing Reflections

Room Setup
The traditional approach, for instance at a zoo, is to get your lens as close to the window as possible, to eliminate any light hitting the surface in front of the lens. This is pretty much your only recourse if you are shooting from outside in, but shooting from inside out increases your options. Clearly, you don’t want to have your lens touching the window when shooting garden birds for a couple of reasons. Firstly you will be presenting a man like image close to your subject that will frighten them and secondly you won’t be able to adjust position when your subject moves.

The Garden Outside
For my shots I discovered that I couldn’t focus on the nearest perch (my beloved antlers – thank you Jo!!) as it was too close (there is a way round this, see later) to the window anyway, so I needed to retreat into the room, way back from the window. I still had a good view, but there was more glass in front of me to reflect objects in the room. This had the added advantage of reducing my presence in the window. In fact, hiding behind my camera and the piano at the window (see production shot above) meant that I had frequent visitors to the perches. There were some reflections from objects in the room (my daughter’s playroom), but these were quite easily countered by turning off the lights in the room.
Our house has glass doors to capitalize on borrowed light, so I was getting an annoying reflection from the front door which also has glass panelling. Drawing the curtains over the front door removed these completely. In a way, you want your windows to be reflecting black, so another tip is cover up any highlights in the room you are shooting in with black sheets, either of paper, or perhaps a black panel reflector or two if you have them lying around. The ideal scenario would be a black painted room with no contents, though this is unlikely to find favour with the spouse or partner.
Finally it is best if the window that you are shooting through doesn’t have direct sunlight shining onto it as this reduces your chances of getting the light levels in your room down to a reasonable level, and causes reflections and flare on the window itself. It’s not so easy to fit a lens hood to a window frame!!
The Setup
For photographing garden birds in the snow I used the following setup. I had my D4 on a Gitzo Carbon Fibre Tripod (though any would have done), with a Wimberley Gimbal head Mk II, and a 600mm f4 Nikkor lens, though I could have used something like a 70-200mm f2.8 with a 2x teleconvertor. This would have had the advantage of a close focus point so I wouldn’t have had to be so far back in the room. On the question of how to make the 600mm nearest focus point closer to the front of the lens, the solution is simply to add an extension ring between the lens and the camera body. You will lose a small amount of light, and you may lose infinity focus, but this doesn’t really matter in a situation like this where nothing is too far away.
Gallery
Cheers,
R.
Mar
09
Shooting Garden Birds
Field Craft / Garden Birds / Nature / Photography / Photoshop / Slideshow Posted by Robin
/
0 comments
Frosty Mornings are so Cold

The Hide and Feeders
On a frosty Sunday morning in March (the 3rd 2013 to be precise) I had the urge to pop up my hide and go shooting garden birds. We do have feeders in our garden, to which we have a steady stream of Goldfinch visiting along with a variety of Tits (Blue, Great and this month Long-Tailed), but I had shot these before and was keen to try a different position in the garden. Our garden is L-shaped so there are a few different angles from which to shoot, and I have not yet tried them all. So the day before I visited one of our local garden centres and purchased some fresh feeders on sticks and placed them round the corner so as not to disturb the current visitors to our existing feeders. This turned out to be a very helpful strategy for reasons I did not yet fully appreciate. I did not particularly want to shoot Goldfinch, but rather a selection of other garden birds, but I expected them to make an appearance (ie the Goldfinch) round the corner if I put out more Niger seeds. You can probably see the three feeders on the right hand side, beyond the hide in the picture above. The feeders are stocked with, from left to right, high energy bird feed, peanuts and Niger seeds. You may also be able to see, by zooming in, that there are 3 perches attached to the poles underneath the feeders. Obviously the plan is to have the birds land on the organic looking perches for some of the shots. I can’t stand birds on feeder shots actually – but nevertheless everyone takes a few whilst your waiting for better shots on the perches – unless you are exceptionally disciplined.

A Gnarly Perch
Here is a close-up of one of the gnarly sticks used as a perch for shooting garden birds. Usually you need about 10m or so beyond the focus point in order to blur the background. For this reason, I positioned the perches so that, by shooting from the hide level, I would be taking in a background beyond the fence (mostly). It was a dull and overcast day, so the background was either distant tree foliage or dull sky. As it happened, towards midday the sun came out and I was treated to lovely blue skies as well. The day was bitter cold, so I set up with plenty of layers and my trusty flask of coffee in the hide and waited, and waited some more. The joy of shooting overcomes the feeling cold, but I was shivering for hours afterwards. Make sure you eat regularly to keep the cold out.
Happily there started to arrive a series to blue and great tits, mostly to the high energy feeder and the peanuts. Sadly, not one alighted on my special perches. Actually there is a bit to know about perch diameter. It is essential that the perches are not too wide as this hurts the bird’s foot musculature and they don’t stay on them very long. Moose Peterson says that being uncomfortable in this way also affects the bird’s eyes in an unhelpful way. So titrate the diameter of your perch to the size of your intended bird’s feet!! I wasn’t sure what to do. Was it just a matter of waiting (a very long time, as opposed to just a long one) or was there something that I could do to improve my odds?
Field Craft for Shooting Garden Birds
So here’s what I did. I took down the peanut feeder. It was getting a lot of traffic, but not so much the Niger seeds, and actually the peanut feeder had the least visually appealing perch. I also put an assortment of peanuts, meal worm and high energy feed on the top of the fence in the distance to see if I could encourage some birds onto that. Et Viola, a Great Tit landed on my gnarly perch. Boom he was gone. It was so unexpected I wasn’t ready and missed the shot. And then, something even more unexpected. Siskin. And at least 3 males. All loving the Niger seeds, greedily feeding on the built-in perches for minutes on end. Bright yellow and gorgeous. Visiting only from mid-March to mid-May, and completely unnoticed in the garden so far. Still no gnarly stick action though. But in-between plenty of birds on the fence in the distance, and still within reach of the 840mm combination of Nikkor 600mm plus 1.4x teleconvertor. These interventions did make a difference to my hit-rate on the organic perches, but even so these shots were few and far between. I could have put suet on the back of the thicker sticks, but I am loath to do this in case it shows up in the photograph.

Close-up of the Hide
So, what about the Hide? The hide is an F1 Fold Out Hide from Wildlife Watching Supplies. This is a cube shaped hunting style Hide with a built-in metal frame. It folds down to a small case that has two straps for easy carrying by hand, or on your shoulder, or back. It comes with pegs and guy ropes (although you usually don’t need to use the guy ropes). For shooting garden birds it really is very easy to put up, but if you are on your own it is necessary to peg the base out in order to pull up the roof frame. The hide is very well made and has viewing “windows” at the front and at the sides in addition to the rear. Each window has a cover attached by toggles (like an old duffel coat) and velcro’d on scrim netting. The inside is matt black coloured so provided you are wearing dull coloured clothes the animals don’t know that you are there. Clearly from this photograph you can see that the Hide cannot be said to be inconspicuous in my back garden, yet I am constantly amazed at how close birds, squirrels etc will approach. Sometimes too close for the 600mm to focus on!! I purchased my Hide with a handy portable chair (the C25 Fold-Out Chair). It has a handy shoulder strap, and a fabric pocket beneath the seat. The only down side is that there is no ground sheet, though I haven’t really found that one is essential.
The Photography
There was quite a range of lighting between the various places that the birds were landing so, at least until the sun came out, I was forced to select a pretty high ISO to keep the shutter speeds up to a reasonable level. I find that I can reliably shoot at a 160th with the 840mm set up on a tripod with gimbal head, and can get away with a 125th of a second on a good day. This meant sometimes rising to ISO 2500. When shooting garden birds that are fast-moving, I find it difficult to change the ISO at a moment’s notice, so this is something I tend to do in-between shots. I live in hope that practise will eventually make perfect for this issue. It’s certainly easier to change ISO with your eye to the viewfinder on the professional bodies like the D4. It’s strange, but I can adjust aperture and exposure compensation whilst juggling back focus and firing but really struggle with the left hand adjustment of ISO, which means I slightly lose control of the camera bracing and positioning is critical for rapid shooting within frame. But setting a high ISO in advance does let me increase depth of field for the brighter perches by stopping down, which I can do very quickly. Once the sun came out I was able to get down to ISO 200 for some of the shots again. Usually I shoot wide open at f4 or f5.6 with the 1.4x teleconvertor, but I have found it beneficial to stop down to f8 or f11 respectively to get slightly more feather and beak in focus, particularly when the bird is face-on.
The Photoshop
There isn’t a great deal to say about this. The images were prepared in Lightroom 4 and finished in CS6. All that was required was some mid-tone contrast adjustment via the ever amazing Color Efex Pro 4, and some sharpening using my usual sharpening actions in a 3-pass routine with additional local creative sharpening where required and sharpening for screen to finish. I must discuss sharpening as an issue in-depth some time.
Glad to be back in the warm,
Until next time,
Robin.
Feb
28
The Machinery for Drop Collision Photography

Splash Art Kit Mk II
First off, I was alerted to this new drop-image possibility by a review in Amateur Photographer (January 26th edition). The kit in question is the SplashArt Kit Mark II, manufactured by High Speed photography Ltd, 31 Roebuck Lane, Buckhurst Hill, Essex IG9 5QN. Their website is www.phototrigger.co.uk. Tel: 07905 836280. My pal Geoff was similarly taken and, without further ado, purchased said item and brought it round for a test shoot for which I supplied the set and the lighting.
There are 4 dials on the control box, with line markers but no scale markings or labeling, so it all seems like guesswork to start with. From left to right (and top to bottom) the dials control; the size of the first drop, the time delay between drops, the size of the second drop and the camera delay adjustment. There is a small micro-switch that controls the mode (1 drop, 2 drops or 3) and is responsible for firing off a round of drops and triggering your camera. As others before me have said, the apparatus is reminiscent of the retort stands we used to have in school chemistry lessons with an additional gizmo attachment at the end. The drop container looks like a small sandwich box of the type popular in supermarkets now, though this does not impede its functionality. Un-clipping the top to add colourants to the drop mixture will move the retort stand however, so you will need to refocus if you do.
For lighting the drop collision photography I used 2-3 SB900 strobes set to 1/128 power fired through a translucent (clear) plastic A4 ring binder cover (with the ring binder removed) to backlight the drops. I would have liked to use a translucent plastic sheet similar to those used on light-boxes or x-ray viewers, but I did not have time to source this for our shoot. I angled both strobes at 45 degrees, to begin with, both at the same height. I quickly realized that a diagonal spread of light would be better so moved one of the lights onto a light stand.
The Technique

Setting up the Focus Point
In order to start our drop collision photography, we set the SplashArt kit to 1 drop mode to find the focusing point. First time out I used the knife-edge method, but I have now found a better way. I used the dual threaded spigot that comes with my flash brackets. It has a thread each end and is shaped like a small metal reel. It is reversible so that it can be attached to two sizes of thread and then acts as the spigot that you clamp your bracket onto in the same way that you would use the top of a formal light-stand. I placed this in the drip tray and fired off a series of drops adjusting the position each time until the drops fell inside the small threaded end. This works much better because you don’t need a second person to hold it still whilst you focus and can get a more accurate result. When using a macro lens it is quite difficult to get the whole splash in focus, and this way you know where the front and back of the drip will fall, so you can focus on the front edge, back edge or in between according to what you prefer to be most sharp. As you can see, this drop was slightly to the right of the threaded hole at this point (greater splash to the right). It was also a 2 drop scenario because we hadn’t yet switched the SplashArt kit to single drop mode. You will notice that the drop is red colored. We didn’t start off this way, we began with clear water in the tray and the dropper, but this shot from later on in the shoot was necessary to reposition the camera focus following moving the drip container in the process of putting pink food colouring into the top and stirring it.
The next logical step was get a feel for where the drops fell in the two drop mode and how much camera delay would be required to get a pit, crown, or a pole.

Pit

Crown

Pole
Once this is done, the next step is to control the spacing between drops so that there is a collision. The size of the drops that collide seems important and I think that similar settings on the dials for the first and second drops (first and third dials) helped me get a satisfactory result with the SplashArt Kit. The sign that you are approaching the correct timing between the drops is when you start to see some action at the tip of the pole, for example:

Finding the Collision Point

Repeatability
Once this point is reached a smaller further closing of the gap between drops may be necessary, and thereafter just plenty of trials, until you get some attractive results. All the shots you see here in the slide show were made first time out with the SplashArt Kit Mark II. One session of 4 hours or so got us all these shots (minus a coffee and brief lunch break of course). There is a lot of variability between shots. I don’t know whether this is because the timer cannot perfectly control the drip valve, or whether there are timing issues with the flash. My SB900 strobes, as usual, were fired using my trusty Flex Mini TT1 with AC3 controller and TT5 trigger combination. This gives on-camera control of the distant flash which makes for less walking round the studio (kitchen) and speeds things up a little. I suspect that there is no particular issue with the flash timings (but can’t completely rule it out) as at no point do I see a double drop image which means that both flashes trigger at the same time. Not bad when the flash duration is 1/38500 of a second!!
More on the Lighting
As you can see from the slide show, and the production images, I have used a selection of coloured gels on the strobes along with changing up the position of the strobes relative to the translucent plastic background. I must admit that my selection of gels is a bit limited, but the combinations were:
- White on White
- CTO (orange) on White
- CTO on Blue
- CTO on Red
I have also got green gels (to colour match for flourescent lights) which might also have looked good but I didn’t think to try. Needless to say there are a couple of approaches to white balance settings in this situation. You can use tungsten or cloudy settings for, instance, to produce a uniform rich yellow or blue colour. Alternatively, as I did here, you can use the preset flash white balance to produce an overal neutral result but then gel the flashes to produce the colours. This is my preferred approach because, although it requires multiple strobes, you do get greater flexibility.
It would be possible to set up a single coloured, or patterned multicoloured (perhaps printed out on a home inkjet printer), background, and reverse light that to get similar results to the multi-strobe effect.
For water drop collision images you do really need to backlight. For milk images you can front light, and for the closeups you see in the slide show this was really necessary to counter some of the shadows produced by side lighting. In fact I ended up using three strobes. A single backlight and two front lights. The front lights were camera right at 45 degrees and camera left at 45 degrees but much higher up to light into the extensive crowns. We might have been ok with a single front strobe placed centrally and above the camera in order to throw the shadows behind the splash.
More on the Fluids
Since my first attempt at drop collision photography, I have been reading Corrie White’s Comprehensive Water Drop Photography Guide. You will find a lot more detail on what you might do to water to thicken it, and some further tips on lighting milk etc. What I have realized is that it is easier to get spectacular crowns, and some really interesting graphic shapes, using the thicker substrate of milk, than it is with water. In fact, as Corrie points out, there are some things that you just can’t do with water alone. Clearly thickening water with sugar or guar gum also has side-effects to the look of the resulting solutions, so sticking with plain water is probably best. Nevertheless the old school physics fact that water is densest at 4 degrees centigrade is worth knowing and using here. So next time I will definitely try using very cold water and placing some ice cubes in the drip dispenser and into the drip tray.
Colourings
We only had red food colouring at our disposal this time out. Clearly there are many others that you could purchase fairly cheaply. I have heard that some people use printer inks, but this may be quite expensive. Red looks great in contrast to the white milk. One tip for the milk shots using coloured drops, you need to stir the drip tray in between trials to whiten up the milk again. You could also put colouring into the drip tray and experiment with the two colours mixing together in the drip stem. I really do think that you are limited only by your creativity.
Things to Try
- I really fancy having a go at splashes inside bubbles. Wow. Can’t wait.
- Splashes where the drip container is a crystal glass, or similar, and can be seen in the shot.
- Odd looking colour combinations.
- Several splashes composited into the same shot.
Until next time,
Robin.
Feb
26
Context

A Single Drop…
I’ve seen a lot of fantastic drop collision photographs recently, both on the net and in magazines. It seems clear that there are at least two levels of water drop photography, the random ‘hit and hope’ style of droplet photography (without the collisions) and the more engineered droplet collision photographs made with the assistance of some complicated electronic hydraulic systems. Markus Reugals is perhaps the grand father of the more technical approach, and another fine water drop artist is Corrie White.
Having read a little about water drop photography, I decided to have a go at the hit and hope style which is much less technically demanding but more reliant on good timing and good luck. A little research indicated that I didn’t need too much equipment and if I was prepared to be patient I could still get some good results. All I needed was a plastic bag, some water, a drip tray, a small strobe, camera and tripod and I would be good to go. If I could throw in a coloured background in addition then the world was my oyster. The set-up would prove to be a little Heath-Robinson, but nonetheless effective for that. I knew that those nicknacks would come in helpful at some point, and if I was to consider purchasing some mechanical drop making machinary, I at least needed to know what other technical issues might arise.
Practicalities
Here’s how I went about it.
- Firstly I set up a turkey basting tray on the surface in the kitchen.
- Next I filled this with water and suspended a resealable sandwich bag filled with tap water about 35cm above.
- I placed a pin hole in one of the sandwich bag corners, and let it drip into the basting tray at a steady rate.
- Next I set up my flash heads. You need these to be very close to the water-drops to get good exposure because you want to use the lowest possible manual flash setting that your guns will provide. I used 3 Nikon SB900s on a Joe McNally Lastolite TriFlash, set to 1/128 power, though I could have got good results with just one flash head, albeit at a higher ISO. This gives me approximately 1/38500 of a second.
- Then I set an A2 sheet of coloured cardboard against the wall behind the tray and aimed the flashes towards it. In this way the droplets were both side and backlit both by direct flash and a coloured wash of light from behind. Ideally you would shoot through an opaque perspex to both soften and spread the light. Coloured gels can then be used to create interesting colour wash in the background and on the water surface.
- Finally I set up my D4 on a tripod with a 105mm Micro NikKor and focussed on the drops as they hit the water. To get better accuracy I placed a sharp knife blade in the exact position of the falling water droplets and focussed on that. You need to attach a remote release, and depending on the camera body and system you are using you may use the built-in light control or perhaps radio triggers. In this instance I used Flex tt5 radio triggers as the D4 does not have a built-in commander flash. Alternatively I could have used a separate flash gun to provide the remote control.

Splash and Drop…
Then all you have to do to start your water drop photography is watch the drips fall, and fire a few test shots to get the correct exposure. Obviously you need to obliterate the ambient light with the combination of shutter and aperture (I was using 1/250th second and f11) in order to avoid any ghosting. Watch out for your highlights. There is a tension between too much specular highlight and detail in the drops and the general brightness of the pool. After an initial trial I found that I was having to shoot downwards at too steep an angle. To counter this I needed to shoot from further back so I hooked up my 2x teleconvertor to the 105mm and this gave an effective focal length of 210mm and a greater distance from the droplet.There is a further issue with the positioning of the water droplets. I found it more convenient to have drops fall towards the front of the drip tray in order to have the frame filled to the top by the pool in the background. Otherwise the edge of the tray might be visible. I wasn’t brave enough to shoot into a pool with a meniscus!! Secondly there is considerable variation in the exact landing spot of the drops wich can easily vary by 5mm or more front to back, making critical focus a bit of a lottery. The higher the water in the tray, the flatter you are able to keep your lens. There needs to be some angle to ensure that the background does not include the edge of the tray (unless you have a 6 foot drip tray that is). Nevertheless the variation in focus drop to drop is countered by taking a lot of shots. Once you get your eye in, you can improve your success rate substantially. I did end up taking 765 shots in all, but there was quite a lot of experimentation to get my final set up.
Photoshop Embellishments…

Embellished Drop and Splash…
As lovely as this image was fresh out of the camera, it was crying out for that something extra to really make it pop. Looking carefully at the top of the splash column I could see that there was a specular flare highlight at the top. If I had used f16 or f22 this might have been substantial enough on its own, but in this instance it required a helping hand.I have used a few techniques here. First of all I created a starburst in Photoshop (white on a black background), and then I sized and placed it into position on a separate layer. Change the blend mode to screen to drop the blacks out and Robert is very definitely your mother’s brother!! Photoshop has a lens flare feature (Filter | Render | Lens flare) but how do you get this into your image? Again the trick is to create a new layer. Fill it with black. Create your lens flare on the black layer (I used the flare for a 105mm prime). Change the blend mode to screen, reposition and set the opacity to taste to finish.
Sharpening is another interesting issue. If your droplet shot lacks that critical crispness, and quite a few will do, one way to counter this is to use octave sharpening. I first learned about this technique in a book by Lee Varis called Skin. The edition of the book that I have was published by Sybex in 2006. The book claims to be the complete guide to digitally lighting, photographing and retouching faces and bodies, and it really does do a good job at this. There are a few useful sharpening techniques that I would recommend you check for yourselves but the octave sharpening routine has general applicability above and beyond portraiture. The point of the technique is that you use multiple sharpening layers (4 in this case) to minimize the visibility of wide halos. Unsharp mask values are set, in order, at radius 0.5px, 1.0px, 2.0px and 4.0px all at an amount of 500%. Each layer has a luminosity blend mode, and the opacity is set at 100%, 50%, 25% and 13% respectively.

Starburst…
There are plenty of online tutorials on how to make a starburst. The basic technique is to start with a white line on a black background. Apply motion blur to the line to get a lovely fade effect on the ends, then copy, rotate and resize the line to get the final effect. If you save your creation you can use it again at any point where a convincing starburst is required. If you create a large starburst, you can reduce the size without loss of quality.Over the last few days I have been experimenting with an electro-mechanical dropper and can confirm that there will be a part 2 to this article. Wow!! Here’s a taster, until next time…
And For Next Time…

Something for the Future…
Cheers for now,
Robin.
Recent Comments