
Feb
21
A Few Days Out
Birds of Prey / Field Craft / Garden Birds / Nature / Nikon D4 / Nikon D810 Posted by Robin
/
1 comments
A Few Days Out
Setting the Scene
It’s been quite a while since I could afford the time, and the cost, of having a few days out of my local area, just for the purposes of shooting wildlife! This trip had been planned for a few months and you often have to book very early just to get places. My pal Geoff and I have often gone with Natures Images (Mark Sisson and Danny Green) in the past, and their workshops are universally fantastic! This time we booked with Nature Photography Hides (Mark Hancock) for the hides in South West Scotland. We had used Mark’s hides in Worcester to shoot Kingfisher previously (on a Nature’s Images workshop), so knew they would be of good quality. The plan was to work with the Sparrowhawk hide, the Red Squirrel reflection pool and the Buzzard Hide. Unfortunately the reflection pool was frozen so our host, Alan McFadyen, swapped us to one of his personal hides to shoot Kingfisher in order to avoid disappointment. As it happened, that was to work out very well indeed! Alan was a great host, and very personable, and the hotel we stayed in (the Selkirk Arms Hotel in Kirkcudbright) were fantastic. Great food, and they pulled out all the stops to provide early breakfast and packed lunches for our demanding schedule.
Day One
We met with Alan in the small village of Ringford at 7.15am and moved on to the hides from there. We negotiated the Buzzard hide for the first day, and made our way up a short climb, through the snow, to a hide looking out into an initially very foggy scene.
And my was it cold!! The mist cleared to reveal a really beautiful view of the valley and yes the Buzzard did arrive and sit on an awesome perch. He was there for 20 minutes and we never took a shot!! There is a serious learning point here, which is this: Having taken due note of all necessary advice, sometimes you just have to go for it! We knew that he tended to be very twitchy before eating, and would usually fly off if he detected any lens movement from the hides. We were advised to wait until he had flown to the rocks to eat the rabbit or mice on the rocks. Unfortunately he had obviously eaten before arriving and had no interest in the free meal on the rocks. He was very twitchy on the perch and we might have only got one shot before he flew off. We will never know. The main thing is that we did no harm!
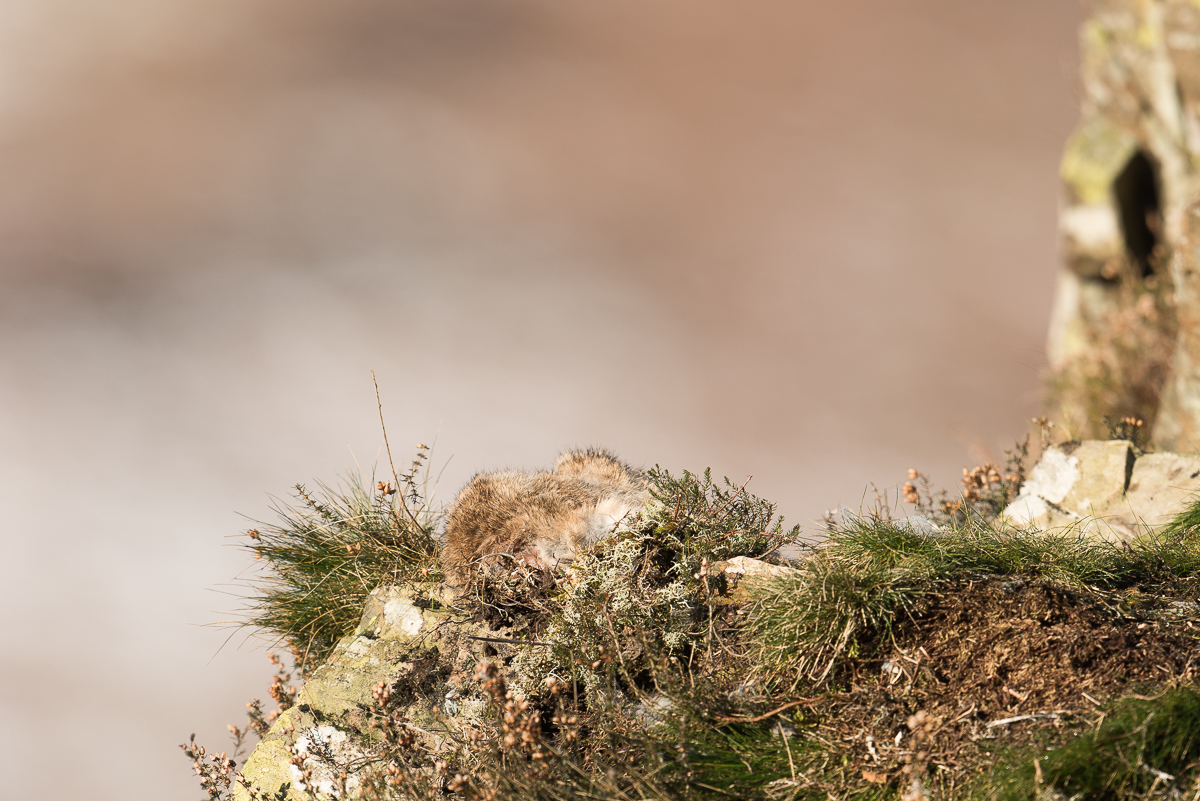
Feed on the Rocks
The Buzzard retreated to the distant tree line and seemed happy as Larry, preening and sunbathing. Just too far away for anthing other than a context shot. I would have struggled even for that were it not for the mega-resolution of the remarkable D810.
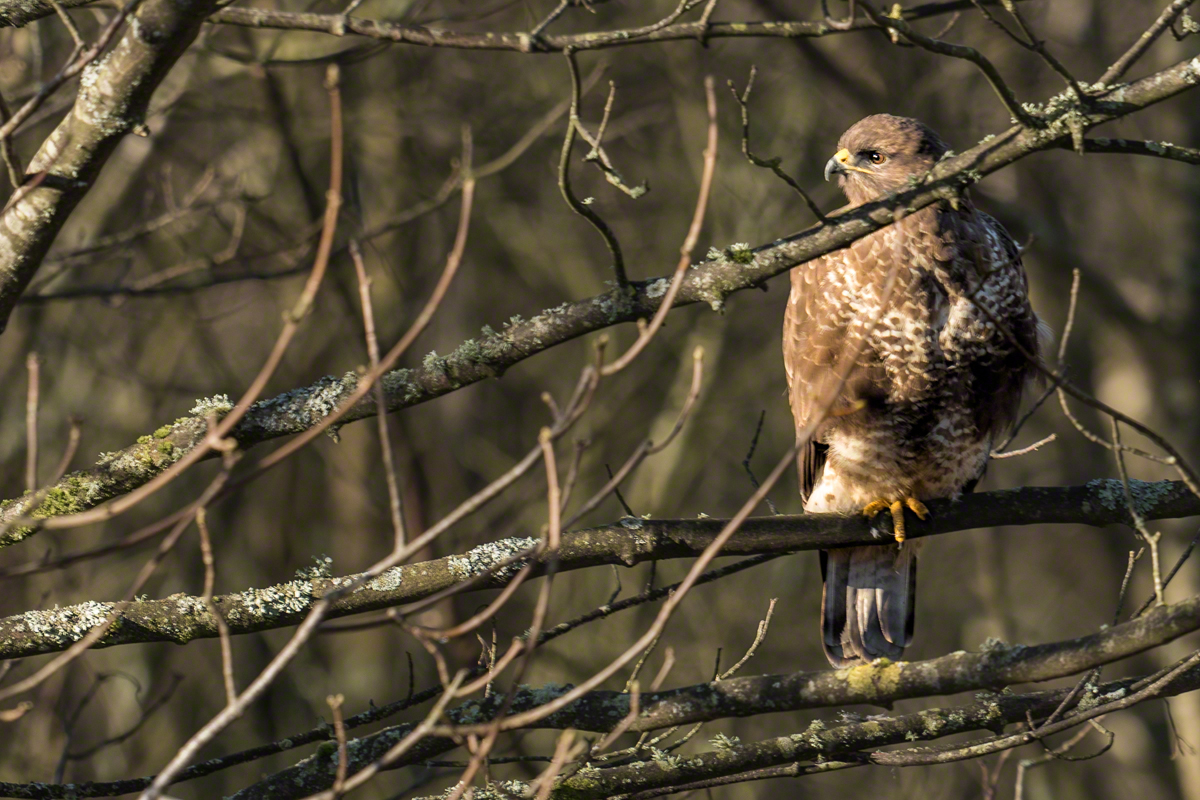
Buzzard in the Trees
Day Two
This was the bonus day of our plan for a few days out. Kingfisher diving shots. Wow! Alan has a couple of hides down in a secret location by the river estuary. One hide is actually in the river at high tide! Fortunately for us, we were in the dry hide as there is quite a large tidal surge during the day. Yet again the weather was perfect, sunshine but frosty and cold.
An Early Fright
We met Alan at the hotel and he asked what lens I’d be using. 600mm I said. He looked horrified. Haven’t you got anything smaller? 200mm is all you will need!! Fortunately I had my 70-200mm f2.8 VR2 with me, plus teleconvertors, and Geoff was using his 200-400mm f4. Drama over. I was concerned about the quality though, and whether I’d get enough background blur with this kit. As you can see by the final shots below, I needn’t have worried. Most of my shots were taken with my 1.7 teleconvertor, and if I hadn’t been shooting full frame then I wouldn’t have needed one at all. A zoom definitely helped too because I could swap from wider to narrower view depending on whether the Kingfisher was on the perch or diving into the tank.
So How does it Work?
It would take a remarkable amount of patience, luck and time to catch Kingfishers fishing in their completely natural habitat, so photographers increase their chances with a staged set that includes perches and fish tank. Et viola, now you have a place, and a 2 hour window of time, in which you can see a Kingfisher fishing. The utilitarian looking setup shown below is perfect for the job.
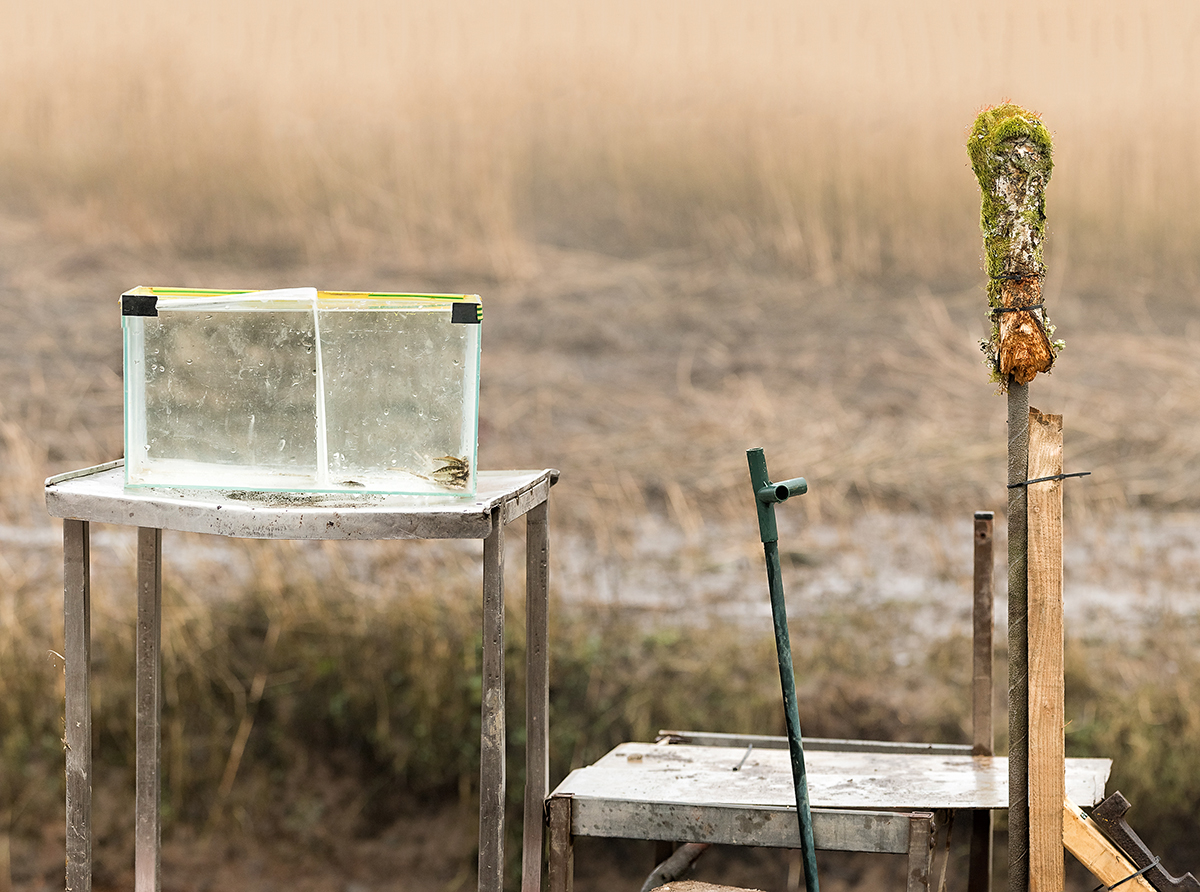
Riverbank Set for Kingfisher Fishing
As you can see, the river bank sits below and in front of the tank and perch. Beyond the tank you can see the reeds which are sufficiently far away to provide a very blurred out background when you are focused on the fish tank or perch. You can see the fish bait in the bottom corner of the tank.
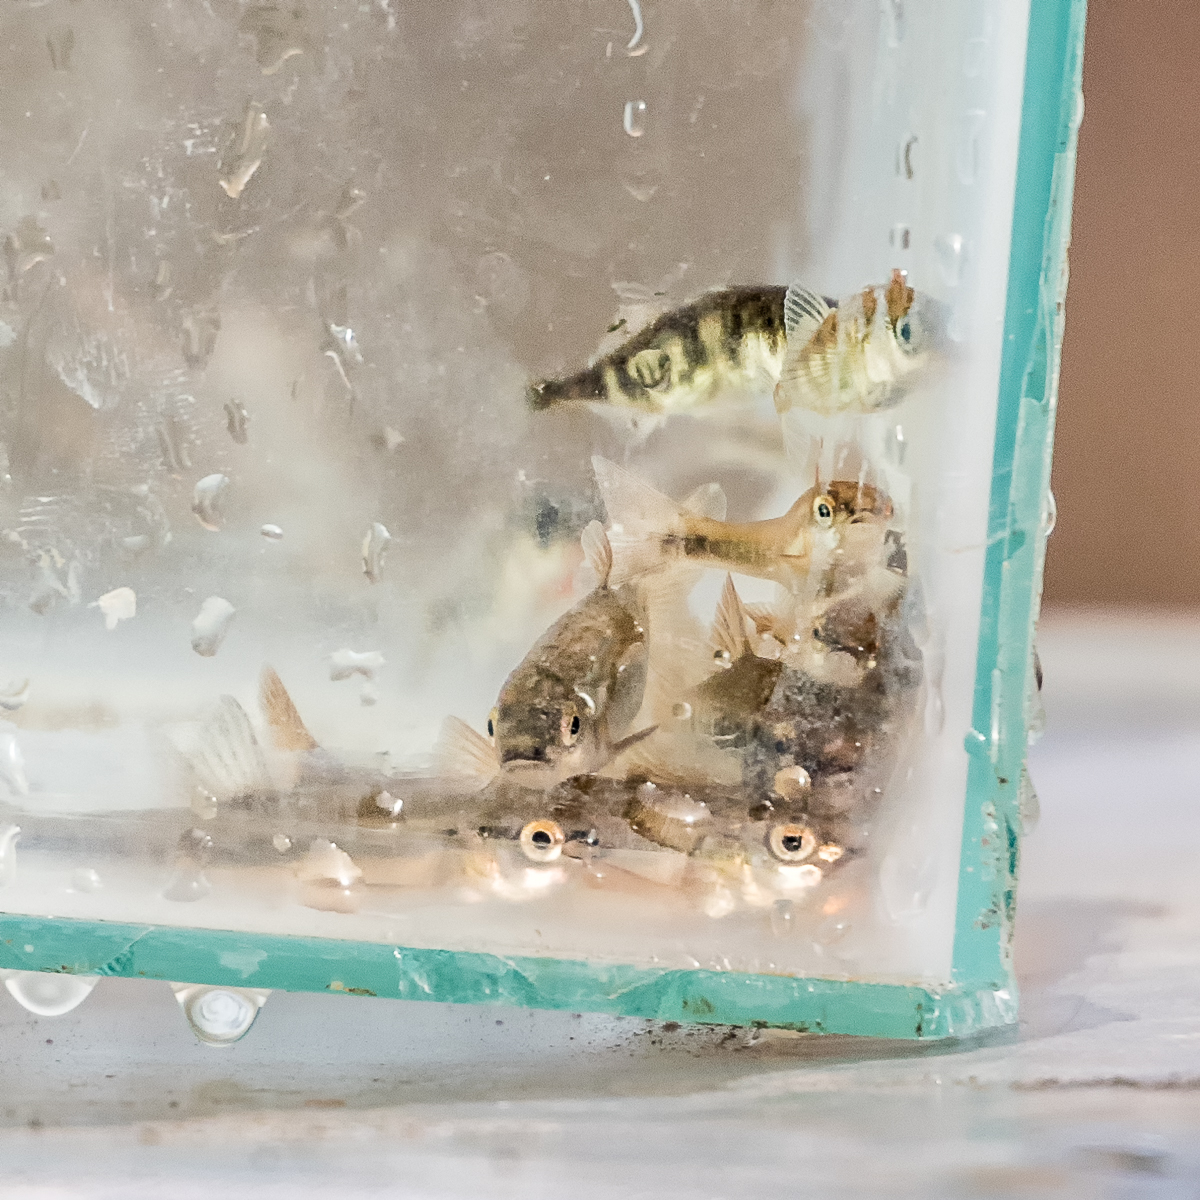
Kingfisher Bait
Taking a Shot
It took me all day to realize what I am about to tell you now. So if you want to know how to take diving Kingfisher shots, listen up!!
The Kingfishers know the deal. There are fish in that tank, and like an expensive fish restaurant, they can choose which one they want. Every two hours or so they need to feed, so along they come, as regular as clockwork. They land on the side of the tank and take a good look, they peer in, and look round, apparently sizing things up then — whoosh — with a splash they are in the tank and emerging with a fish. At least that’s what it looks like. But actually, that’s not what just happened, not even close!
To take an effective image of a diving or hovering Kingfisher you need a few things in place:
- An exposure of 1/2000 second or faster to freeze the motion
- To test the exposure in advance to ensure that you don’t get any blown highlights, or blown colors, on the Kingfisher itself
- Pre-focus on the mid point of the tank
- Your fastest frames per second set in camera
- A wide-enough field of view to capture the action
1/2000 Second Exposure
This can be a bit of an ask at the beginning and end of the day. Depending on your maximum aperture, your ISO might have to go way up. Let’s consider some scenarios. I was shooting a full frame Nikon D810 with my 70-200mm f2.8 zoom Nikkor. I ended up using my 1.7x teleconvertor which gave me sufficient reach for a reasonable crop on the perch shots, and a wide enough crop on the tank. This gave me an aperture of f4.8 which at the start of the day meant an ISO of 2500, 1/2500 second and a reach of 340mm. Had I been shooting cropped sensor then I would have had an effective reach of 300mm at f2.8 and an ISO of 1000 with 1/2500 shutter speed would suffice. Either scenario means minimal depth of field so precise focusing is essential.
I had my D4 available, and, despite the phenomenal dynamic range of the D810 sensor at low ISO, the D4 beats it from ISO 400 upwards. Did this matter? Actually, no it didn’t. What you need to remember is that at dawn, and dusk, the light becomes flatter and much less contrasty so dynamic range is less of an issue than noise is. Interestingly, despite the poor reputation of the D810 for noise at high ISO, it is still 2 years newer than the D4 and the difference is less than I might have expected (for noise).
Check Exposure
This is also crucial. The Kingfisher has very bright and iridescent colors that are very easy to blow out. This is one of those circumstances where you really need to use your 4-channel histogram display (RGB, R, G and B) to check than none of the channels are blown. You have a couple of choices here. Take a few shots to ascertain the best exposure value and then switch to manual mode. The down-side of this is that you will have to check the light levels during the day and adjust accordingly. This can be especially problematic if the sun is in and out behind clouds. Alternatively you can shoot aperture priority with negative exposure compensation. This is what I did in fact, using -0.7 ev exposure compensation. Again there is a caveat, which is that if the light becomes very contrasty (eg. in bright sunshine) you might need to increase the exposure compensation. If the light is very flat though you may have to reduce it, or even use positive exposure compensation . There’s no substitute for experience here unfortunately.
Pre-focus and Its Implications
You know where the edges of the tank are, and you know that the Kingfisher will fly in between them. Manual focusing is arguably the best, and Alan had a suitable target for us to pre-focus on. With manual focus you help optimise your frames per second because the camera doesn’t have to waste time focusing.
Focusing Target
I didn’t use manual focus though. This was because the perch and the tank were at different distances from my shooting position in the hide. With this in mind, I used my back focus button and set my shutter to release priority. This gives you the best of both worlds. You can pre-focus on the mid-point of the tank (it just so happened that there were some glue drops on the outside of the tank in the middle of the side face which worked perfectly), and fire at will when the Kingfisher dives. Or you can auto-focus on the bird on the perch if it lands there when it emerges from the tank.
Fastest FPS and Gotcha’s
I really wanted to use my D810 which gives 5 fps at full frame 36mp. Partly because it still feels very new, and I’m getting to know what it is capable of and also because I hoped for a few images that could be printed full detail at A2. I suspected that I would use the D4 first when the light was low, and the D810 when the light was better and the contrast higher, to optimize both noise performance and dynamic range. But actually, a new priority presented itself that meant I was willing to use the D810 from the start (see below). I only used the D4 at the end of the day when the light was really terrible and I needed to get my frame rate up (or so I thought).
I have a battery pack on my D810, and at Dx crop (15mp) it can shoot 7 fps. At full frame I was only getting 3 fps at the start of the day and, what I didn’t realize until I got home was that, I had my camera set to backup the main SD card to the secondary CF card (as opposed to overflow which I normally use). There’s no doubt in my mind that this slowed down the frame rate at full size, but was less of an issue at 1.2 crop (24mp) which then gave me 6 fps which was much more satisfactory.
A Wide Enough Field of View
I mentioned above that the Kingfisher appears to go off the side of the tank directly into the water, but that this is not what actually happens. In reality, faster than the human eye can register it, the Kingfisher flies up into the air and then dives down into the water to get the fish. The problem is that you just can’t see it so you don’t realize where you need to point your camera to get the best shots. Here’s an example of the sort of issue that occurs. First frame the Kingfisher is barely in shot, next frame he’s half into the water, so at 6 fps you are nowhere close to a satisfactory shot. It’s just happening too fast.
This took 1.5 seconds, start to finish
Here I’m burst shooting for 10 consecutive frames at 6 fps. You would need to be precise to a level of approximately 1/100 of a second in your timing to get the bird central in your frame every time. So what’s the trick? Well it boils down to this. To have a fighting chance you need your camera set to its fastest frame rate, and a wide-enough angle of view to improve your chance of getting an image in frame within any particular 1/10 second.
How do you do this? My advice is shoot portrait orientation with the base of your frame about twice the width of the tank to start with. Move wider if you still are not getting anything and shorter as you get better with your timing. The more pixels you have the better, but there is a tension between your number of pixels and your frame rate, and the size of the bird in the frame and your success rate. Simple as that!
Finally, how do you know when the Kingfisher will dive? Actually this is very straightforward, but can be easy to miss. The Kingfisher points his beak towards the fish a few times first and then gives a single longer neck stretch towards the fish and flies. As soon as you see that longer neck stretch start shooting and keep going until the Kingfisher has left the scene.
Putting it all Together
In the final analysis it just takes practice, once you have your settings. In reality you only need one good shot for a day’s shooting, so try to be patient. There’s a lot of waiting around between the bursts of action, but that’s wildlife for you! Don’t forget that Kingfisher are protected and don’t try any of this without the proper supervision. Definitely never approach a Kingfisher nest in the UK with your camera!
D4 or D810?
I think that you can use either camera successfully. There is clearly a difference between 6 fps and 10 fps in terms of the number of successful frames you can catch, but you can shoot a wider area on the D810, at 24mp, thereby increasing your success rate, so in the end there is not as much difference as you might think between the two. I was forced to switch to my D4 at the very end of the day in order to minimize noise, but I would still have come away with sharp shots even if I hadn’t switched.
Final Day
And what of the challenges on the final day? We were blessed with lovely weather yet again. A backdrop including some snow and woodland, fearsome cold (of course) and the expectation of a Sparrowhawk called Mad Max. Unfortunately Max didn’t show, but lots of other cool birds did. The Woodpeckers were spectacular. Did I have any problems, well yes in the sense that I needed to use my beanbag rather than my tripod, which works well enough, but I’m less used to it. The balance point on my Nikkor 600mm is on the focus ring, a terrible design flaw in my view, meaning that when you turn the camera to portrait orientation, the focus changes if the lens isn’t lifted completely off the bean bag (easier for body builders, less so for me), so you have to refocus. The 600mm Nikkor is a full 5kg in weight, even without its camouflage kit. Also, I had not brought my extension rings.
Extension rings I hear you ask. Are you crazy? You shouldn’t be shooting macro with a 600 you fool!! No, quite so. Here’s the thing. Some of the perches were set up for shooting with a 70-200mm or 70-300mm lens and they were just too close for the 600 Nikkor which has a minimum focus distance of 5m (autofocus), 4.8m (manual focus). You can bring this forwards (at the possible expense of infinity focus) by using an extension ring! Old-school, but useful..
And for the portrait shots..
Don’t forget that you can follow me on twitter or G+, but for now, until next time..
R.

Nov
02
Rediscovering My Photography
B&W / Birds of Prey / Cameras / Landscapes / Macro / Motorcycling / Nature / Nikon Cameras / Nikon D3 / Nikon D300 / Nikon D4 / Nikon D810 / Photography Posted by Robin
/
0 comments
Rediscovering My Photography
My Journey Back, This Year in Pictures..
Background
I’m sure that I am the same as every other working individual. Work-life, home-life and chores expand to fill all available time — that’s Robin’s Law, one of many! The balance of these three may change from time to time, but essentially, hobbies are squeezed into any free time that you are not too tired to use. Over the past 12 months I’ve been focused on my cycling, as this has been making me feel better emotionally, and physically, but whilst doing so I’ve had a nagging feeling that something else is missing. I’ve known that it is my photography well enough. I’ve been thinking that I may as well dispose of my cameras, and other studio equipment, because they represent a large investment and I’m not using them. Fortunately I have managed to resist the urge, and in an effort to re-balance things, have started making time to take a few images again.
Recession and the Cost of Living
In reality my retreat from picture taking has been multi-factorial. I have read a lot of recommendations along the following lines: “Take loads of pictures, it doesn’t cost you anything to experiment with digital photography”. In one way this is true, well almost, it doesn’t cost very much to press the shutter button. The only real costs, once you have purchased the machinery, are for electricity to charge the batteries. Beyond this though, if you want to keep your photos safely, you need storage space in the form of multiple hard drives (or DVD’s if you have the patience to record them), and these do cost money. If you want people to enjoy your work you may also choose to purchase a website with it’s own attendant charges etc. There may be other expenses too, after all, there are only so many photographs you can find in your garden or front room. There comes a time when you have to invest in some form of subject-seeking. This can take many forms from the full-octane photography holiday, through to purchasing multi-colored knickknacks from a stationers for your macro photography. For some of us, the true joy of photography lies in the execution of a fabulous print. These also cost money, especially the A3 and A2 ones, and if times are hard, and you can’t afford the ink and paper for your printer, some of the joy of photography is leached away. The improvement in the UK economy has therefore also been one factor in my rediscovering my photography again.
With all this in mind, I took a day out to replenish my soul with one of my favorite subjects, a variety of birds of prey on an organized shoot at a falconry center. Some out-doors in natural settings, and others in the studio. Easy-peasy..
Gauntlet Birds of Prey, Eagle and Vulture Park
If you would like to visit the Gauntlet birds of prey, eagle and vulture park I can strongly recommend it. The vulture collection is a particular treat. In addition to photography workshops they have flying displays at 12.30 pm and 3.00 pm, Vulture feeding at 12.00 pm and a meet and greet at 2.00 pm as well as other attractions.
A Photo-Walk Around Chester
Invigorated by shooting wildlife again, albeit in captivity, I next tackled a photo-walk around Chester. Not a brilliant day, in fact quite dull, so I had to keep my wits about me. Black and white to the rescue..
A Visit to Oxford
In our only city-break this year, we went down to Oxford to see Ceri, the daughter of some friends of ours, as she started her final exams. The weather was not kind to us, unfortunately, so we had plenty of time to look around the shops, and drink the occasional cup of tea and coffee.
A Visit Thurstaston
The next step in my rehabilitation occurred during a drive out to Thurstaston with my daughter. The plan was to find some coastline, and take a few pictures along the way. As good fortune was to have it, the North Wales Hang Gliding and Paragliding Club were flying, and we got a few shots of them, plus the visitor center had a photography exhibition and a public hide with views out onto some well stocked bird feeders. Heaven!
The Journey Continues
Sadly, these trips were still not quite enough, on their own, to get me taking pictures regularly again. Have you had the experience of wanting something all the more, when you knew you couldn’t have it? Well, my D300 broke! I hadn’t been abusing it, I’d just been updating the firmware to include compatibility with the 800mm f5.6 Nikkor extreme telephoto (it’s not like I will ever own one, but I like to be up to date), when to my astonishment, it just stopped working. In all honesty I hardly ever use the D300. It’s old technology now, but it is my backup camera and I do like to use it for macro shooting extreme close-ups with an old 300mm zoom and a 50mm reversed onto the end. And now, suddenly, I couldn’t. Should I buy a new camera? Probably not worth it if I’m not using my cameras much, but should I get the D300 repaired? Well probably, yes, was the conclusion I came to, if a camera that old can even be repaired? Well it turns out that it could. Nikon UK have a fabulous online system for repairs. You can say how much you would be prepared to pay without seeking permission to proceed, and even get the free postage label printed out from the website. They prepare an estimate and you say whether you want to go ahead or not and that is pretty much that.
Needless to say, once the D300 was returned to me in good working order, I couldn’t resist using it for some macro shots, and generally loving it and reminding myself of all its settings. Sad I know.. In fact, the challenge was as much to produce some good looking and clean shots with it as I could. I’d forgotten how noisy and textured D300 images could look. Sensor technology, and the supporting electronics behind them, are so much better now than even 5 years ago! Here’s how I got on:
Oulton Park Track Day
By this point I’m fully engaged with the drama and creativity, seeking new photographic experiences and subjects again. I’ve said before on this blog that, for me, it is more about the photography than the subject. Novelty and complexity are always the way for me. I’ve never shot cars or bikes on a track before, so this would be a great entrée. Is it difficult? Depends. If you want a straightforward shot, tack sharp, just set a monster shutter speed and shoot away. If you want a sharp bike and rider with spin-blur on the wheels done in camera, on a bend, yes that’s tricky first time out. Impossible? You be the judge!!
Hooked Again!!
The Inevitible Consequences..
And so it was, hooked again. Desperately fighting the urge to buy a new camera, but eventually succumbing to the temptation. A couple of years ago I blogged about wanting a Nikon D4 and a D800, but having to choose just one. That time it was the D4, this time the siren call of 36mp detail was too much for my battered psyche, and so to the D810..
More later,
Robin.

Apr
13
The World in a Droplet
Focus Stacking / Macro / Photography / Photoshop / Retouching / Water Droplets Posted by Robin
/
0 comments
The World in a Droplet
Macro Photography can be a Challenge
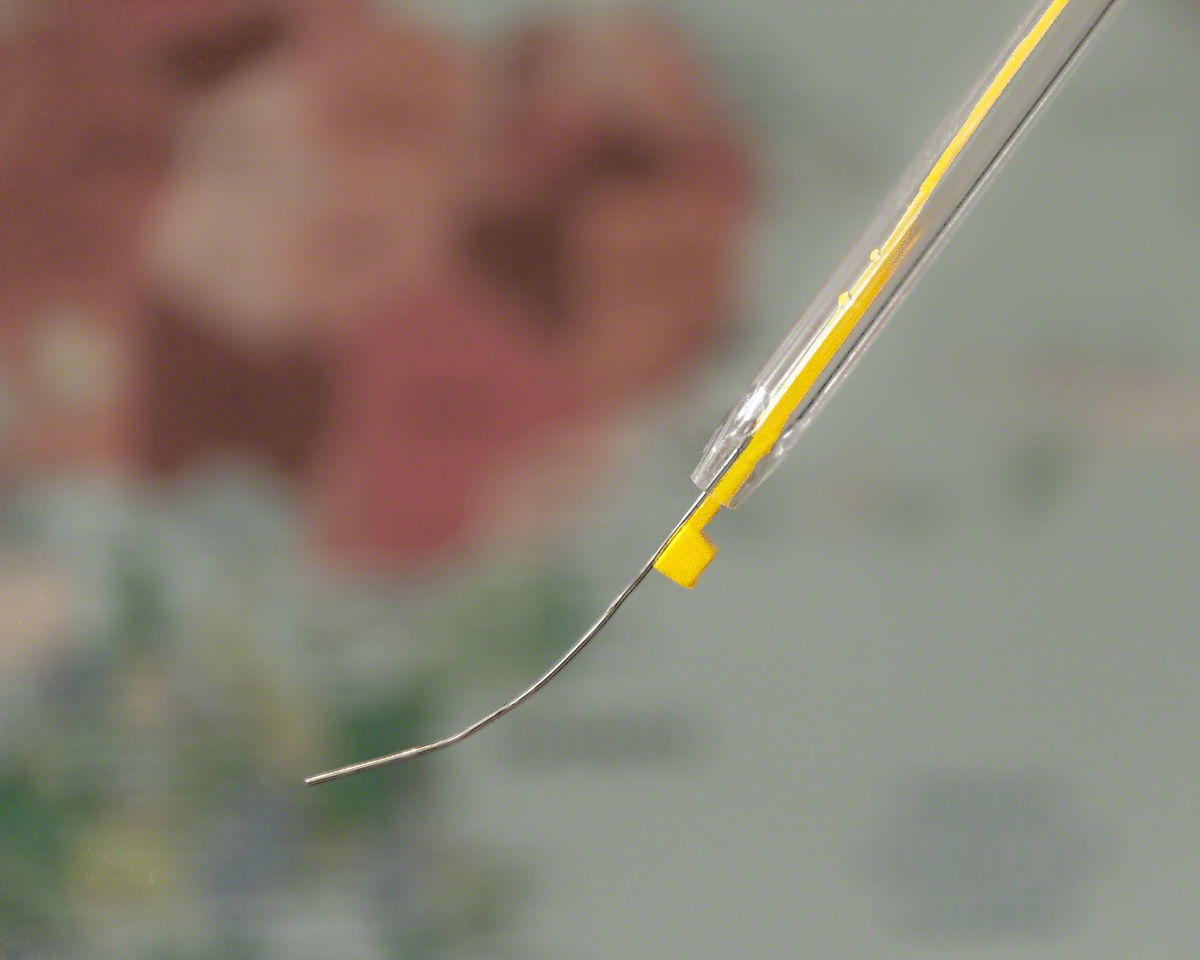
The Basic Premise
My inspiration for the world in a droplet idea came as a result of seeing an image of a drop of water on a hypodermic needle on the web. You could see a thin reflection on the base of the droplet, which was very small in the frame, but you couldn’t see what it was. I had the idea that I could have the reflection of a world atlas in the droplet and, of course, larger in the frame.
Testing the Theory
Although I was confident that I could pull this off, I knew it might be difficult. I thought I could get the magnification, but I wasn’t sure about the rest. How to get a drop on a wire (I don’t have a hypodermic needle), how to get the map reflected and what about the necessary depth of field. A pilot project seemed the thing to test the theory. I didn’t take any production shots of this, so you will have to use your imagination.
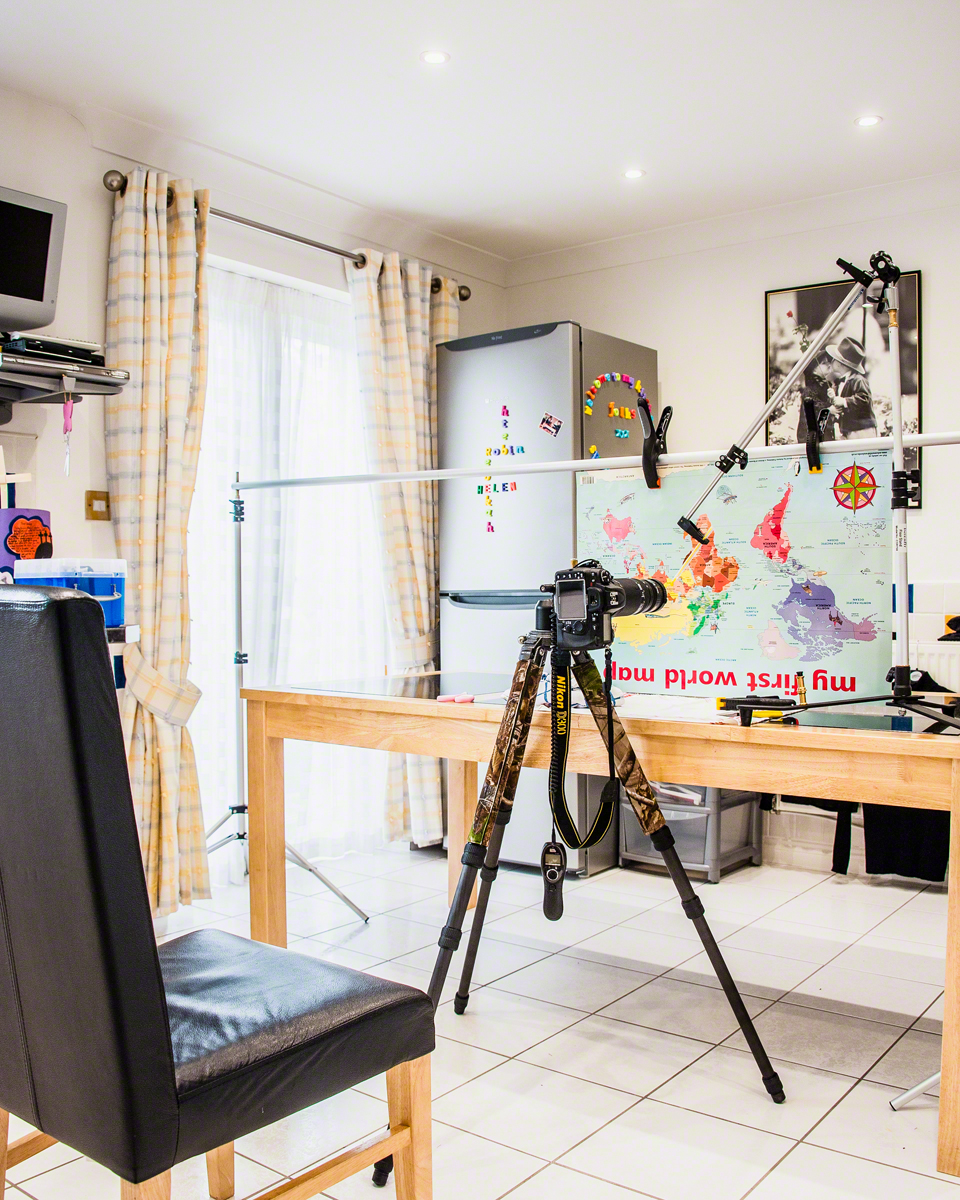
Daylight seemed perfect, so I set up on the surface by the kitchen window. I took my floor stand (a light stand) and, using electrician’s tape, fixed a cardboard tube from a roll of aluminium basting foil leftover from the Christmas turkey. To this I taped an empty Bic biro carcass with a blue paperclip wedged into the end, and bent it into a sort of hook shape. Using a second biro carcass, I poured water into the open end until I got a droplet on the end of the paperclip hook. Actually, I didn’t realize how lucky I was to get this to happen quickly because it proved a nightmare to reproduce when I did the final world in a droplet image.
Equipment wise, I used my old D300 Nikon as it would give more magnification than a full frame (the droplet was only 1.5-2 mm wide). I fitted an old 75-300 mm Nikkor lens, and using a set of reversing rings, fixed an old 50 mm f1.8 Nikkor to the end. I quickly found that I had more reach than I really needed so zoomed the 70-300 to a wider setting, and took my shot.
First Stab..
So what did I learn? Firstly, I’d have been better off setting up somewhere other than the backlit kitchen window, because I was getting a lot of flare and unwanted reflections in the droplet and had to shutter out the window. Secondly, focusing is really difficult because there is so little depth of field. If you move the tripod it can take an age to even locate the droplet again, never mind focus on it. You aren’t able to clearly see the text on the map when you focus on the droplet, so it is very hard to get it sharp (at least with my eyes). Partly because you can’t define the letters, partly because it’s hard to make fine enough adjustments to the focus (more on this below).
Secondly, the map image appears to be on the rear surface of the water droplet, so you have to focus there to get the map sharp. This means you can’t see sharp edges on the droplet itself, and the paper clip is not properly in focus. In fact the paperclip would have been better parallel to the plane of focus to avoid so many depth issues. When I do this for real, I will have to use focus stacking.
Thirdly, the map was upside down in the droplet (of course you idiot!!), so that needs turning upside down before you start.
Doing it for Real
Household chores notwithstanding, it was a few days before I got to try this again. Time to approach things more professionally and turn the house upside down in the process! Clearly this is best when your wife is out for a few hours. I wanted a more adjustable setup as I’d had real problems changing the position of the map first time round. I wanted to be able to adjust the field of view in the droplet, so that meant adjusting the position for and aft, as well as from side to side. Secondly, I wanted to be able to position the wire with the drop on it a little more precisely (there was no adjustment on the cardboard tube setup) too. Finally I wanted the droplet to be side lit to avoid flare.
Getting the Droplet on the Paper Clip
This was the hardest part of the shoot bar none! After much trial and error I came up with the setup shown. I was able to use an old Lastolite reflector holder on my floor lighting stand as shown. This worked out fabulously because the spring grip made the perfect holder for the biro, which could then be slid backwards and forwards for perfect positioning in the frame. My only regret was it took a couple of hours, and a roll of electician’s tape, for me to realize I could do this!!

Getting the droplet on the paperclip proved difficult, but here are a few tips. The angle of the biro carcass needs to be quite steep so that water runs out of the end quite quickly. This makes it more likely to run around the curve of the paperclip, and consequently to leave droplets. Too slow and it just drops out of the end of the tube (counter-intuitive to be sure). Don’t forget to place a cloth underneath to catch the drops! The attachment system for the clip that worked best, and I tried many, was to have a cable tie underneath the clip as shown below. The cable tie slows the water down and ensures that it is running over the paperclip.
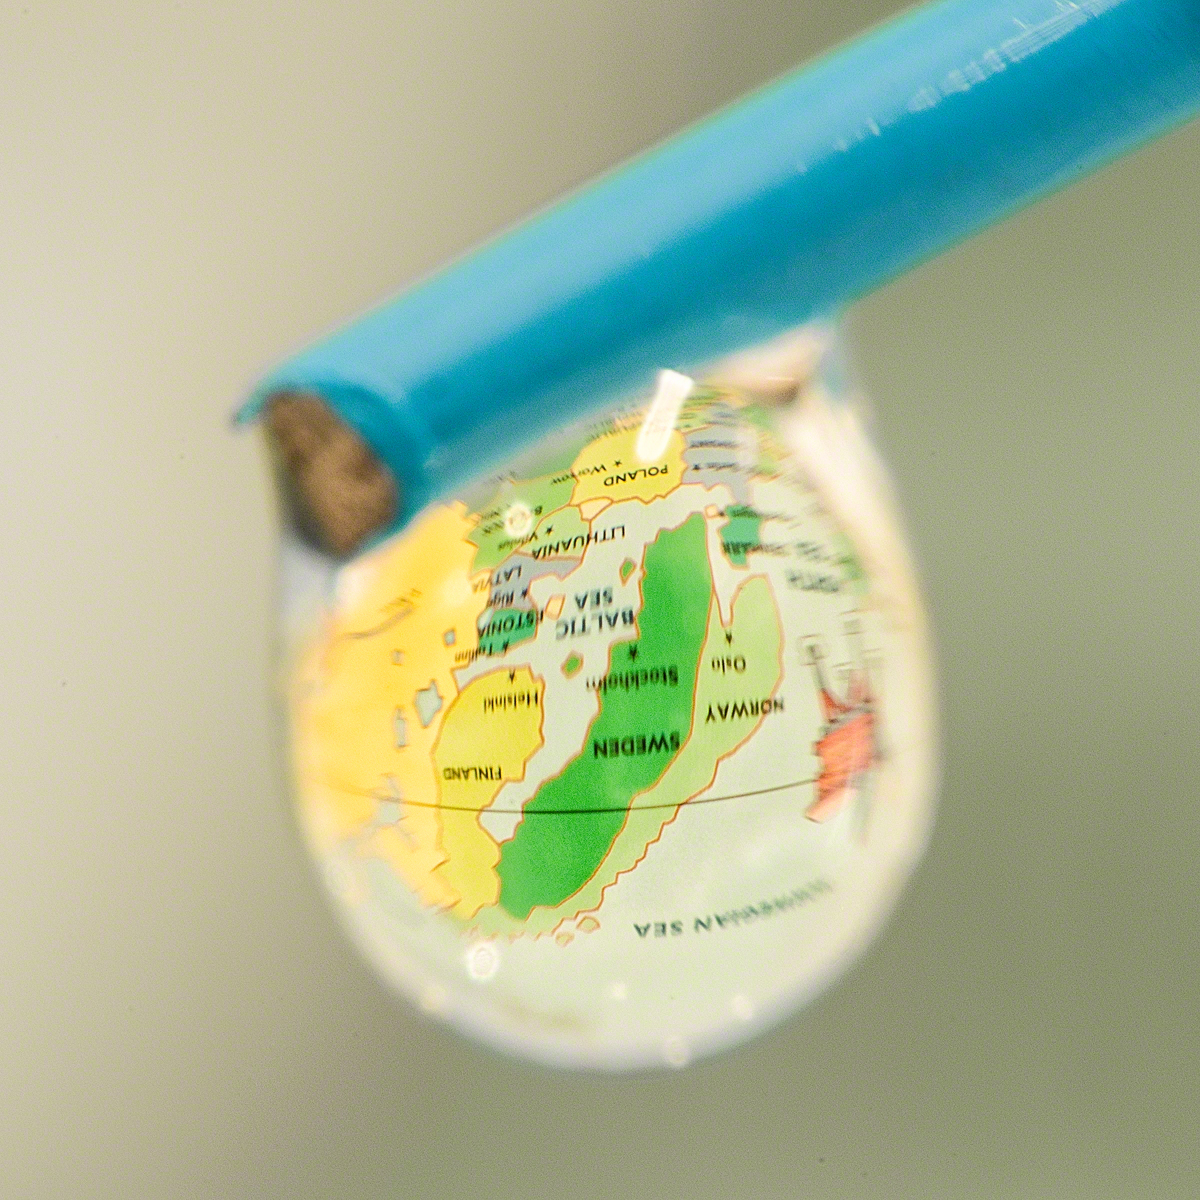
The Photography, Getting in Close
Firstly, don’t forget to turn the map upside down if you haven’t already. Given the size of the droplet (approximately 2 mm) you need considerable magnification to fill the frame. My solution was to use a reversed 50 mm lens on the end of a longer lens. The longer the second lens, the greater the magnification. I used an old 75-300 f4.5-5.6 Nikkor from my film camera days. You will need a reversing ring to join them together, and I purchased mine (52 mm to 62 mm) from a UK company, SRB Photographic (formerly SRB-Griturn) that make and sell a wide variety of these specialist items.
Both lenses were focused at infinity, and the 50 mm aperture was set to f1.8. I’m not certain that a wide open aperture leads to the best quality/depth of field, but that will be an experiment for another day. The 75-300 zoom was set to f32 and I used the zoom control to finesse the magnification.
To focus, I moved the camera / lens setup back and forth on a Manfrotto 454 Micropositioning Sliding Plate. You can just see the lock screw poking out above the D300 on the tripod in the picture above. It can be surprisingly difficult to find an image at this magnification so be patient!
It goes without saying that to avoid camera shake you should use a remote release and mirror lock up.
Watch-Out!! Don’t Damage the Lens…
The rear element of the 50 mm Nikkor is flush with the back of the lens which is problematic. It is very easy to flick the paperclip onto it, and there is a risk of scratching the lens or getting water into the electronics. Even though this was a very old lens, I didn’t want to damage it, so after a few near misses I decided to use my smallest Kenko auto-extension tube as a lens hood for the back of the lens. I used the shortest one in order to minimize the risk of extra vignetting.
Focus Stacking
Depth of field at this magnification is very narrow and both the map, the paperclip and the edge of the droplet need to be sharp in the final image, so take separate images at each depth. The front of the droplet is unnecessary as it would obscure the view of the map. Using the 454 it was possible to get the 3 images required for the blend.
Post Processing
The images for the focus stack will be pin registered if you haven’t moved the tripod, so they can be loaded as layers into Photoshop without issue from Lightroom (or whichever way you choose). Any adjustments in Lightroom or Camera Raw should be made to each of the images before stacking them. In Photoshop, the sharp paperclip and map images can then be blended into the final image using layer masks. Here I took the opportunity to desaturate the background (i.e. the full sized map) a little to make the map inside the droplet all the more prominent. After that, some sharpening using your preferred method or plug-in finalizes the image.

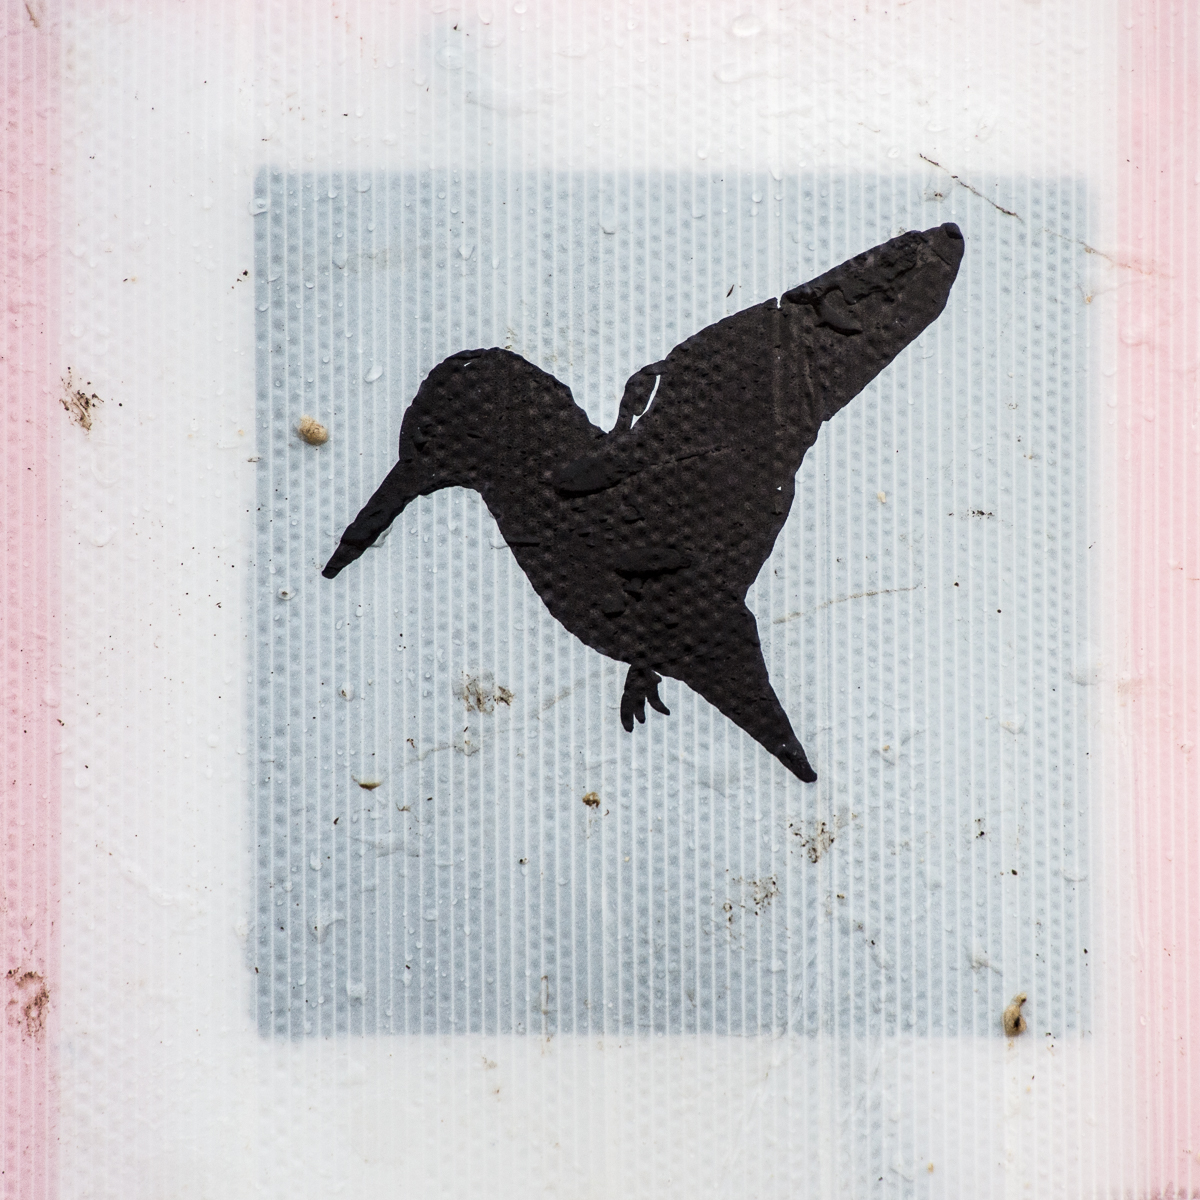
The World in a Droplet!
Cheers, R.

Apr
09
Shooting Red Kites at Gigrin Farm
Time-off is Precious!
It’s been a while, in fact, as I think about it, I haven’t been to Gigrin since I purchased my D4. The last time I was there would have been 7th April 2011, 3 whole years ago to the day. Since I adopted cycling as a new pastime there has been increased pressure on my photography time, to a point where it can be months between structured shoots. But this week, I’ve booked in a couple of days shooting, of which this was the first.
Facilities at Gigrin
Hides for Photography & Filming
There are a range of Hides for the photographer. The ground level hides are adequate for photography for those with compact cameras and DSLRs, whilst the tower hides have been built for photographers with more professional equipment in mind. The Gateway hide is around 4m closer to the kites than the towers. The tower hides have a partial roof as protection, and a bench fitted to the rear of the hide with coat hooks on the left-hand side. This arrangement is ideal for panning overhead and gives a superb view of the kite’s surroundings. Newcomers to the tower hides should be aware that there is a green line on the floor that marks the most forward standing position so as not to frighten the birds.
Disabled Access
Four of the hides are wheelchair friendly, with ramps and internal access, and there is parking for up to four vehicles right outside the hides for those unable to walk the 100m from the regular car park. There is even a wheelchair accessible photographic hide with the same roof arrangements as the towers.
The Red Kite Shop
In the handy Red Kite Shop you can purchase a range of goods including binoculars, note pads, mugs, bird feeders and Red Kite clothing (T-shirts, Sweatshirts, Fleeces, Caps) books, paintings and videos.
The Photography
Equipment
For our trip, we booked the larger tower hide, and I shot with my D4 and 600mm F4. To begin with I was using my 1.4 teleconverter as well, but, to be honest, that amount of reach really handicaps you because it restricts you to birds beyond the feeding zone where there is sufficient space in the viewfinder to pick them up and pan with them. You need too much precision to pick up birds in the middle distance, and this is unrealistic unless you are a seasoned professional wildlife photographer. Birds near-to will have their wings cropped, also not a good look! My pal Geoff was shooting with a D4 and a 200-400 F4, he had also started with a 2x teleconvertor but also found that he was better off without one.
Focusing
To begin with it is very difficult to track the birds. You must practice shooting with both eyes open (to help you lock on, and see the best action coming) and over half an hour or so you will find you can pick the birds up in the viewfinder more easily. Even then you are at the mercy of your camera for finding focus. Always use continuous auto-focus and the highest frame rate that your camera can manage. To make life easier we were both shooting with Gimbal Heads. I found it best to focus on the tree line first. This makes the acquisition rate much higher when you target a bird in flight because the distance is much closer to that of the bird.
Another problem comes with losing focus when the birds dive for food. Red Kites do not land on the ground (though interestingly one did just that on Monday, and it is the first time I have ever seen it), so they dive steeply and swoop down picking up their food (or prey) in one really fast action. I found that I would lose the birds on the way down, and when I found them close to the ground again I had lost focus. I think that one technique that may help you with this is to stop focusing once the bird dives, then pick it up again on the floor. This works because the Kite will be at about the same distance from the camera and you won’t have been risking a refocus on the background as you swing the camera downwards once the bird has gone. On Nikon professional cameras you can adjust the timing of the refocus pause, which can also help you stay on the target.
I find that the best technique is to pick up a Kite in the distance, then follow it until it has filled the frame, or done something interesting. It is very tempting to take thousands of photographs of very distant birds because they seem larger to your eye than they do to the lens, but by being patient you can get some good shots that fill the frame. Make sure to start shooting just before the kite is large enough in the frame because they move very quickly and you can end up with clipped wings. Be careful to avoid shots of the bird flying away from your viewpoint or turning away from the lens. Some of your best shots will be obtained once the birds have thinned out (and the other visitors have gone home). This is because you are sufficiently practiced by then, and there are fewer birds to contaminate your shots. If possible you want to get the kite with space to fly into the frame. It can help to use the central focus point because it is more sensitive and also guarantees space in the frame, which ever way the bird is travelling, if you focus on the head.
Finally, don’t forget to try some vertical shots, and shots with more than one bird. Odd numbers seem to work better than evens for this.
Settings
In a change to my usual practice of using a couple of manual exposure settings (one for light and the other for shade) described elsewhere, I used a different technique due to the very flat lighting conditions. I set my camera to auto-ISO, with a minimum speed of 1000th of a second, then set a manual exposure of 1600th second at f4. I took a couple of test shots (repeated through the afternoon) to judge the exposure compensation that I would need shooting against the white sky. This ranged from 0.3 – 1.0 stops as the afternoon wore on, but this gave great results and I didn’t need to worry when the sun came out for the odd shot.
I usually turn vibration reduction off for shutter speeds above 500th second, but (in the heat of the moment, against the breeze, I didn’t realize it was turned on – easily done when you’ve covered up the switch with a waterproof camo-cover) I’m pleased to say that it didn’t seem to make any difference to the image sharpness.
Post Processing
These days I’m using lightroom for initial adjustments, then adding a quick mid-tone contrast boost to the bird itself using Tonal Contrast in Color Efex Pro, followed by my 3 or 4-pass sharpening routines in photoshop. Though I must say that the Raw Pre-sharpener algorithms in Sharpener Pro 3 are just as good and much faster to implement.
Spoils of the Day…
Cheers,
R.

Feb
07
It’s Finally Here, My Boardman Team CX 2014
Did I Mention that I’ve had a New Bike?
The Story So Far
If you have been following my blog you will know that my Marin Bear Valley mountain bike died recently (see Alas No Cycling…), and that I have ordered a Boardman Team CX from Halfords. Well I’m happy to say that it has arrived, and after a few teething problems, which Halfords sorted out for me without any fuss, it is all set up and ready to go.
I Like to Tinker
When I picked the bike up, the lad in the store said “I’ve set the brakes up as best I can, but they are rubbing”. “This should settle down over the first hundred miles or so”. Well, as you might imagine, I wasn’t going to be satisfied with brake pads wearing out as a solution to poor adjustment, so I had a go myself when I got home. It turned out that the reason for the rubbing on the front disc brake was a warped disc, so no amount of adjustment would fix that. With the appalling weather that we have been having in the UK recently, it was a few days before I could take the bike out for a run round the block but, when I did, the gears made a lot of noise and not all of them were available. More tinkering required. The cable tension on the front derailleur was too loose causing insufficient travel, and the low and high stop screws for both the front and rear derailleurs also needed setting. The trouble was, the rear caddy was bent inwards towards the wheel, so if you made the mistake of trying to pedal backwards, the chain fell off. Time for a trip back to the store!!
In fairness when I took it back the engineer, who really knew his stuff, sorted the gears out on the spot, and was a pleasure to watch working. I hadn’t mentioned the disc brake issues, but he noticed and adjusted them both anyway. He swapped the front wheel out for one with a straight disc, and he was even dissatisfied with a tiny misalignment of the handlebars, and sorted that out too.
It disheartens me that so many things these days are not right first time, never mind first time, every time, but I suppose that the next best thing is prompt and effective remediation, and Halfords have certainly done that. The Boardman Team CX 2014 was very good value for money and the Halfords’ deal includes 3 years annual servicing.
Second Time Out
My second ride was much more successful. The gears were running smoothly and the bike was rattle-free (unlike the Marin) and pretty comfortable over the bumps. I realized that my riding position needed attention (the saddle height was too low, and needed to slide back slightly) and the front tyre pressure needed raising. The riding position is much more comfortable than the Marin ever was, with the consequence that I can now see much further down the road without hurting my neck. Just waiting for the weather to improve, and I can get back to building my fitness again.
Making the Best of a Photo Op
Purchasing a new bicycle is a rare occurrence for me (the last one being 20 odd years ago), so it seemed too good an opportunity to miss to photograph the CX. Now, had I had my wits about me, I might have researched how to do this skillfully beforehand. But hey, that’s not how to live on the edge, I can learn through doing. Better still, if I start this just before we are due to go out as a family, I can get some added time pressure and regular shouts to get a move on because it’s time to have my shower (thanks Helen!!). Perfect. No really.
The Shoot
Once again the weather was torrential and gale force, so the photography had to take place inside. I did not have an assistant, so I had to be a bit creative. Whole bike shots were out of the question, but detail shots seemed possible. I wanted an uncluttered background so I used one of my Lastolite (double sided black and white) panels. Lighting was an issue because I didn’t have time to set up flash, and because I was using the door frame between the kitchen and hallway to prop the bike up, I had to cope with a crossing cast because our kitchen has daylight balanced LED lighting, whilst the hallway has tungsten. In the event this worked out quite well because, if I turned off the hall lights, the white Lastolite panel was dimly illuminated by the kitchen lights (avoiding the cast) and which also brought the bike forward in the image, as it was brighter in the frame.
Camera and Lens
I was short of time so it boiled down to this. Do I go with my micro nikkor 105 f2.8 or my 28-300 f4.5-5.6 zoom? Given that the light was poor, plus I want to be able to play with depth of field, the macro lens gets it. So D3 plus 105. Why not D4 plus 105, with its better low light capability? Because the 105 was already on my D3 so that was quicker!
So, with no prior experience of shooting velocipedes, this is how it turned out.
Let me know what you think,
R.

Jan
26
Alas No Cycling, But a Few Hours to Play…
Photoshop and the Art of Self Destruction
Last weekend I had a great ride on Saturday, 2,000 feet of climbing (and calorie burning), over 25 miles, including the famous Horseshoe Pass. The weather was cold and wet, with some wind, but a lovely lunch at Fouzi’s in Llangollen made up for the strain. I had been having some difficulty with my freewheel for several months, and there had been a few events where its slipping had caused problems starting off, especially at temperatures near zero. Last Sunday, I set off for another ride, but the freewheel failed completely. No forward motion, so alas no cycling. My friends walked back with me to the car, and we talked about what next. I had been hoping that I could manage through the winter and get a new bike in the summer months, but this plan has had to be trashed. Spares for the Marin have been hard to get, and a freewheel seems impossible to source at this juncture. So I have ordered a new bike from Halfords, and I’m waiting for it to arrive. I’m going for a Boardman Team CX this time. It should see me through the rest of the winter, once the frame size I require is shipped down from the Leeds store. But that is another story.
The weather has been awful today, so I guess it has been no hardship to stay at home, but I needed a diversion to make up for not having a regular hit of exercise on the Marin. So what was it to be today? I didn’t fancy a trip out to photograph landscapes or wildlife (the weather again), and my inside macro-brain was similarly uninspired. I caught sight of an old book on the shelf in my study, ‘How to Cheat in Photoshop CS3, The Art of Creating Photorealistic Montages’ by Steve Caplin. That’s it I thought, I’ll just play this morning, with Photoshop, just see what I can create. I didn’t have a plan, or any pre-conceptions, it was a spur of the moment thing. I thought about it for a while, and decided that I would edit a photograph of myself, and see what might be possible. That way, nobody would be offended.
Gold Finger…
First off, how about some fun with Curves?

First convert the image to black and white using your preferred method, then, to get a metal effect, you need a curve with wiggles. From here it is simple enough to color the image with a second curve that does 3 things. Lift the red and green mid-tones and then darken the overall image.
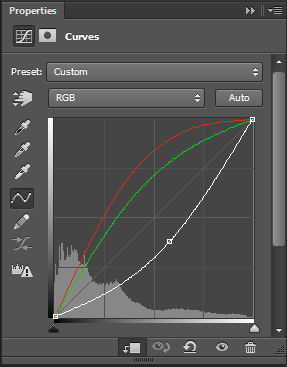
Layer mask your image to taste and away you go. For this image, I made a cut-out of myself, and jumped it up onto its own layer, in order to simplify the masking. There was already quite a lot of contrast in the image, so I was able to do this fairly straightforwardly using the Quick Selection tool, rather than resorting to a channel mask.

Goldfinger, He’s the Man!
The Next Level
That was fun. It only took a few minutes, but was not intrinsically satisfying. I would definitely like my own weight in gold, but would want to earn it by doing something that was a real test. So what next? Play some more, it’s the only way!!
Having thought of myself as a golden statue, what about being a robot? Perhaps with something removed? What about some missing face? What about an explosion of some sort? Hmm. An idea was taking shape. Smoke and flame, that’s the stuff. Now, I can definitely step you through what I did next, but for this blog it might be sufficient just to show you the finished piece. I’m not claiming that this is perfect, I didn’t spend too long working on it, I way just experimenting after all. I’m certainly not sure that an exploding head merits such an inane smile. But hey, it’s a start.

Until next time,
R.

Jan
12
Food Images
11 New Food Images for Sale at TDI
Released on Sunday 12th January 2014, The Doctor’s Images provides 11 more images as poster and canvas prints, in a range of sizes, at reasonable prices. The range includes the Cream Tea Collection, a selection of Restaurant Food Images and, of course, the Fish! To get your copies of this exciting new range of food images, go to Print Orders, Macro, Food from the TDI homepage.
Best wishes,
R.

Jan
05
New Year, New Profile Photo for LinkedIn
Photography / Photoshop / Portfolio / Portrait / Studio Flash / TDI News Posted by Robin
/
0 comments
The Making of a New Profile Photo for LinkedIn
The Reason Why…
I have been working on my social media profile for a few weeks now. I have a Google+ account, with a page for TDI, an Instagram account and most recently a LinkedIn account and now Twitter. I am in the process of getting to know the strengths and weaknesses of these, how they work, and how best to engage with them and will be linking. My LinkedIn account is really to support my other career as a psychiatrist but I have previously used the same (branding) image as for TDI and my other accounts. Thinking that I probably need something a little more formal, my wife agreed to help me take a fresh portrait for LinkedIn.
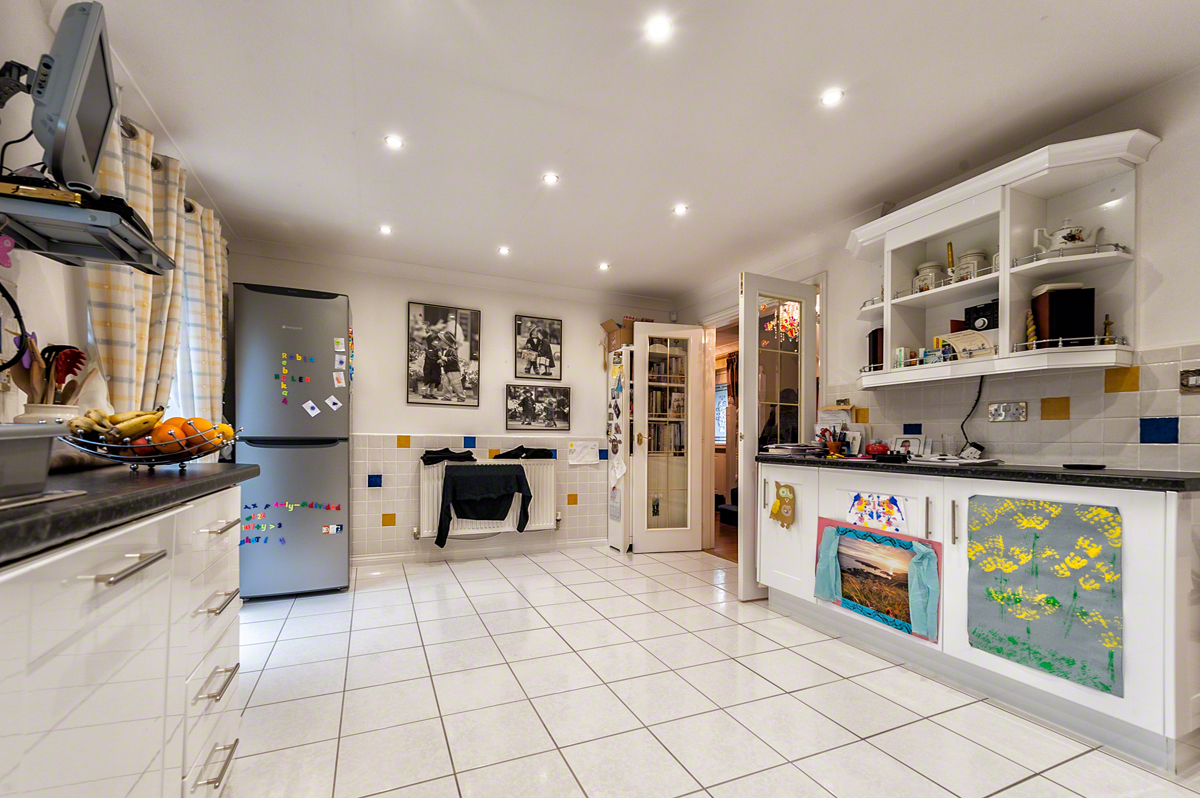
A New Fridge-Freezer, A New Problem
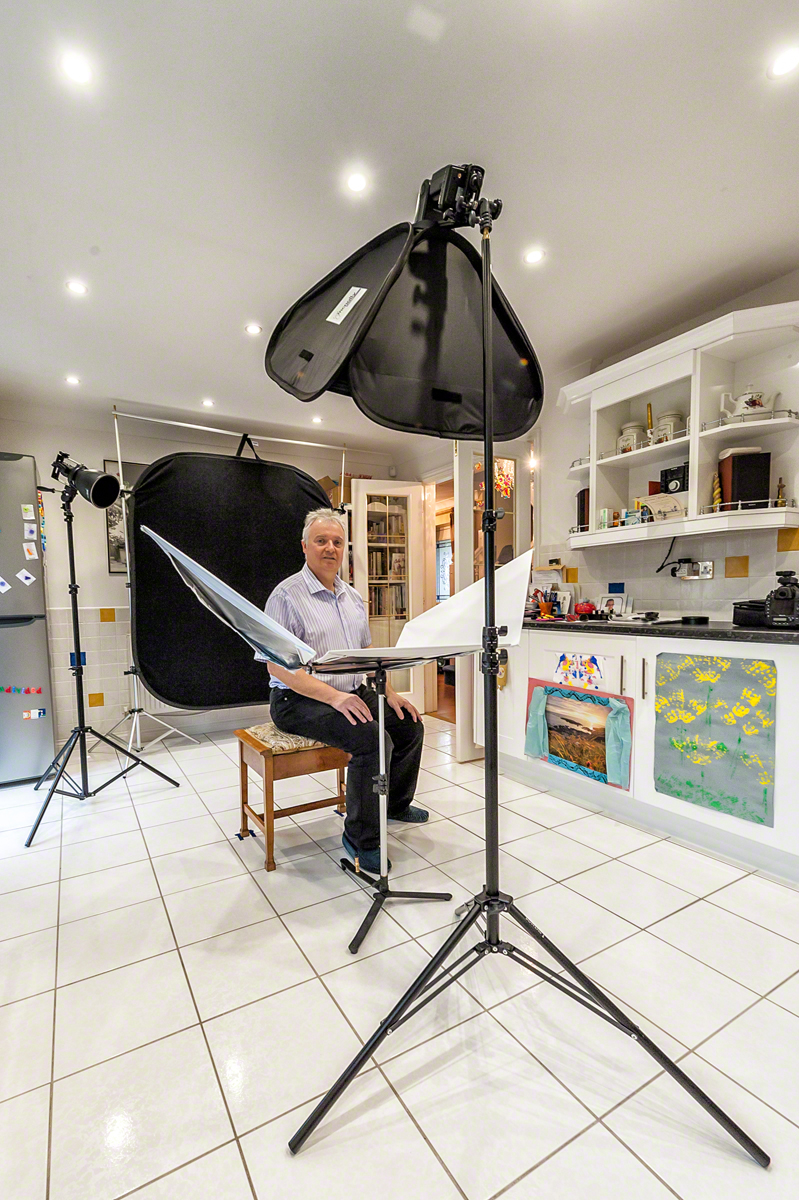
Towards the end of last year our built in Fridge-Freezer decided that it would start freezing everything in the fridge, as well as the freezer, and to make so much ice that the drawers in the freezer wouldn’t open at all. Fearing a fire, and not having enough time to source a reasonably priced built in unit, or re-fit it in the appropriate cupboard, we elected to have a free-standing unit instead. In fairness this has been a great success, my daughter has decorated it with magnets, and uses it as a noticeboard for maths puzzles for her poor old dad to write down and solve. But here’s the rub. I can’t easily move the kitchen table out to the side like I used to, because a third of that space is now Fridge-Freezer!! So using the kitchen as a studio to capture a new profile photo is a world more grief than it used to be. Still, I needed some exercise because the weather had trashed our planned cycle ride today (too much ice this morning, too much rain and gale force winds this afternoon). Plus my bike’s not well at the moment either. So moving a heavy table and running up and down stairs a lot seemed just the ticket.
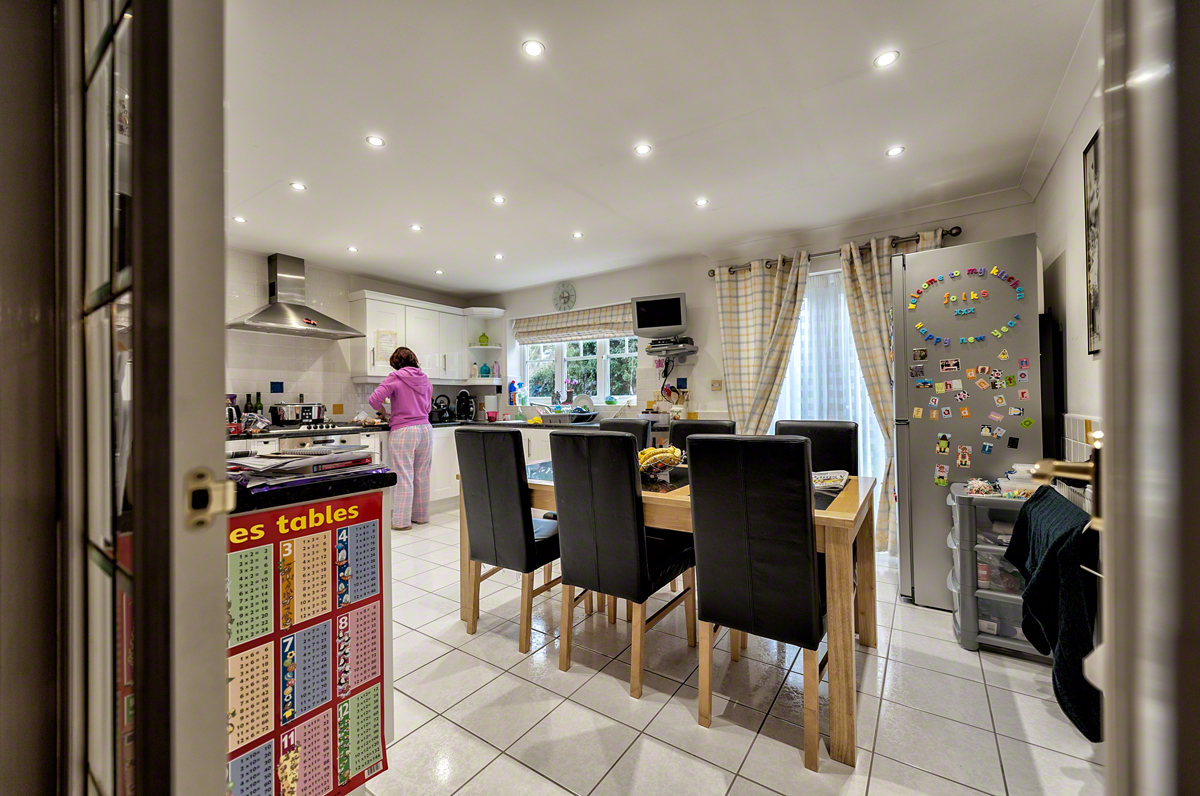
The Area to Clear, Ho Hum..
So here’s the thing, that kitchen table had to go out in the hallway. Would it go out through the doors? Could we lift it? If it was out in the hallway, could we get back in the kitchen? Was I going to be able to carry my equipment from upstairs past the obstruction? Who knew, we had to give it a try. After, that is, Helen had cleaned the floor!!
Phew, That Looks Better!!
After much shoving and scraping, and even more hoovering and washing, a space was made available in the now pristine cooking and dining area. So, whilst Helen moved on to pastures new, for further housework opportunities, I set about bringing the necessary equipment downstairs, and stockpiling it into the hallway. Hmm.. That’s a bit of a mess you’ve got there thought I. I wonder how long Helen is going to stay patient with you?

Hallway Carnage…
So onto the setup and test shots. I went with the D4 with 70-200 f2.8. This was going to be quite heavy for Helen, but she was confident that she could manage anything I threw at her. I decided not to shoot tethered. It was just one portrait and the image on the back of the D4, particularly with the 3 channel histogram, was more than sufficient to judge framing and exposure. I used my favorite portrait set-up of the Lastolite Triflector and Nikon Speedlight fired through a Joe McNally Ezybox with soft white interior and 2 layers of diffusion. For separation I used a second speedlight (an old SB800, in SU4 mode at 1/32 power) fired through a Bowens grid-spot attached via the rather superb Interfit Strobies XS Int326 gizmo. As usual, the camera was connected to the key light using a PocketWizard Flex Mini TT1 and Flex TT5 set up with the AC3 Zone Controller set to -2/3 exposure compensation, with ISO 200, 1/160th second and f8. Finally, my favoured Lastolite black velvet panel, suspended from a suitable stand, completed the picture.
So That’s how it’s Done!!
We have daylight balanced LED lighting in our kitchen, so I left those on during the shoot. The only slight problem was teaching Helen to use the back-focus button (I have all my cameras set up this way for my wildlife photography) instead of half pressing the shutter release, but she picked this up really quickly, and didn’t need reminding to focus on the forward eye.
Until next time,
R.
Dec
27
Another Image of the Week for TDI
At Printer’s Inc
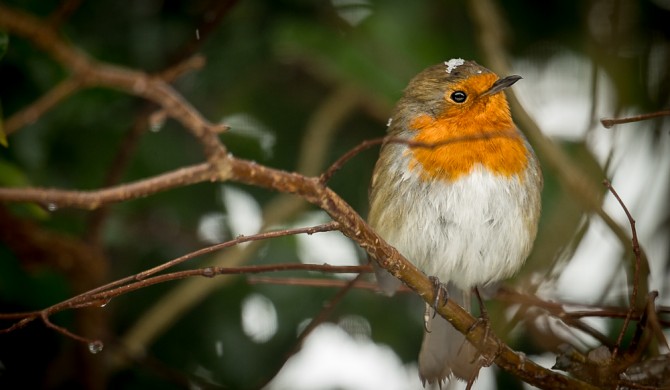
“Robin in the Snow” (above) has been featured as the Image of the Week at The Printers Inc over the Christmas week 2013. The Doctor’s Images is particularly pleased to have this slot over the festive period, not least because of the very christmassy nature of this particular photograph. This is not the first time that TDI has achieved the coveted Image of the Week slot at The Printers Inc, as an image of a Eurasian Eagle Owl was featured earlier in 2013. I didn’t have to travel too far for this one as “Robin in the Snow” was taken in my back garden. See Photographing Garden Birds in the Snow (published on 26th March) 2013 for further details of the shoot.
Robin in the Snow and the Eurasian Eagle Owl in Flight are both available to purchase from TDI and The Printer’s Inc.
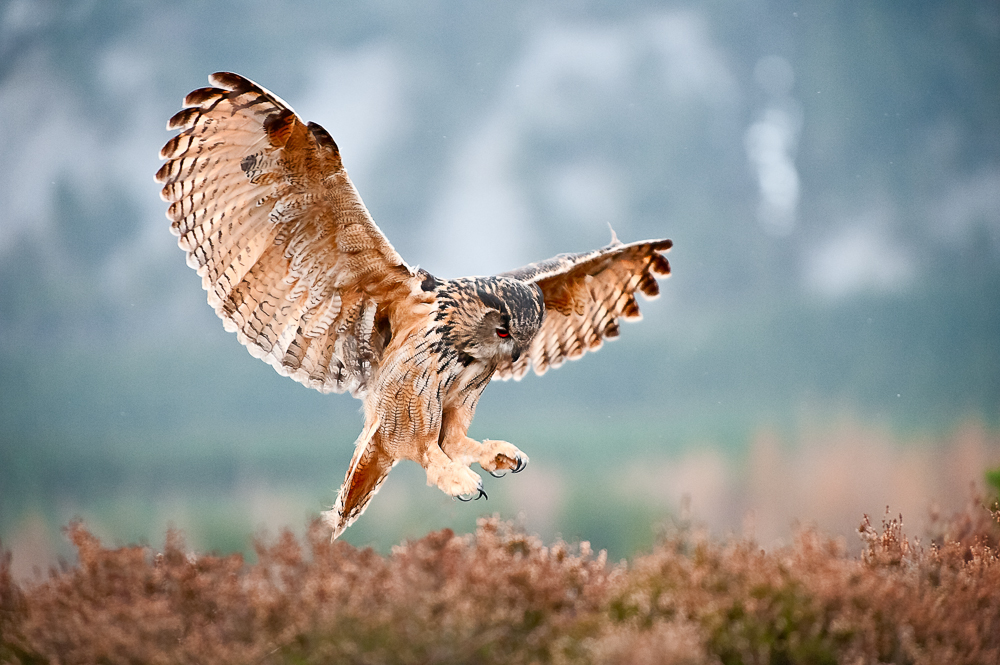
Eurasian Eagle Owl in Flight
Best wishes,
Robin.

Dec
14
Free Postage in UK until February 2014
Birds of Prey / Christmas Bargains / Nature / Photography / Sales / TDI News Posted by Robin
/
0 comments
Free Postage on UK Deliveries
TDI are pleased to announce that there will be free postage on images delivered within the UK until February 2014.
Here at TDI we have also recently reviewed our pricing policy and reduced out tariffs across the board. Check out our wide selection of wildlife and macro images, and see if there is anything you would like to hang on your own wall, or give as a gift, this Christmas. We have a range of stretched canvas, semi-gloss and premium matte prints available in sizes from A5 through to size A0 on selected images.
Prices range from £5 for an A5 Premium Matte print, through to £166 for a 40×60 inch Stretched Canvas. Canvas prints can be purchased for as little as £20, with A3 Premium Matte prints available for as little as £10.
Our prints are professionally produced by The Printers Inc.
Coming Soon…
A selection of garden bird images, including birds in snowy settings, will shortly be available to order from TDI.
Best wishes,
Robin.
Recent Comments